Description
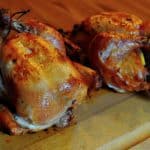
Rotisserie Chicken, Dry Brined with Rosemary, Lemon, and Garlic recipe. Crisp skin, tender meat, and a flavor-filled dry brine make a great chicken.
Ingredients
Scale
- Two whole chickens, about 4 pounds each
- 4 teaspoons Diamnd crystal kosher salt (about 1/2 teaspoon kosher salt per pound of chicken)
- 2 teaspoons minced fresh rosemary (1 teaspoon per chicken)
- Zest of 1 lemon (1/2 a lemon per chicken)
- 2 cloves of garlic, minced (1 clove per chicken)
- 1 whole lemon, halved (1/2 lemon per chicken; use the one that was zested)
Instructions
- Dry brine the chicken: Make the dry brine by putting the the salt, rosemary, garlic, and lemon zest in a mortar and pestle or spice grinder, and grinding until it is a fine powder. It will be kind of wet - halfway between a paste and a powder. Rub a two-finger pinch of the dry brine (about 1/4 tsp) in the cavity of the bird. Next, loosen the skin from the breast meat by gently running a finger under the skin of each breast. I rub 1/4 tsp of the dry brine on the meat of the breast, working it under the skin. Then I rub the outside of the chicken with the rest of the brine, using about 1/2 tsp per "side". I start with the breast, then I turn the chicken to one side (with the leg and wing facing up), then flip and do the other side. Finally, I salt the bottom (backbone) side of the chicken. Put 1/2 lemon in the cavity of the chicken. Repeat with the second chicken, then refrigerate overnight, or up to 3 days. If you are salting more than a day in advance, cover the chicken with plastic wrap, and remove the wrap the night before cooking to let the chicken skin air dry in the refrigerator.
- Truss and skewer the chicken: One hour before cooking, remove the chicken from the refrigerator. Fold the wingtips back under the chicken, then truss the chicken tightly. (Again, see the basic technique for trussing details). Skewer the chicken on the spit - get it on there tight! I like to put one set of prongs under the breast of the first chicken, then the other skewer through the thighs. Then, I put the second bird on upside down compared to the first bird. This makes the whole spit more balanced, which eases the load on the rotisserie motor. Also, it looks cool that way.*
- *Yes, I'm a cooking nerd.
- Prepare the grill: Set the grill up for rotisserie cooking at high heat. For my Weber Summit, this means removing the grates, turning the two outer burners (burners 1 and 6) to high, and turning the infrared burner to high. Then I put my drip pan in the middle, over the unlit burners, and let the grill preheat for ten to fifteen minutes.
- Cook the chicken: Put the spit on the grill, turn on the rotisserie motor, and cook with the lid closed. The cooking time will be from 45 minutes to 1 hour 15 minutes, depending on the size of the bird. A 4 pound bird will be done in about an hour. The best way to tell if the chicken is done is to check the temperature in the thickest part of the breast meat. You want that temperature to be 160*F to 165°F, but no higher. I start checking the temperature at the 45 minute mark, and check it every 10 to 15 minutes after that.
- Serve: Remove the spit from the grill, remove the chicken from the spit, and remove the trussing string from the chicken. Let the chicken rest for at least 15 minutes, then carve and serve.
- Category: Rotisserie
- Cuisine: American