
He said "butt". Heh heh heh.
Beavis and Butthead
I get this question a lot: how do you make a beer can chicken? And, is it worth it?
The first part first: what is beer can chicken? Take a can of beer, and pour half of it into a cup. Then, tell the chicken "relax, this will only hurt for a second", and shove the can into the butt of the chicken.
How do I use the extra half-cup of beer? Lubricating the chef, of course.
OK, that's overly dramatic. (And a bit gross. Sorry.) I carefully lower the chicken onto the can, and work it in as deep as possible. The can and the chicken legs form a tripod, standing the chicken up on the grill. I learned this recipe a long time ago, on the barbecue boards, when it was called beer butt chicken. (Again, barbecue guys are eight year olds at heart.) Then, in the early 2000's, the recipe was noticed by the wider world…and picked up the family friendly beer "can" chicken name.
The tricky part of this recipe is transporting the can stuffed bird. The can and chicken legs form a stable tripod that holds the chicken upright. But, because of the breast meat, the chicken is top heavy, and it wants to flop over and spill beer everywhere. This is annoying if it happens on the way to the grill…and potentially painful on the way back, when you are suddenly juggling hot beer and chickens. If you're cooking more than one bird at once, get someone to help you steady the birds as you carry them to and from the grill.
As for flavor…I don't notice much of a difference between beer can chicken and chicken roasted on the grill, without the beer. Believe me, I've tried - I've done this with cheap American beer, expensive craft beer, and fancy imported beer. I've also done it with soda pop - both cola and root beer. If there is any difference in flavor between any of these, it is very subtle. So subtle that I haven't noticed it.
So why am I using an expensive craft beer in the pictures? Because I get to drink the other half of the can.
If it's a juggling act, and it doesn't taste better, why do I cook beer can chicken? Because the can acts as a vertical roaster. I can easily fit two large chickens (5 pounds plus) in my kettle grill, and I once fit three smaller chickens (3 to 3 ½ pounds). Standing the birds up helps cook for a crowd.
OK, OK...I'll confess. This recipe is all about showmanship. Chicken stuffed with a can of beer, and cooked on the grill? Of course I'm making this recipe.
Recipe: Beer Can Chicken
Adapted from: Steven Raichlen, Beer Can Chicken: And 74 other offbeat recipes for the grill
Print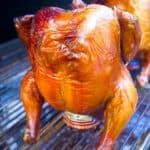
Beer Can Chicken
- Total Time: 5 hours 15 minutes
- Yield: 2 5-pound chickens 1x
Description
Beer Can Chicken - the backyard barbecue classic
Ingredients
Brine
- 3 quarts water
- ⅓ cup table salt (¾ cup kosher salt)
- 2 tablespoons brown sugar
Chicken
- 2 (5-pound) roasting chickens
Instructions
- Brine the chicken: In a container large enough to hold the chickens, dissolve the salt and sugar. Submerge the chickens, cover the container, and brine the chicken for 4 hours to 8 hours. Remove the chicken from the brine and pat dry with paper towels. (No need to rinse - the salt in the brine isn't overwhelming.)
- Sit the chicken on the beer can: Spray the cans with a fine coat of cooking spray. (This will make it easier to pull the can out of the chicken when it is done cooking.) Set one of the half-full cans of beer on a baking sheet, and lower the cavity of the chicken onto the can. The chicken should sit all the way down on the can, with good posture - the chicken should be sitting with its spine pointing straight up, and the tail and the knobs of the drumsticks should be touching the baking sheet. (If the chicken isn't sitting all the way down, grab the can and the chicken and wiggle them around - the edge of the can is probably caught on the spine of the bird.) Repeat with the other can and chicken.
- Set the grill up for indirect high heat (450°F+): Set the grill up for indirect high heat, and add the smoking wood to the grill. For my Weber kettle, I light a chimney starter full of charcoal, wait for it to be covered with ash, then pour it in two equal piles on the sides of the grill, and put a drip pan on the charcoal grate between the piles. I put the smoking wood directly on the coals, then I put the grill grate back in and brush it clean with my grill brush.
- Grill-roast the chicken: Carefully transfer the chicken to the indirect heat part of the grill grate. (If you have a helper, have them walk with you to the grill. Ask your helper to carry the sheet pan while you walk with them to the grill, holding on to the chickens. Then, have them hold the pan while you lift the chickens and cans onto the grill.) Close the lid and cook until the chicken reaches 165°F in the thickest part of the breast meat, about 1 hour and 15 minutes for a five pound bird.
- Carve and serve: Transfer the cooked chickens and cans to a clean baking sheet, and bring them back into the house. (Again…see if you have a volunteer to help.) Lift the chickens off of the cans and set the chickens on a cutting board. (I grab the can with one set of tongs, the backbone on the top of the bird with another, and lift the bird while pulling down on the can.) Discard the warm beer and cans. Let the chicken rest for fifteen minutes, then carve and serve.
Notes
- There are all sorts of vertical chicken roasting gadgets you can buy to make this easier. They add stability to the process, with a wider base to support the chicken. But, c'mon, you have to do it the original way, at least once.
- Now, I like this chicken. It's very good, and grilled chicken is much better than oven roasted chicken. But, for the ultimate chicken, see my rotisserie chicken recipes.
Tools
- Grill (I love my Weber kettle)
- 2 (12-ounce) cans of beer, half the beer removed (ahem)
- A probe thermometer (like my favorite, the ChefAlarm) makes it easy to tell when the chicken is done cooking - run the probe wire under the grill lid, away from the coals, and wait for it to hit 165°F.
- 2 fist-sized chunks smoking wood or 1 cup of soaked wood chips (I used cherry, but I also like apple, hickory, and oak with chicken.)
- Container to brine the chickens (I use an 8-quart food service container, but a stock pot works fine.)
- Cooking spray
- Prep Time: 4 hours
- Cook Time: 75 minutes
- Category: Sunday Dinner
- Method: Grilling
- Cuisine: American
Would you like to save this recipe?
What do you think?
Questions? Other ideas? Leave them in the comments section below.
Related Posts
Grilled Butterflied Chicken with Dry Brine
Rotisserie Chicken, Dry Brined with Rosemary, Lemon and Garlic
Grilled Butterflied Chicken with Garlic and Butter Baste
My other Grilling Recipes
Enjoyed this post? Want to help out DadCooksDinner? Subscribe to DadCooksDinner via eMail or RSS reader, recommend DadCooksDinner to your friends, and buy something from Amazon.com through the links on this site. Thank you.
joe says
you said beer butt! LOL, in all seriousness I love beer chicken
John Townsend says
Hi Mike, I bought the medium VORTEX and I'm going to try beer can chicken on my 22.5 weber one touch gold. Have you had any experience with the Vortex, and if so what do you think about it? Thanks
Mike V says
No experience with the Vortex, sorry.
Mike V @ DadCooksDinner says
You're welcome - and I love the MacGyver-worthy improvising!
jason says
I wanted to try this and I wasn't ready to commit to a full batch. Made the cheese mix as described. Use my Vitamix to ground the ancho pepper. Stuffed 4 rather large peppers (I thought they looked full but I should have really pack them more). I made 4 tin foil boots that held them up. Pre-heated the BBQ to 400. Turned off the front burner. Medium heat on the back and cooked them up front covered for 25 minutes. Work well. Going to do it again. Thanks! - Jason
craig t says
there are several grilling options that help with the balancing act...metal pans with removable cups for holding the liquid.
The pans collect the rendered grease, preventing a potential grease fire and keep the mess down.... and are more stable than just the can. The cups are removable for clean up and filling
I prefer this over a beer can for these reasons and the fact that there is paint/ink on the outside of the can and cans are coated inside to prevent a reaction with the beer and the aluminium So, use a stainless steel or porcelain container
craig t says
75 whole peppers cut in half for 150 pepper boats!
Mike V @ DadCooksDinner says
Sounds great! (And - 150 of them? Holy cow.)
craig t says
Cooked these today at the Porkopolis Eggfest (Green Egg) with these mods,,,
Used Hungarian peppers cut lengthways (used your cheese/spice combo), crumbled bacon on top, splash of Dave's Garlic Hot Sauce after cooked., Cooked at 350 til cheese melted, bout 15 minutes. .Called them Pepper Boats. Did 150 boats ! Big hit !
Mike V @ DadCooksDinner says
Thanks for sharing, Craig!
craig t says
by cutting them length ways the stem gives you a handle to grab them with.. I think it makes them easier to eat, less messey
craig t says
I tried these but sliced them length wise and laid them on a perforated grill pan ..
I also fried some bacon and choopeed it up,,, sprinkled on top of the cheese,,, when they came off the grill I drizzled Dave Garlic Hit Sauce ...
fir thoze who cant take the heat uze banana pepperz
Mike V @ DadCooksDinner says
Thank you - glad you enjoyed it!
Athena says
I first thought that was a strawberry slid under the skin in the upper left corner of the photo. Haha! I thought to myself, "Now there's something different. Strawberry? Hmmm..."
By the way, I don't think I've ever posted here but I should tell you your 2010 Pressure Cooker Short Ribs recipe is my favorite for its minimal effort/maximum flavor ratio. It's awesome!