
I love my rotisserie. It turns out better roasts than any other method I've tried.
Get it? Turns? Thank you, thank you, I'll be here all week.
There is some extra work involved with rotisserie grilling - you can't just slap the meat on the grill - but it's worth the effort. Here is my ten step program for your grill's rotisserie attachment.
You'll need:
- A grill with a rotisserie attachment (spit, spit forks, motor, and motor mount (which is attached to the rotisserie ring if you bought the Weber kettle rotisserie).
- Trussing twine (look for heavy butcher's twine)
- Heat proof gloves
- Something to rotisserie. (May I suggest a chicken?)
1. Truss and spit the meat
No matter what meat you're cooking, it needs to be trussed. The rotisserie turns gently, but as the meat cooks, that gentle turning will tear the roast loose if it is not securely tied down.
Secure the meat to the spit with the spit forks - push them in there tight. Again, you don't want anything wobbling around.
For trussing and spitting instructions, see my YouTube videos:
- How to truss and spit two chickens for the rotisserie (Video)
- How to truss a roast (Video)
- How to truss a beef tenderloin (Video)
2. Set the grill up for indirect heat, with a drip pan in the middle, between the lit burners or the coals.
On a charcoal grill, light the coals, then pour them into two piles on the sides of the grill. (If your grill has charcoal baskets, they're perfect for this.) Set the drip pan on the charcoal grate between the piles of charcoal. Next, put the rotisserie ring on the grill and make sure it is seated.
On gas grill, remove the grill grates, then preheat the grill with all burners on high for fifteen minutes. Turn off the burners in the middle of the grill, leaving the two outer burners lit, and set a drip pan on top of the burner covers in the middle of the grill. (If you have a rotisserie burner, now is the time to light it - push the knob in, the knob until the burner ignites, and hold the knob down for twenty seconds to get the gas flowing properly to the rotisserie burner.)
If the roast will take an hour or less to cook, I almost always use indirect high heat (450°F or higher internal grill temperature). If it will take longer than an hour, I go with medium heat (about 350°F inside the grill.)
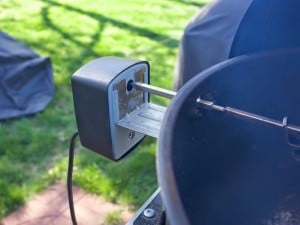
3. Mount the motor
Slide the rotisserie motor onto the mounting bracket, plug it in, and turn the motor on and off to make sure it is working.
4. Open the lid on the grill.
Do this now, before you go pick up the spit - you don't want to be fumbling with a yard long metal spear with a heavy roast in the middle with one hand, while you try to open the lid with the other hand.
Not that I've dropped a roast when the spit slipped out of my hand. No, that wasn't me.
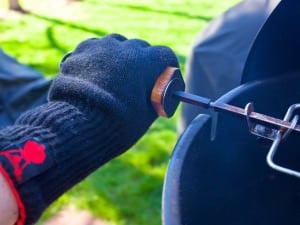
5. Mount the spit into the rotisserie bracket
Grab the spit with heat safe gloves or oven mitts. Plug the point of the spit into the rotisserie motor. Lower the notch on the spit into the groove on the other side of the grill. (The groove is in the rotisserie ring for a charcoal grill, or is built into the side of the firebox for a gas grill.)
What about the counterweight? If you have a gas grill, you don't have one, so skip this section. If you have a kettle grill rotisserie attachment, it comes with a counterweight; I ignore it unless I'm cooking something huge, like a 20 pound turkey. Then, I remove the motor from the mounting bracket and set the spit in the grooves on the rotisserie ring. I let the spit go, gravity takes over, and the spit ends up with the heaviest part of the roast facing down. I attach the counterweight to the end of the spit pointing straight up - voila, balanced! Slide the spit out, remount the motor, plug the spit in, and go.
6. Turn on the rotisserie motor
Make sure the spit is turning freely, the meat is secure, and the drip pan is centered below the meat. If the meat is loose or wobbly, stop the motor, loop some twine around the meat, and tie it down tight. Better to tie it down it now than find it ripped loose from the spit forks later.
Again, not that that's ever happened to me. Ever. Nope, not even that one time I…um, I mean…nope, never happened.
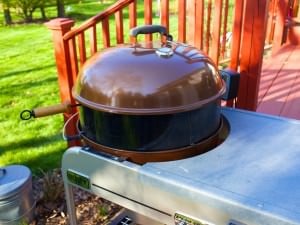
7. Cook with the lid closed
Leave the motor running, close the lid, and cook with the lid closed as much as possible until the roast is done cooking. (I check the roast after a half an hour to make sure everything is still turning properly, then close the lid again and let it cook.)
8. Using the heat safe gloves, remove the spit from the grill and transfer it to a carving board.
Be careful - the spit is a branding iron when it first comes off the grill.
9. Remove the roast from the spit, and remove the trussing twine
Remove the first spit fork from the spit. Using tongs or a carving fork, push the meat off the spit and slide it onto the cutting board. (Keep your heat-proof gloves on until you have the spit set down on a heat proof surface.) Cut the trussing string and remove it from the roast immediately. (The crust on the meat will harden as it cools; the sooner you get the trussing string off, the better.)
10. Rest, carve, and serve
Let the meat rest for ten to fifteen minutes, then carve and serve the crispest, most crackling roast you've ever cooked.
Adapted from my cookbook, Rotisserie Grilling. I did mention I wrote a cookbook, right? Right?
What do you think?
Questions? Other ideas? Leave them in the comments section below.
Related Posts
Rotisserie Prime Rib, Reverse Seared
Rotisserie Chicken with Spanish Smoked Paprika Rub
Rotisserie Leg of Pork with Injection Brine and Herb Rub
My complete list of rotisserie recipes
 Check out my cookbook, Rotisserie Grilling. Check out my cookbook, Rotisserie Grilling. |
Everything you could ask about the rotisserie,
plus 50 (mostly) new recipes to get you cooking.
It's available as a paperback, or a Kindle e-book, so you can download it and start reading immediately!
Enjoyed this post? Want to help out DadCooksDinner? Subscribe to DadCooksDinner via eMail or RSS reader, recommend DadCooksDinner to your friends, and buy something from Amazon.com through the links on this site. Thank you.


Greer says
My lovely new rotisserie keeps tripping out the power inside my house. I've got no garage, so no other power source. Do you think a portable power bank might help? (I've been looking ta a Energizer 155Wh Portable Power Station which is suitable for low wattage items up to AC100W, total <120W) And will it last long enough to do some low and slow cooking?
Mike Vrobel says
I’d recommend a battery powered rotisserie motor: https://www.onegrill.com/Cordless_Rotisserie_Spit_Rod_Motor_with_AC_Adapter_p/4pm03.htm
Greer says
Thank you Mike, that's perfect!
Vermont Grillmaster says
How do you maintain the internal temperature in the Weber Kettle for long 1+ hour cooks? My attempts seem to run out of heat after about 45 minutes - 1 hour
Mike V says
Add 16 coals to the fire every hour to keep it going.
Brian Thomas says
Wanna say goodbye to handling piping hot spit rods and forks? Get one of these!
http://www.ebay.com/itm/E-Z-Que-Cradle-Rotisserie-Basket-System-for-Weber-Kettle-Kit-2290-6-x-17-5-/281321423862?pt=LH_DefaultDomain_0&hash=item41801043f6
I have two of these. One for the Genesis EP320 and one for the Performer. The E-Z Cue Rotisserie Basket is GREAT for smaller items such as pork loins, game hens, etc. You can even use it for chicken depending on the size.
When your food is done, just loosen the screws on the forks, flip them back and take out your food with tongs or a serving fork. Love it!
Of course there is a limit to the size of the things you can cook with this. For larger items I just use the regular spit rod and forks. It is more time consuming to clean but it is made of 304 SS so it will last forever.
Mike V @ DadCooksDinner says
Of course you can, Mauri!