*Or, as I like to call it, Bubba Sous Vide.
I've been reading about the magic of sous vide cooking for a while now. Chefs have been using the technique for years; it lets them cook food to a very specific level of doneness, using a water bath with an immersion circulator. If they want a steak cooked to perfect medium-rare, 128*F, they set the immersion circulator to 128*F, seal the steak in a vacuum bag, and put it in the water bath. The steak cooks all the way through to the temperature of the water, and stays at that temperature for as long as it is in the water. When the chef is ready to cook, they unseal the bag, sear the steak, and serve it. Voila - perfect medium rare from edge to edge.
Immersion circulators![]() aren't cheap; professional models are out of the price range of home cooks. (Or at least this home cook.) Sous Vide Supreme
aren't cheap; professional models are out of the price range of home cooks. (Or at least this home cook.) Sous Vide Supreme![]() came out with a model for home cooks last year - it is tempting, but at $500, I've been able to resist temptation so far.
came out with a model for home cooks last year - it is tempting, but at $500, I've been able to resist temptation so far.
*I'd love to get one, but I couldn't justify the $500 price tag, and the kitchen space it will use. I love my gadgets, but this seemed like a gadget too far.
Then, Kenji Lopez-Alt had a brainstorm. Instead of an immersion circulator and a vacuum sealer, he filled a beer cooler with hot water, and used a zip-top bags. The cooler traps the heat, keeping the temperature of the water steady enough to use as a sous vide water bath.
Kenji's Beer Cooler Sous Vide was a hack worthy of McGyver, and I loved reading about it. I put it on my "I need to try that" list, and...promptly forgot about it. That is, until I went grocery shopping for Valentine's Day dinner. My local grocery store had a great deal on thick cut New York Strip steaks. I grabbed a couple, then wondered how I could cook them to a perfect medium-rare. (Perfect medium-rare is my quest.* And it's tough with thick cut steaks.) Kenji's technique popped back into my head, and I knew what I had to do.
*My greatest shame is presenting my mom with a steak that is not rare. For all my skill as a cook, I have a problem with overcooking beef. What can I say? I get distracted sometimes. I was hoping a side effect of this technique would be more consistent results. It is easier to measure the temperature of a cooler full of water than it is a thin steak.
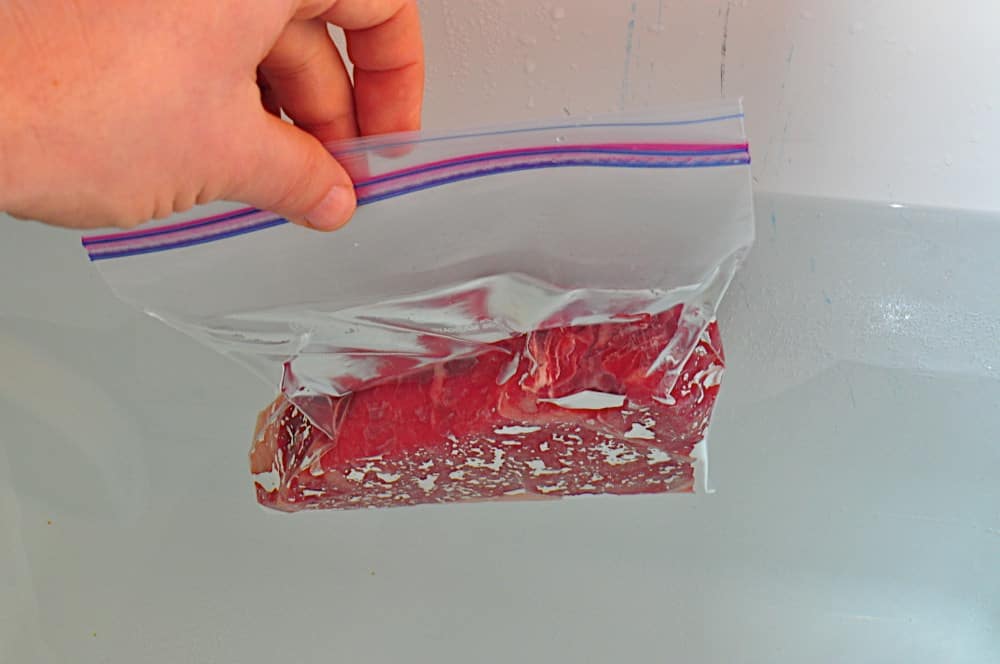
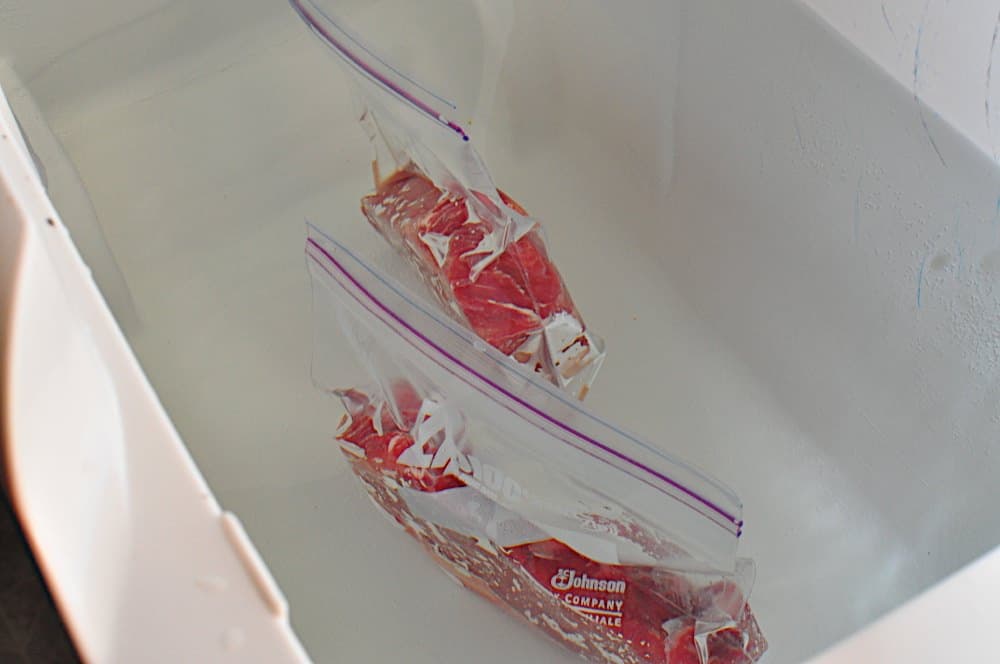
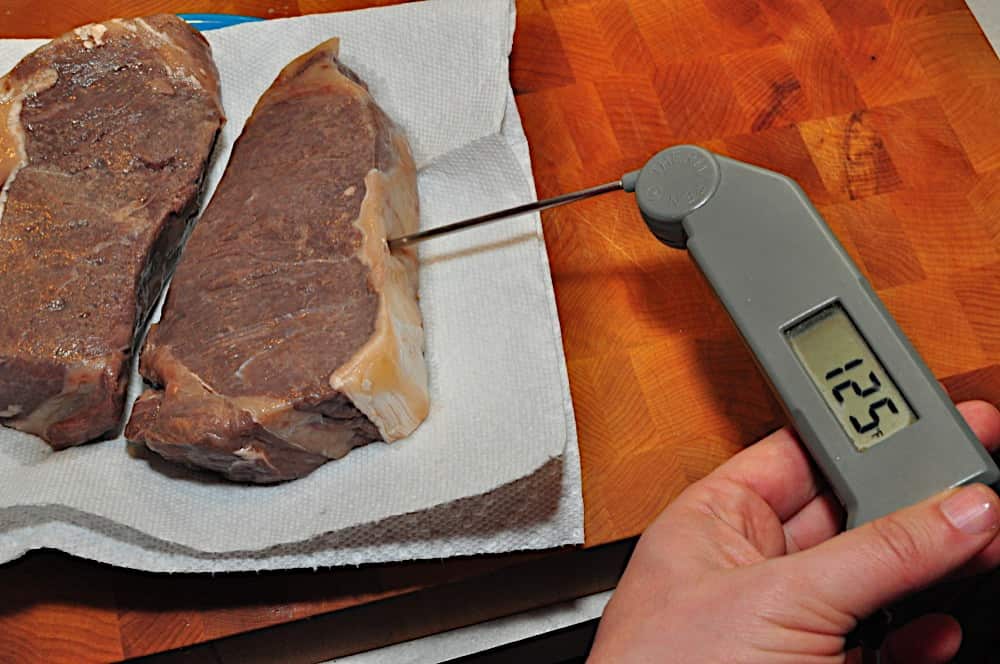
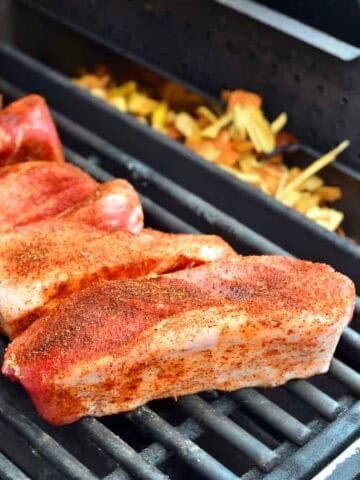
The process is simple: fill a beer cooler with water about five degrees higher than the temperature you want the steak to finish at, because the temperature will drop slightly. Season the steak, then put it in a zip-top bag, and seal the bag most of the way shut. Slowly lower the bag into the water to force out the air. Once the bag is almost all the way submerged, seal the top and close the cooler. Let the steak sit in the water bath for at least one hour, to cook all the way through to the temperature of the water.
*Timing isn't critical - the steak can't get hotter than the water, so it can not overcook. This is part of the beauty of the technique.
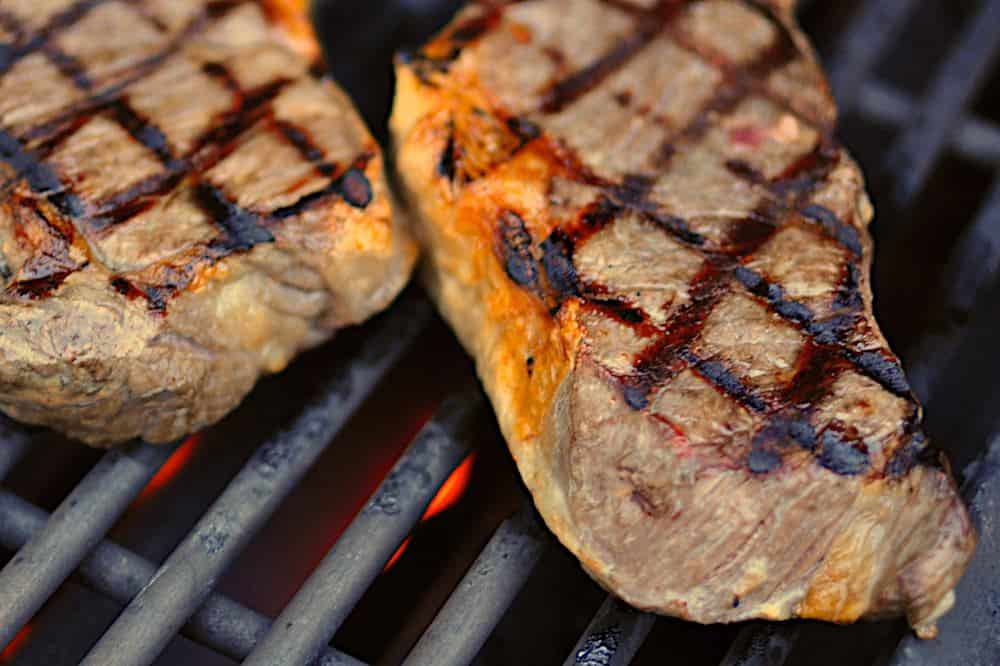
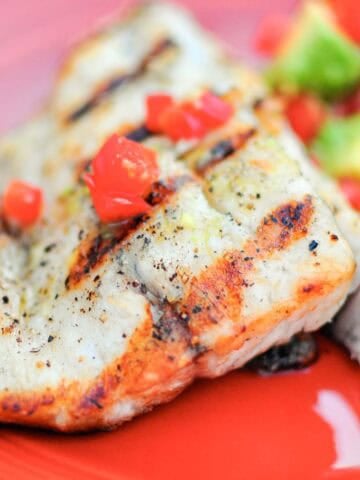
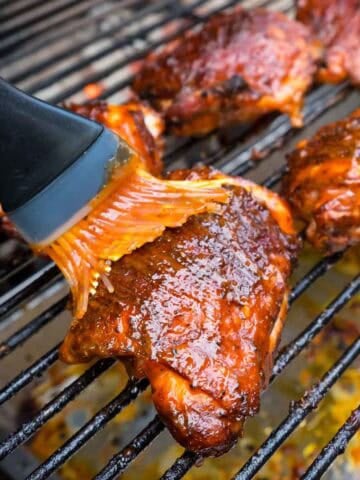
Remove the food from the bag, pat it dry, then sear on ripping high heat. I go two minutes a side, rotating 90 degrees after one minute to get a diamond pattern of browned crust on the meat. It doesn't need any more cooking than that; it is already cooked to the doneness you want by the water bath.
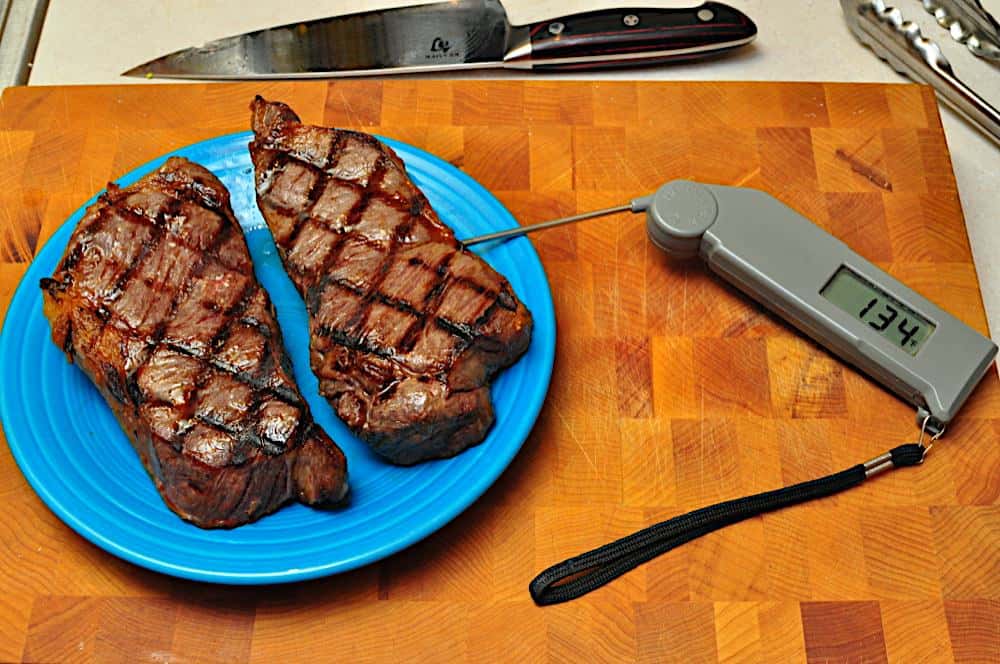
Instead of searing in a fry pan, I got my grill as hot as I could, then grilled the steaks for 2 minutes a side. I had nice browning, an impressive set of diamond grill marks. And the results? Oh...the results...Ohhhh...
*Sorry, give me a moment. I'm overcome by the memory.
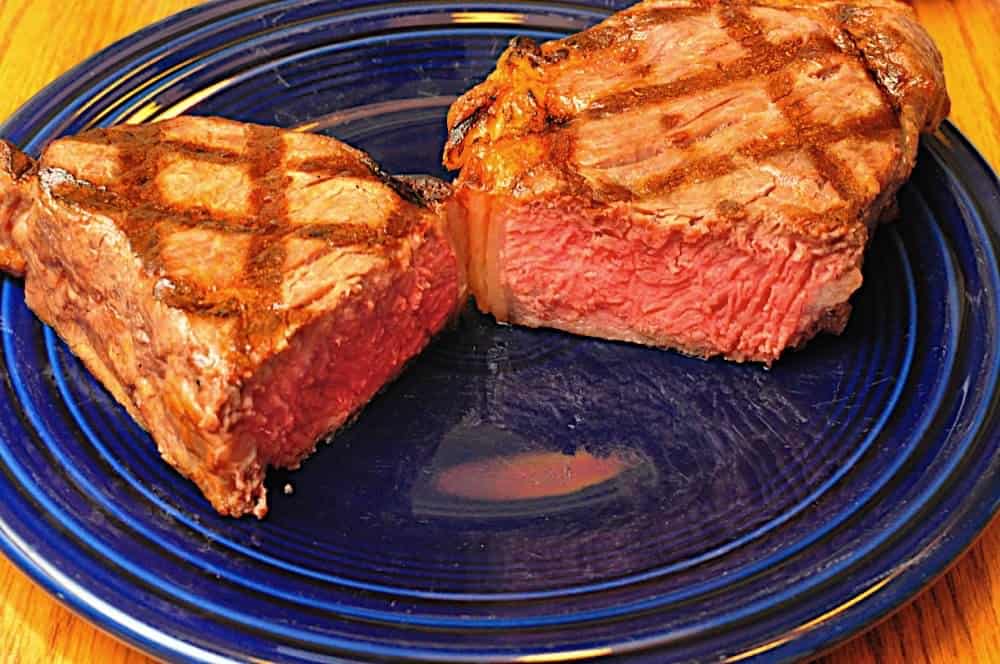
This was, bar none, the best thick-cut steak I've ever cooked. An inch and a half of perfectly pink beef from edge to edge, with a thin browned crust on the outside. Not the usual gradation of red in the middle, through shades of pink, then gray and overcooked, before getting to the brown crust. This was medium rare from one side to the other. And, tender? The long, slow cooking in the water bath leaves the juices in the meat. They don't get squeezed out during the cooking time. The result is buttery beef, the likes of which I've never made before.
*I can't wait to try this technique with prime grade beef. Or rack of lamb. Or a thick cut pork chop. Oh, and about that Sous Vide Supreme? Darn it, now I'm lusting after one.
Are you a home cook looking to try something out of the ordinary? Have you been on a quest for a perfectly cooked piece of beef? You have to try this out. Thank you, Kenji!
Recipe: Beer Cooler Sous Vide Grilled New York Strip Steaks
Adapted From: Kenji Lopez-Alt Cook Your Meat in a Beer Cooler [SeriousEats.com]
Cook time: 1 hour water bath, 4 minutes on the grill
Equipment:
- Grill (I used my Weber Summit. Here is the current version of my grill.
 )
) - Large cooler (At least 2 gallons capacity; more is better)
- Quart sized zip-top bags
Ingredients:
- 2 thick-cut New York Strip Steaks (at least 1 ½ inches thick)
- 1 ½ teaspoons Kosher salt
- ½ teaspoon fresh ground black pepper
Directions:
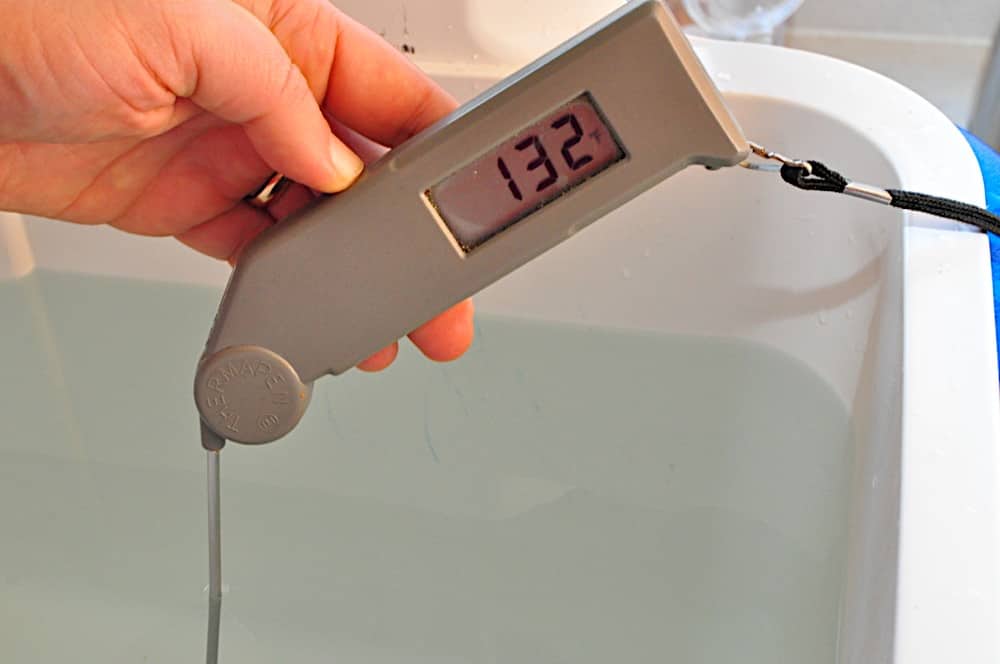
1. Cook the steaks in the beer cooler water bath: Fill a large cooler with 132*F water. (I fill the cooler most of the way with hot tap water, then add boiling water until I get to 132*F). Sprinkle the steaks evenly with the salt and pepper. Put each steak int its own zip-top bag. One at a time, slowly lower the bags into the water, letting the water push the air out of the bag and seal itself around the steak. When the bag is submerged to the level of the zip, seal the bag, then let it sink into the water. Close up the cooler and cook the steak in the hot water bath for at least an hour.
*If you are cooking for more than two hours, check the water temperature and add boiling water occasionally to keep the temperature between 125*F and 130*F.
|
|
||||
|
|
2. Prepare the grill: Set the grill up for cooking at high heat; as high as you can get it. For my Weber Summit, I turn all the burners to high, let the grill preheat for 15 minutes, then brush the grate clean with my grill brush.
3. Sear the steaks: Remove the steaks from the zip-top bags, and pat them completely dry. Put the steaks over the highest heat part of the grill, and cook for two minutes, rotating 90 degrees after one minute to make a cross-hatched pattern on the steaks. Flip the steaks and cook for another two minutes, rotating 90 degrees after one minute. Remove the steaks to a platter, and rest for ten minutes before serving.
|
|
Notes:
*I cooked these steaks on my gas grill because my charcoal grill (and deck) are covered with mix of snow and ice that I haven't been able to break through. I would much rather use charcoal for my searing; the high, dry heat of charcoal will brown the meat much better than gas. I'm going to use a full chimney of charcoal, piled two coals deep over half my charcoal grate to create a very high heat searing zone.
*February in my house can't be described as warm, which gave me a couple of obstacles to overcome. The hottest water from my tap was only 115*F, so I added boiling water to bring the temperature up. (Luckily, my electric kettle![]() boils water very quickly.) My house was also very cold; according to my Thermapen, the air temperature in my kitchen was 62*F. I did a dry run (wet run?) with the cooler and two gallons of water, and the temperature dropped ten degrees in two hours. I added a lot more water the second time around, filling the cooler completely, and trusted the extra thermal mass to keep the temperature up. I started the steaks in 133*F water; after an hour and a half the water was down to 126*F. I think the water bath can hold the steaks longer in the summer; in the winter I would be ready to grill after no more than an hour of cooking in the water bath.
boils water very quickly.) My house was also very cold; according to my Thermapen, the air temperature in my kitchen was 62*F. I did a dry run (wet run?) with the cooler and two gallons of water, and the temperature dropped ten degrees in two hours. I added a lot more water the second time around, filling the cooler completely, and trusted the extra thermal mass to keep the temperature up. I started the steaks in 133*F water; after an hour and a half the water was down to 126*F. I think the water bath can hold the steaks longer in the summer; in the winter I would be ready to grill after no more than an hour of cooking in the water bath.
*Another advantage to this technique is the brining effect, caused by seasoning the steaks before they are cooked in the water bath. I forgot the pepper - these steaks were just beef and salt, but they were seasoned all the way through.
*I'm really excited by this technique. Can you tell? I thought this would be a cute trick, something to try once; instead, I've been thinking about these steaks ever since I ate one, and I can't wait to try this again.
What do you think? Questions? Other ideas? Leave them in the comments section below.
Related Posts:
Grilled Rib Eye Steaks with Mediterranean Herb Butter
Grilled Flank Steak with Chimichurri
Grilled Flat Iron Steak with Salsa Verde
Adapted from:
Kenji Lopez-Alt Cook your meat in a beer cooler [SeriousEats.com]
*Enjoyed this post? Want to help out DadCooksDinner? Subscribe using your RSS reader or by Email, recommend DadCooksDinner to your friends, or buy something from Amazon.com through the links on this site. Thank you!
David Froula says
Hi Mike sorry have not seen this post in a while. I cook the chicken breasts at 145 degrees for at least 90 minutes, then finish on the grill to crisp the skin ("bone in" breasts). Serious eats has a good write up on the chicken technique here:
http://www.seriouseats.com/2010/04/sous-vide-basics-low-temperature-chicken.html
MikeV @ DadCooksDinner says
@Dave_In_TN:
You're welcome, and happy new year!
PS: What water temperature do you use for chicken breast?
Dave_in_TN says
Thanks for this post, we use this technique regularly for steaks, chicken breasts are also incredibly juicy using the bubba method. I actually keep the water bath in a stock pot on the stove turned down low. Did it with rib eyes tonight, and grilled over charcoal using AB's "jet engine sear" (put the grill grate right on top of the chimney starter and seared for about a minute a side.
Oh and hope you have a Happy New Year and looking forward to the blog updates for continued ideas and inspiration! Thanks D-C-D!!
realfoodguy says
I quartered the duck, cutting out the backbone and wing tips, saving them for next weekend's batch 'o stock. In hindsight, I should have made airline breasts, since the rib bones of one of the breasts punctured the bag.
I kept the bath at 160. When the temp would drop, I'd scoop out a few quarts and boil it in the pot for my pressure cooker, which was sitting on top of my induction burner, and then dump that water back in.
After the bath, onto the grill for crisping. That worked well, but not quite as well as the rotisserie. Next time, I'm going to try a hotter, but indirect fire on the Bubba Keg - more like a hot oven than the grill.
MikeV @ DadCooksDinner says
@Paul:
You're welcome!
That sounds like a great idea. What did you cook - boneless duck breast? (Skinless, too? If not, how did the skin crisp up?) And what temp did you use for the water?
Paul says
Mike,
I borrowed this technique for grilled duck today. Thanks for the inspiration!
Chris says
Hi,
I also eat only grass-fed beef, and don't have any issues. Tried the sous vide technique last night, and the results were perfect. I trimmed the excess fat on the perimeter of the 3/4 lb. cut, salted for an hour ahead of time, then prepared. I took some pics: https://picasaweb.google.com/110466800548872900877/SousVideRibEye?feat=directlink.
Truly amazing; thanks for opening my mind to this. It's incredible how one can never stop learning new things.
Chris
MikeV @ DadCooksDinner says
@Chris:
Thanks for the input on the grass fed beef. I'm glad it worked for you!
I have to try pre-salting and sous vide one of these days. My steaks have had the deep seasoned flavor from salting right before the sous vide, but I wonder if letting them air dry for an hour before going in the bag will also help.
MikeV @ DadCooksDinner says
@Marcy:
Interesting! Thank you for the links, and let me know what you find out.
I was going to get some grass fed beef at the farmers market this weekend; I may have to pick up a steak instead of my usual pack of hamburgers, to try this out.
Marcy says
I believe I have discovered the problem. We buy grass-fed and it is not as easy to cook.
Nom Nom Paleo recommends salting the meat a day ahead of time (almost like a dry brine) and cooking for at least two hours.
I am determined to try again.
MikeV @ DadCooksDinner says
@Marcy:
I'm sorry to hear you were disappointed!
I use this technique because it gives me a perfect rare or medium-rare doneness level, and then a quickly seared exterior on the steak. Raising the heat to try to melt the fat might work, but it will not give you a medium or (shudder) higher level of doneness.
I haven't tried it on a very fatty cut, like ribeye, so I'm interested to hear that the fat didn't turn out how you expected. I'll have to pick up some ribeyes and try them myself...
Marcy says
I was so excited to try this. Nom Nom Paleo had mentioned this technique a while back, and then I saw your post and had a steak ready to go.
Well, it did not turn out! My rib steak was in the water bath over 2 hours which started just over 140 F and ended up around 125 F (we have a small cooler). The fat did not break down. I might try it again with a higher temperature, but I sure was disappointed this time.
MikeV @ DadCooksDinner says
@Ty'sMommy, @Anonymous:
Thank you! I have to admit, I've been obsessed with this technique since I tried it out for this post. I can verify that it works with pork chops and beef tri-tip roast (as long as the roast isn't too thick, and you let it sit in the cooler for at least two hours...)
Ty'sMommy says
Oh. My. God. I know what I'm going to be going the next time I see some nice Delmoinoc steaks at the local grocer!!!
Anonymous says
Going to the store right now.must try this