Note: This post started as one of the five point lists in my year five update last week…but it got away from me. After it grew to a thousand words, I realized it was its own post.
An inquisitive reader asked me what type of camera I use to take pictures for the blog. They weren’t the first to ask, so I thought I’d share with everyone. Here’s my photography equipment, and the software I use for my photography workflow.
But first
A disclaimer. Cameras don’t take pictures - people take pictures. A SLR with a good lens will help your photography, but not as much as learning about composition, lighting, depth of field, focus, taking lots of pictures, and editing ruthlessly. Oh, and looking at lots of pictures, seeing the ones you like, and trying to figure out why they work. I’m a decent photographer, if I say so myself; I was obsessed about photography before I became obsessed about food, and I’ve been taking pictures for a while now. But there are photographers who are head and shoulders above me, and it’s not because of their equipment. They can use a Soviet era film camera and create pictures that leave me stunned.
Camera
Nikon D5100 SLR with Nikon’s 35mm f/1.8 lensI use a fast, fixed lens (that is, no zoom) for all my pictures. I love the shallow depth of field I get from shooting with smaller apertures - that wonderful, blurred background effect. Most of the shots on this blog are somewhere between f/2.8 and f/5.6. I love the 35mm f/1.8. I just wish Nikon would make an image stabilizing version of this lens. I do all of my shooting hand-held, and my hands aren’t as steady as they once were. I could use an extra stop or two of vibration reduction.
Why no zoom lens? A few reasons. First, zooms that can open as wide as f/2.8 (or even f/4) are really expensive. Second, I don’t need to sneak up on food to get a picture - if I need to zoom, I use my feet. It’s not going anywhere, unless I drop the plate. Finally, fixed lenses can focus a lot closer than zooms, and I need to get close to my food for good pictures. Now, if someone could make a f/2.8 zoom that has close focus, I’d consider it…but I probably couldn’t afford it. Nikon has a lens that is close - their 24–120 f/4 VR lens. It’s a little too slow at f/4, and the close focus (1 ½ feet) is a little too far. My real issue is the price - at $1200, it costs about 6 times as much as my little 35mm f/1.8.
That said, I’d love to try the 24–120. After I wrote this, I started to think…maybe I can rent the 24–120 for a week, to play with it. I hate it when I start to upsell myself. Resist. Resist!
TKPic Nikon D5100 with lens, flash, and Lowel EGO and bounce card
Photo Lighting, during the summer
Natural light, often with a bounce reflector to fill in the shadows.
“Bounce reflector” sounds fancy, but all it has to do is reflect light. Any large, rigid, white surface will work. For years my bounce reflector was a piece of white styrofoam…until I held it a little too close to the grill and it melted. Now I use the bounce reflector that came with the Lowel EGO light (see below). It is a large piece of folded foam core, so I can open it up into a “V” shape and set it next to my plate - no need to hand-hold it. (And I keep it away from the grill as much as possible.)
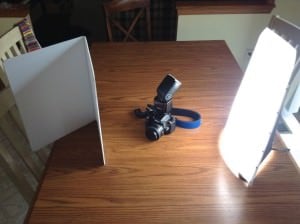 |
| L to R: Bounce card, Nikon with flash, Lowel EGO light |
Photo Lighting, during the winter
Nikon SB–700 Flash, occasionally a Lowel EGO tabletop photography light.
Darkness falls early in my neck of the woods. (Sounds like there should be a pack of wolves out back, doesn’t it?) I have to use artificial lighting for pictures when the daylight gets short - or I’d have to switch to blogging about DadCooksLunch. From October through April, I leave the SB–700 attached to the camera, with the head turned to bounce the flash off the ceiling.
When I have time for a composed shot of a finished dish, I use a Lowel EGO light set. It’s a single unit photography light, and a bounce card. I set them up on my front room table, do some set design with napkins, forks, and the main course, and take the picture.
Photography Software
Eye-Fi memory card, iPhoto, Photoshop Elements, Picasa
Here’s where I share my photography workflow. The Eye-Fi should probably go in the Camera section of this post, but I think of it as the start of my photo workflow. I take a picture, and when I’m in range of my wifi network, it automatically uploads the pictures to my computer. No removing cards, finding a connection cable or plugging in the card reader. Next, I go into iPhoto, which is what I use to manage my photos. I sort through the pictures, deleting any that didn’t work, and picking out my favorites.
Next, I edit the pictures. I try to compose in camera, setting up the framing exactly how I like it, so most of the time, iPhoto’s built in editing software is enough for my needs - occasional cropping, photo straightening, and basic color adjustments. When I need more drastic editing, I switch to Photoshop Elements and its more powerful set of tools.
Finally, I export from iPhoto to Picasa, and upload from Picasa to PicasaWeb albums. (I think they’re now Google+ albums, actually.) I don’t like the extra step, but my blog is hosted on Google’s Blogger.com platform, and Picasa is their tool for uploading pictures. I should probably switch to using Picasa as my photo manager, and cut iPhoto out of the loop, but I’m used to iPhoto, and it’s where all the family photos are stored.
*Which, thinking about it, is another good reason for me to switch - I really should break the blog photos into their own library. The kids are tired of the flood of pictures of rotisserie chicken in the photo stream.
What do you think?
Questions? Other ideas? Leave them in the comments section below.
*Enjoyed this post? Want to help out DadCooksDinner? Subscribe to DadCooksDinner using the RSS or Email options on the right, recommend DadCooksDinner to your friends, buy something from Amazon.com through the links on this site, or donate through my tip jar. Thank you.




Mike V @ DadCooksDinner
Thanks, Jeff - I've been thinking about them. Good to hear it worked for you, I'll give them a try.
Jeff
Mike, I did just what you thought about..."borrowed" a lens to try it out before buying it. See borrowlenses.com. You can rent for as little as three days and up. Very good service.
canvas prints
What a cool camera, im thinking of getting one to.
meigancam
The information which has been posted here in this blog regarding menu changes at beaches and cream in disneys beach is quite interesting and informative.