*This was the first recipe I thought of when All-Clad asked me to test their new d5 Stainless pans. Enjoy!
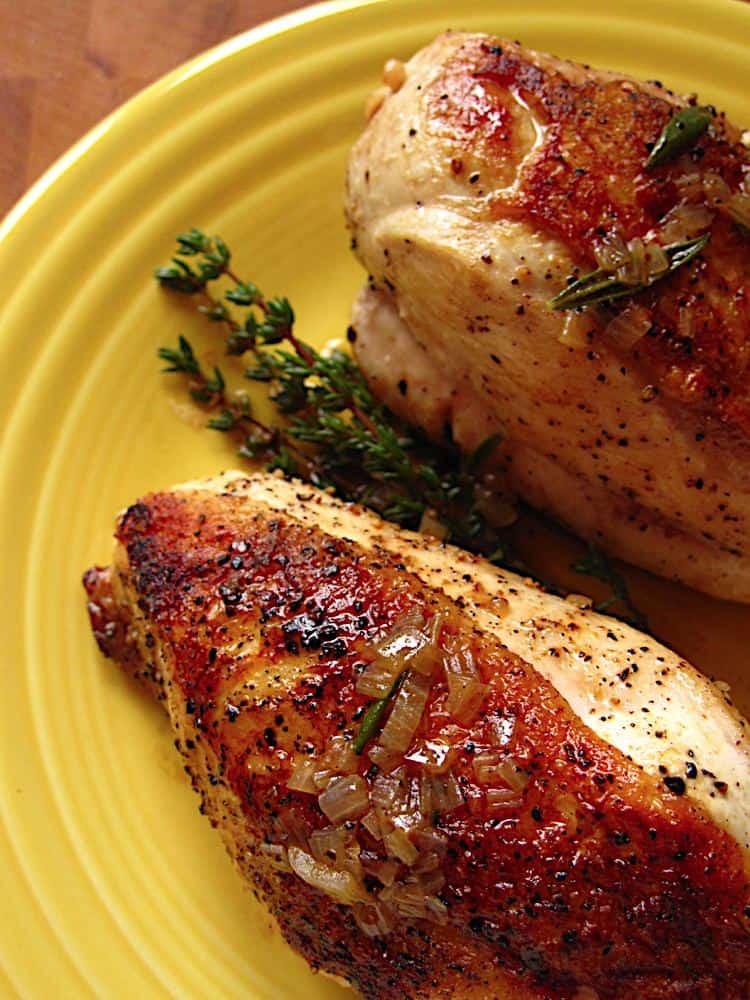
The best part of chicken is crispy skin. This recipe gives you the crispiest skin that I know how to make.
*The only thing that comes close is cooking your chicken on a rotisserie. I don't think fried chicken counts, because you're frying the coating as much as the skin.
**Not that there's anything wrong with fried chicken.
The basic sear-roast technique is useful when you want to cook something with a deep, browned crust, but it's too thick to cook through on the stovetop without burning. You sear it to get the browning, then move it into the oven to gently finish cooking. I've sear-roasted everything from pork tenderloin, to thick-cut steak, to rack of lamb. This recipe is my favorite application of the sear-roast technique.
Recipe: Sear Roasted Chicken Breasts with Lemon Herb Pan Sauce
Equipment
- 12-inch oven safe frypan (It needs to be a heavy pan - I love All-Clad pans
 for this; that's why I picked it to test the d5 pan. My second choice would be a 12-inch cast iron skillet.)
Sear Roasted Chicken Breasts with Shallot Herb Pan Sauce
- Total Time: 45 minutes
- Yield: 4-6 1x
Description
Chicken breasts with a quick pan sauce. Simple cooking at its best.
Ingredients
- 4 chicken breasts, bone in and skin on
- 2 ½ teaspoons kosher salt
- 1 teaspoon fresh ground pepper
- 1 teaspoon canola oil
Pan Sauce
- 1 small shallot, minced fine
- 1 cup chicken stock (preferably homemade) or water
- 2-3 thyme sprigs
- 1 rosemary sprig
- Zest and juice of ½ of a lemon
- ½ tbsp butter
- Salt and pepper to taste
Instructions
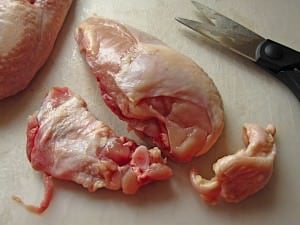
- Prepare the Chicken: Heat the oven to 350*F. If the chicken breasts came with the rib section still attached, remove the ribs. (I use my kitchen scissors for this; see picture, below.) Sprinkle the chicken with the salt and pepper. Let rest at room temperature until the pan is heated. (If you have the time, you can dry brine the chicken by salting it the night before, up to 24 hours in advance, and leaving it in the refrigerator. Or, you can brine the chicken. Dissolve 1 cup of kosher salt in 2 quarts of water, then soak the chicken in this brine for 1 to 4 hours. Pat dry with paper towels before using.)
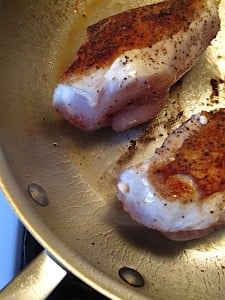
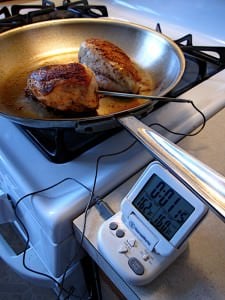
- Sear the chicken: Put the teaspoon of oil in the fry pan and heat over medium heat until the oil is shimmering. Swirl the oil around to coat the pan, then add the chicken, skin side down. Sear until the skin is a dark golden brown, about 6 minutes. Flip the chicken and sear until the bone side is browned, about 4 minutes.
- Roast the Chicken: Move the pan to the oven and roast until the chicken reaches 160°F in the thickest part of the meat, about 15 minutes. (The best way to check this is with a remote probe thermometer.) Using an oven mitt or pot holder, move the pan from the oven to a burner on the stove turned to medium heat, and move the chicken to a serving plate.
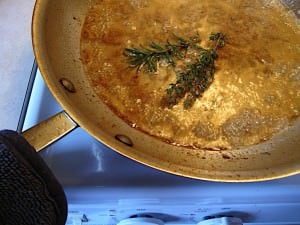
- Make the Sauce: Remember, the handle is still rocket hot! Add the shallot to the pan and sauté for 1 minute, until the shallot is softened. Add the chicken stock and herbs, then turn the heat to high. Scrape the bottom of the pan with a wooden spoon to loosen all the browned bits stuck to the pan, then boil the stock until reduced by half, about 5 minutes. The plate holding the chicken breasts will have some chicken juice on the bottom; add it to the pan. Turn off the heat, remove the herb sprigs, and add the lemon zest and lemon juice. Whisk the butter into the sauce, and add salt and pepper to taste. You want the sauce to be highly seasoned; don't be afraid to add more salt or pepper if it needs it.
- Serve: Spoon a teaspoon of sauce over each breast, then serve, passing the rest of the sauce on the side.
- Prep Time: 10 minutes
- Cook Time: 35 minutes
- Category: Saute
- Cuisine: American
Would you like to save this recipe?
Variations:
*Use bone-in, skin-on chicken pieces instead of just breasts - you can just fit a cut up 4 pound fryer in a 12" skillet. Or, just use chicken thighs, like I did in this recipe: Sear roasted chicken thighs.
*Change up the sauce. Replace the scallion with another aromatic, like garlic or scallions. Replace some of the stock with a liquor, like marsala or sherry. Replace the butter with 2 tablespoons of heavy cream. The variations here are almost endless. If you have a favorite pan sauce, use it here.
*Or, simplify the sauce. The simplest sauce I know is: deglaze the pan with 1 cup chicken stock or water, with some salt and pepper for seasoning. The browned bits in the pan give this simple sauce a surprising depth of flavor.
Notes:
*Don't crowd your pan. If you have a 3 quart saute pan (like I used to), 5 chicken breasts are too many. 4 pieces will have to do. You want a little space between each breast. Otherwise, the chicken will steam instead of browning, and you won't get the wonderful, crispy skin that makes this recipe worthwhile.
*If you want to cook more chicken, double the recipe by using two pans. Or, brown the chicken in two batches, then move it to a roasting pan or rimmed baking sheet, and put that in the oven for the roasting.
What do you think? Questions? Other ideas? Leave them in the comments section below.
Related Posts:
Here's another variation on this technique: Sear roasted chicken thighs with quick lemon pan sauce
Instant Pot Chicken with 40 Cloves of Garlic
Inspired by:
Testing the new 12 inch All-Clad d5 Stainless fry pan
Adapted from:
Pan-Roasted Chicken by Cooks Illustrated [cooksillustrated.com, subscription required]
*Enjoyed this post? Want to help out DadCooksDinner? Subscribe using your RSS reader or by Email, recommend DadCooksDinner to your friends, or buy something from Amazon.com through the links on this site. Thank you!


Teresa says
Tried this yesterday and it was divine!
My husband didn't want me to use all the lemon - used about half of both juice and zest and it still tasted like it had lemon in it.
Thanks!
Mike V says
You're welcome - glad you enjoyed it!
Melissa says
Thank you, I will try that!
Mike V @ DadCooksDinner says
It sounds like the sauce simmered too long, and thickened up too much. Cut back on the simmering - just enough to get the browned bits of chicken loosened, and to thicken up a bit. When I can drag my wooden spoon across the pan and the sauce doesn't immediately fill the pan, it's ready.
Melissa says
My sauce turned out pretty clumpy and not really like a sauce. More like a paste. Any suggestions?
Mike V @ DadCooksDinner says
You're welcome. Glad you liked it!
Missteree says
Thank you for this great technique for cooking chicken breast! Excellent recipe, tips, and suggested alternatives! Kudos!
Mike V @ DadCooksDinner says
I can't believe I forgot the lemon in the ingredients. Fixed.
Annette Stansbury Lowrie says
Other than that? This was the most delicious bone in chicken ever. I highly recommend it.
Annette Stansbury Lowrie says
Lemon?
MikeV @ DadCooksDinner says
@Anonymous:
Yes, that should work - but you don't need to bring it to room temperature. Take it straight from the refrigerator to the oven, and cook until you get 160*F internal in the thickest part of the chicken.
Anonymous says
Hi, can I sear the chicken the day before and bring it to room temp the next day and bake it????
MikeV @ DadCooksDinner says
@Anonymous:
Thank you!
Anonymous says
Awesome walkthrough on how to do this...kudos!
MikeV @ DadCooksDinner says
@AYOTG: Yes, I know - sometimes it's better to be lucky than to be good.
A Year on the Grill says
reviewing cookware... you lucky guy!
i am loving this recipe. You did a terrific job with all the step by step directions.
the sauce is really killer!