This is my basic technique for rotisserie cooking poultry. It produces the best whole birds I've ever cooked. They look gorgeous, and have the best crispy skin I have been able to make. The meat turns out juicy and tender, due to the brining. I've used this technique on chicken, turkey and duck*, and I am going to try it with cornish game hens in the near future.
*Rabbit season! Sorry, had to shout out to Daffy.
Basic Technique: Rotisserie Poultry
[Update 2013-01-24: Here's a video overview of the entire process.]
Video link: Rotisserie Grilling Two Chickens - [YouTube.com]
Equipment:
- Gas or charcoal grill with rotisserie attachment (I'm a Weber fan; my jumbo Weber S-650 gas grill with infrared rotisserie burner is here
 , and my Weber Kettle with rotisserie attachment is this Weber charcoal kettle rotisserie).
 - 9x13 aluminum foil drip pan
- Butcher's twine
Directions:
*Fast brine, for smaller birds (say, up to 5 lb chickens). Dissolve ¼ cup table salt + 2 tablespoon sugar per quart of water in a container large enough to hold your birds. Brine in the refrigerator, covered, for 1-8 hours, about 1 hour per pound of bird. I usually make two quarts of brine for two four pound chickens, and brine them for 4 hours.
*Slow brine, for larger birds (turkey). Dissolve ½ cup table salt + 2 tablespoon sugar per gallon of water. Brine for 8 to 14 hours, about 1 hour per pound of turkey. I usually make two gallons for a 14 pound turkey, and brine for 12 hours. (I use my 12-Quart stock pot![]() as the container when I brine a turkey; a 14lb bird will just fit in it.)
as the container when I brine a turkey; a 14lb bird will just fit in it.)
*Dry brine, [added 5/29/2009]. Use ½ teaspoon kosher salt per pound of bird. Sprinkle evenly over the entire bird. Make sure you get salt on the entire inside of the cavity, and work some under the breast skin by loosening it gently with a finger, then rubbing it in there. (for a 4lb bird, I sprinkle ½ teaspoon on the top, ½ teaspoon on the bottom, ½ teaspoon in the cavity, and then loosen the breast skin and work some salt on the breast. I sprinkle any left over on the top again.) Put the bird on a sheet pan or in a roasting pan, and let it rest in the refrigerator at least overnight. For a chicken, you can do this as early as 6 hours before cooking, and up to 2 days. For a turkey, 1-3 days ahead of time is best.
2. Truss the bird. Drain the poultry, pat dry, stuff the cavity with any aromatics (optional), then truss tightly. See my video, below, for how to truss a bird. This technique works on all birds, not just turkeys. I use a turkey in the video because it is easier to see the technique on a larger bird. (And because it was Thanksgiving.) Trussing is important - if anything is loose and flopping around on the rotisserie, it may wind up in the fire.
*Everyone seems to have their own way of trussing. If you don't like mine, try these: Alton Brown's video is here, and here is one from Chow.com.)
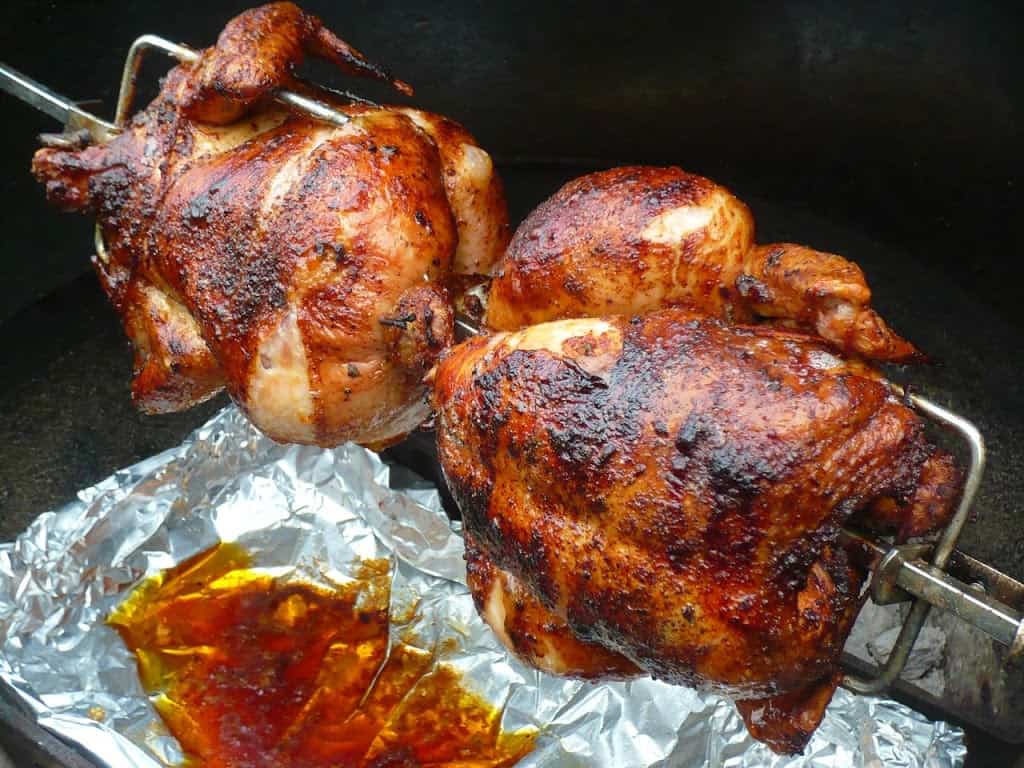
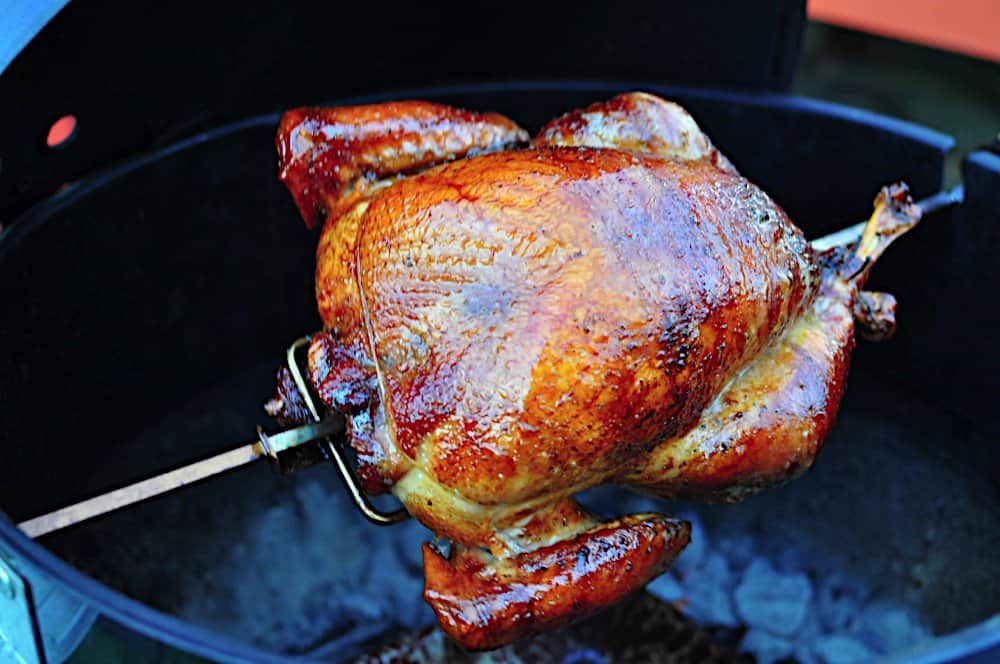
3. Skewer the bird. Put the first fork on the spit, and tighten securely. Then put the poultry on, skewering through the legs first. Spear the legs with the prongs of the fork - you want them to conduct heat into the legs and thighs of the bird. Then, put on the second fork, with the prongs "under" the bird - you want the prongs to be spearing the backbone side of the bird, not in the breast - you want the breast to cook slower. If I'm doing two or more birds, I try to alternate them, like in the picture below - it seems to keep them more balanced. I changed my mind on this - it seems to work better when both birds are facing the same way, nose to butt. If you're cooking two birds with one pair of forks, it holds them together better.

4. Set up your grill. Remove the grates, and attach the rotisserie motor to its bracket, and set the grill up for indirect grilling on high heat.
*For a charcoal grill (like a Weber kettle with a Weber Charcoal Kettle Rotisserie)![]() : light a full chimney of charcoal, wait until it is just covered with ash, and then set up for "indirect" cooking by putting the aluminum drip pan in the middle of the charcoalgrate, and pouring the charcoal in even piles on both sides of the pan. (A fist sized, soaked chunk of smoking wood on the charcoal is good as well.)
: light a full chimney of charcoal, wait until it is just covered with ash, and then set up for "indirect" cooking by putting the aluminum drip pan in the middle of the charcoalgrate, and pouring the charcoal in even piles on both sides of the pan. (A fist sized, soaked chunk of smoking wood on the charcoal is good as well.)
Don't forget the aluminum foil pan in the "indirect" part of the grill; you will get a lot of dripping fat and you need something to catch it. Remember -no grates on the grill for this method - you need the space for the spinning birds.*Special note about setting up a grill for turkey: Because a turkey is so large, you can use directional heat to cook the legs faster than the breast. (This is a good thing, as you'll see below - you want the legs cooked more than the breast.) Try to concentrate the heat around the drumstick end of the turkey. In my charcoal grill, I make a "U" of charcoal on one side of the grill, put the drip pan inside the U, and point the breast towards the open end of the U. For my Weber Summit, I turn my smoker burner and burner 1 to high, leave the infrared rotisserie burner on medium, and leave the rest of the burners off. Then I spit the turkey so the breast is facing burner 6, and the legs are facing the lit burners. (If you don't have the smoker burner, go with burners 1 and 2. If you have a Weber Genesis, with burners that run the length of the grill, you'll have to live with even heat.5. Start cooking: Put the skewer in the mounting bracket, seating the point end in the motor, and turn on the motor. Make sure the bird is spinning freely, then adjust your drip pan to make sure it is under the bird(s). Close the lid - you want to trap the heat in the grill, so it roasts from the trapped heat as well as browns from the direct heat of the flames.
6. Cook the bird. It takes 45 minutes to an hour for a 4 lb chicken, and 2 to 2.5 hours for a 12 pound turkey - adjust the times up or down based on the weight of your bird. Rotisserie cooking tends to be faster than "regular" grill roasting, so start checking if the bird is done at the early end of time frame. I use an instant read thermometer to check for doneness. I'm looking for 155*F to 160*F in the breast, measured at the thickest part of the meat. At that point, the thickest part of the leg should be about 170*F to 180*F, and we're done cooking.
7. Remove and serve. Remove the spit from the grill. Make absolutely sure you are wearing gloves or use oven mitts - the spit will be a branding iron at this point. I get the birds off the skewer as soon as I can, so the hot skewer doesn't keep cooking them. Remember, the knobs on the forks are going to be hot as well! Don't try to turn them without your gloves on, or use pliers or a fork. Let the poultry rest for 15 minutes (at least - 30 would be better), then carve and serve!
Equipment:
I'm a Weber loyalist, so I think these are the best options:
- For best results - use a charcoal grill: Weber Performer 22.5" Kettle with work table with Weber 22.5" Charcoal Kettle Rotisserie
- If you insist on gas, or insist on grilling through a Cleveland winter: Weber Genesis Propane Gas Grill with the Weber Gas Grill Rotisserie
- If you need to intimidate your neighborhood: Weber Summit S-650 Propane Tuck-Away Rotisserie Grill
I've owned all three of these, and #1 and #3 are what I currently own and use. I really prefer to use charcoal for rotisserie cooking. There's something about the results over a live fire that I can't seem to duplicate on a gas grill.
*The Summit 650 is also a monster - it's huge! I've cooked 3 chickens simultaneously, and it felt like I could have squeezed on another one if I needed to.Notes:
*Brining. As I say above, I use the fast brine for everything up to the size of a chicken, and the slow brine for turkey. That being said, you can slow brine chicken (buy 4lbs+ chickens and brine them for 8 hours), and fast brine turkey (12lbs turkey, no more than 8 hours - the concentrated brine might make the bird too salty if you wait longer than that). I've brined chicken for as little as an hour with the fast brine, and had good results, but I prefer the results with 4 hours in the brine. I would brine cornish hens for 1-2 hours, and duck for 1-4 hours.
Click here for my other rotisserie recipes.Inspired by:
Russ Parsons: It's Roasting Outside [LA Times]
Jeffrey Steingarten: It Must've Been Something I Ate: The Return of the Man Who Ate Everything![]() Steven Raichlen: How to Grill: The Complete Illustrated Book of Barbecue Techniques
Steven Raichlen: How to Grill: The Complete Illustrated Book of Barbecue Techniques![]() Cook's Illustrated: The Best Chicken Recipes
Cook's Illustrated: The Best Chicken Recipes![]() , among countless others
, among countless others
 Check out my cookbook, Rotisserie Grilling.Everything you could ask about the rotisserie, Check out my cookbook, Rotisserie Grilling.Everything you could ask about the rotisserie,plus 50 (mostly) new recipes to get you cooking.It's available in paperback and Kindle editions.(You can download the Kindle edition and start reading immediately!) |
*Enjoyed this post? Want to help out DadCooksDinner? Subscribe to DadCooksDinner using the RSS or Email options on the right, link to this post from your blog, recommend DadCooksDinner to your friends, or buy something from Amazon.com![]() through the links on this site. Thank you.
through the links on this site. Thank you.
Esther D says
Hi Mike,
Just purchased a summit s670 and I can't seem to get the rotisserie to work properly. The square part of the spit rod which is next to the pointy part of the spit rod is wider than the area of the motor where you stick it in, and it doesn't go all the way in. I think that is why after trying 2 weeks in a row I am still having trouble.
I am able to get it to do a few rotations but then it stops. It seems like when it stops the heavier part stays on the bottom and because of the bad contact of the spit rod to the motor there is not enough strength to make a full turn. But if that was the case why was it able to initially make a few rotations then stop? Both times I used 2 chickens and tied them the best I could. Week 2 I did a better job tying them but still no luck. In the Weber owners manual it also says that one fork screw should face up and the other should face down, so that's what I did both times. (I see you have the fork screws in the same direction).
I really think it all has to do with the fact that the spit rod is not making a tight connection with the motor. I called Weber a few times regarding the spit rod but they do not seem to be well versed on this. They are just reading from the manual like me and they can't tell me anything about the fitting of the rod into the motor.
Hope you can help... thank you!
Mike V says
Esther, it sounds like you have a problem with either your motor or your rod being the wrong size. My spit rod easily slides into the motor - at least a few inches in. I would call Weber and see if they can send you a replace embrace motor to see if that's the problem?
Esther D says
Hey Mike, I took your advice and called Weber. This time I spoke to a supervisor. They sent me a new motor and new rod to make sure that the fit and function was ok. So in the end my rod was the defective part and now I have an extra motor! I will be cooking 2 chickens on the rotisserie tonight. Will let you know how it goes. Thanks!
Gene Stevens says
MIke, rotisseried chicken turned out great, but I could not fit a drip pan underneath it even with grate removed. This was a 7lb. bird fully trussed. The grill is Weber Genesis 330. Is there a problem with removing the flavorizer bars as well to create more space, and do you even need a drip pan? I was disappointed because I had filled the drip pan with stuffing.
Thanks for any comments!
Mike V says
Take the flavorizer bars out - I have to do that all the time when I use the Weber Genesis at my Dad's house.
Greybeard says
Great, clear directions. I'm just getting the hang of my Summit 670 (had it about a month).
I made this recipe:
http://www.onceuponachef.com/2013/01/peruvian-style-roast-chicken-with-green-sauce.html
and it was delicious, BUT the chicken skin didn't get at all crispy. Any idea why? Any tips to make it mo' betta crispy?
Phil says
That looks awesome man! It's been a while since I used my grill for rotisserie. It makes me wanna go buy a chicken and grill right away. But I can probably do that till end of the week. Got some bottle of beers with that and that's just too awesome.
Mike V @ DadCooksDinner says
I do, for most chicken recipes. But..some brown quicker, especially if they have sugar in the brine or marinade. I check the chicken after 30 minutes and 45 minutes, and if the skin is browning too much, I turn off the rotisserie burner and let the chicken finish in the heat of the other burners.
Greg Gabbitas says
I just got an S-670 and trying this out. Do you really leave the rotisserie burner on high for the whole cook? After 20 minutes or so the skin looked pretty cooked!
Mike V @ DadCooksDinner says
Read the book - I cover this in detail in there.
The quick version: I wear welding gloves to protect my hands, and use a set of tongs to loosen the spits. Then I push everything off the spit, and set the spit so the point and handle are resting on oven mitts. The spit cools down enough to handle relatively quickly.
Chris Lukowski says
Hurray, Santa delivered on the rotisserie and your book! I can't wait to try it out, but there's one more procedural thing I'm wondering about before I light up the grill. How exactly do you deal with the meat removal from the blazing hot spit? It seems like a simple matter, but the logistics of carrying a screaming hot branding iron with a fat dripping piece of meat sideways and into a kitchen full of people ("MAKE WAY, HOT SPIT!!") and limited counter space seem to indicate there are smart ways of dealing with it and some not-so-bright ways. Any suggestions will be appreciated, as well as any pointers on how to clean and store the thing once it cools down (can it be left outside without rusting, etc).
Mike V @ DadCooksDinner says
I don't have any personal experience with the new model Genesis, but it should work fine.
I've had reports from a number of new-model Genesis owners this year who cooked their turkey on the rotisserie.
Go by temperature for the grill instead of burner setup - 450*F internal for high, 350*F for medium.
Chris Lukowski says
Are there any adjustments that have to be made for your rotisserie recipes depending on the equipment, or do your 3 setup configs give off roughly the same amount of heat? I have a 2011 model Genesis (burners perpendicular to spit) and I'm going to ask Santa for its spinner.
Mike V @ DadCooksDinner says
Thank you!
Michael Brigham says
Great site! I'l be back
MikeV @ DadCooksDinner says
@Pablo in TX:
Good luck! Let us know how it goes...
Pablo in Texas says
Thanks! Getting ready to use my rotisserie on my webber for the 1st time! Leg of lamb, wish me luck...
Anonymous says
thanks.