Here's my next step into the cast iron wars:
You can wash your cast iron pan with dish soap.
I know, I know, all of the cast iron zealots are rending their garments, shouting "Blasphemer!". Really, it's OK. Soap won't ruin your seasoning. This is another tip passed down from Grandma that was correct back in the day, but is no longer true.1 Nowadays, dish soaps are milder, and are safe to use to clean a pan - which is good news when you're trying to get sausage gravy out of your fry pan. Sometimes a little soap goes a long way.
Now that I've unleashed he…um, opened the floodgates, here is how I clean cast iron:
1. Scrape
When I'm done cooking, I scrape the pan with my flat edged metal spatula, trying to work any stuck bits of food loose. Then I leave the pan on the stove to cool down. Once dinner is over I check the pan; if anything is stuck to the surface, I scrape it again with my spatula. For a surprising amount of food, this gets most of the gunk removed and ready to brush away with the next step…
2. Rinse and Scrub (maybe with…dish soap….dun dun DUNNNNN)
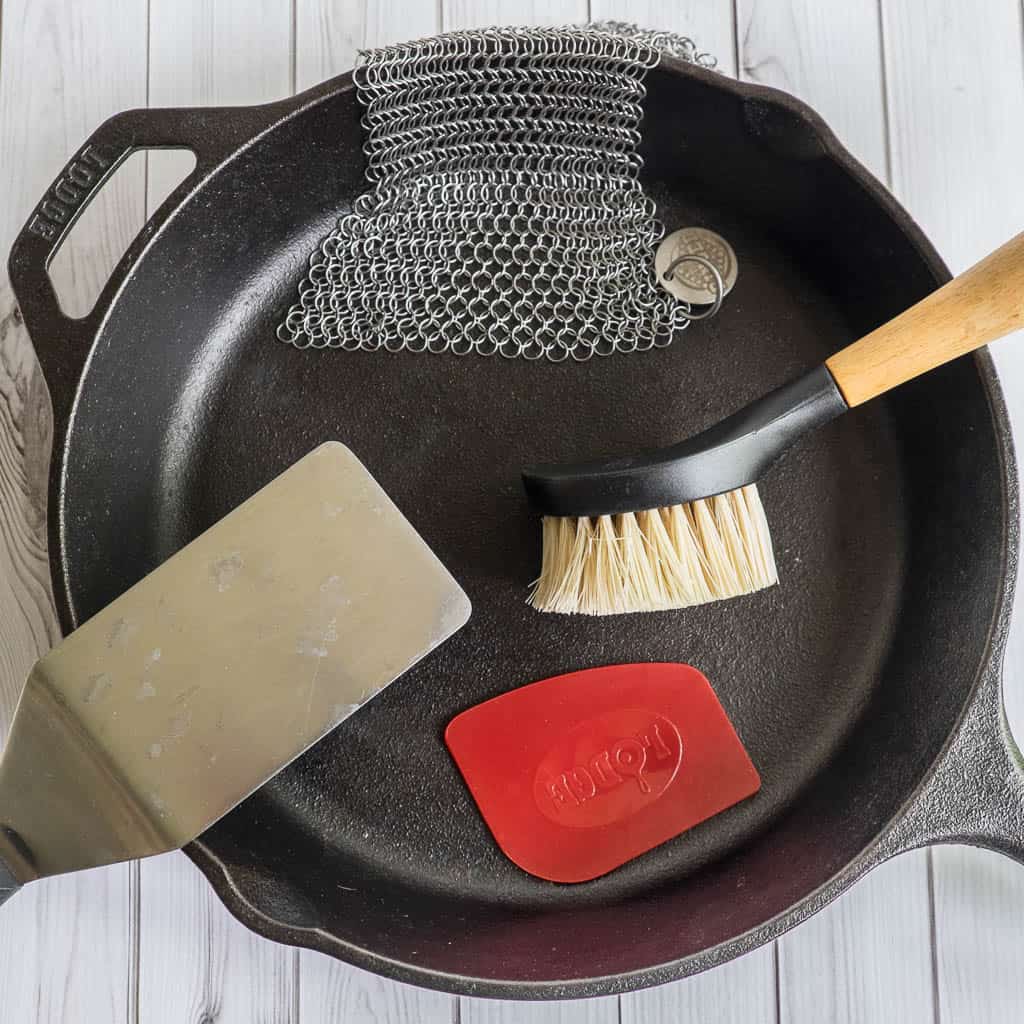
This is where the rubber meets the road…um, I mean, the bristles meet the iron. I run hot water from my faucet, and scrub the inside of the pan out with a stiff-bristled brush (like this one from Lodge). If that's not enough to get the pan clean, I add a couple of drops of liquid dish soap and scrub harder. (Especially if there are any sticky spots in the coating; sticky means the oil has not bonded with the pan, and it needs to be cleaned off.). Brushing usually finishes the job, but sometimes I have to bring out the big guns…
3. Scrape (again)
When my cast iron is really messy, even the brush can't get everything. That's where I turn to my two secret weapons:
The plastic scraper is good for working stuck-on pieces of carbonized food loose from the pan; the chain mail scrubbie is good when the whole pan is covered with stuck-on piece of carbon. 2 After scraping, I go over the pan again with the stiff bristled brush. At this point, the pan should be clean.
4. Dry
Never, ever put a cast iron pan away wet. I wipe the pan down with a paper towel, then set it on the stove, turn the burner to medium, and let the pan heat up for five minutes to boil away any water.
5. Season
If the pan looks good, with a bright, shiny, black coating, then I'm done. I let it cool down on the stove top, and then put it away with my other cast iron.
If the pan's seasoning doesn't look right - If I see silver bumps showing through, or the seasoning looks dry, thin, or scraped off in sections - then I run the pan through another seasoning cycle. Wipe it with a thin coat of oil, buff the oil until the pan looks dry, put the pan in a 500°F oven for one hour, and let the pan cool in the oven. (See my seasoning cast iron post for more details.) Then I make sure to use the pan a lot for the next couple of weeks to build the seasoning back up.
Done!
That's it. I know it looks like a lot of work. 3 But, I usually don't have to go through all this. Once the pan has a good base of seasoning built up, cleanup only needs Steps 1 and 2 (scrape when done cooking, brush with hot water) and Step 4 (dry). That is, unless I cook something sticky, like sausage gravy or a pan sauce. Then I'm going to need to go through all the steps above to get the pan clean.
What do you think?
Cast iron questions? Any other cast iron topics I should cover? Anything I left out? Impassioned speeches about the evils of soap on cast iron? Talk about it in the comments section, below.
Related Posts
Cast Iron Cooking series:
- Why Cast Iron?
- The 12 Inch Cast Iron Skillet
- Seasoning Cast Iron
- Cleaning Cast Iron [This Post]
- Heating Cast Iron [Coming Soon]
- Cast Iron's Best Friend - the Flat Edged Metal Spatula [Coming Soon]
- Other Cast Iron Accessories [Coming Soon]
- Stripping Cast Iron [Coming Soon]
- Cast Iron Recipes
Enjoyed this post? Want to help out DadCooksDinner? Subscribe to DadCooksDinner via eMail or RSS reader, recommend DadCooksDinner to your friends, and buy something from Amazon.com through the links on this site. Thank you.

Rev says
I've found salt works extremely well. Drain off the excess grease, then I pour about a half cup of salt into the pan, and scrub with a paper towel being held with tongs. The salt works great without really sticking or changing the seasoning any, although some spots may require fresh salt. Then just dump it in the garbage, quick rinse under hot water, and good to go.
Should note, I do this while my meal is resting. If the pan cools off first, set it on a low burner for a few minutes to warm up again.