
Instant Pot Kimchi Deviled Eggs. Deviled eggs with Korean flavors from Kimchi and Gochujang, with the eggs cooked using the Instant Pot 5-5-5 method.

Would you like to save this recipe?
Jump to:
Why Instant Pot Deviled Eggs?
I have a lot of Instant Pot deviled egg recipes, all because Instant Pot Eggs are so easy to make with the 5-5-5 hard-cooked eggs technique. Deviled eggs are now my go-to "bring to the party" appetizer and side dish. Ask me to bring something, and it's probably going to be deviled eggs.
Can I hard-boil the eggs without an Instant Pot?
Of course! Use your favorite method to hard-boil eggs. If I don't have my Instant Pot, I use Kenji Alt's recommended hard-boiling method - boil water, then add the eggs and cook for 11 minutes. Immediately put in an ice bath to chill.
Does pressure cooking make eggs easier to peel?
I've read all sorts of ideas for making eggs easy to peel. Pressure cooking them in the Instant Pot seems to help - it's not perfect, but the eggs are relatively easy to peel, and I don't lose much egg white to sticking to the shells. From my understanding of the food science, the best thing you can do is use older eggs - they lose a little moisture, shrinking the egg in the shell, which makes it easier to peel. (I try to use eggs that are close to their sell-by date, without going over.) Older eggs plus pressure cooking work well for me.
Ingredient notes and substitutions
The two key flavors in these eggs are Kimchi and Gochujang:
- Kimchi is Korean fermented cabbage, and is usually quite spicy. It is also chunkier than you want for these deviled eggs; I mince a few tablespoons' worth on my cutting board, and then slice some of the remaining pieces into slivers to put on top of the eggs. Kimchi doesn't have a good substitute; sauerkraut is close, but the flavor profile is wrong. Seek out Kimchi for this recipe.
- Gochujang is Korean pepper paste, like a thick, spicy ketchup. It's getting easier to find in local grocery stores. You won't need much for this recipe, but that's OK - it is a very versatile ingredient. Try the extra paste in my Grilled Gochujang Shrimp Skewers, Instant Pot Gochujang Chicken Wings, or Grilled Gochujang-Glazed Ham. Again, there is not a good substitute for gochujang; seek it out for this recipe.
- Kewpie mayo is Japanese mayonnaise, and is a little sweeter and richer than our mayonnaise. The difference is very subtle, though; if you can't find Kewpie mayo, any mayo substitute is fine.
How to make Instant Pot Kimchi Deviled Eggs in pictures
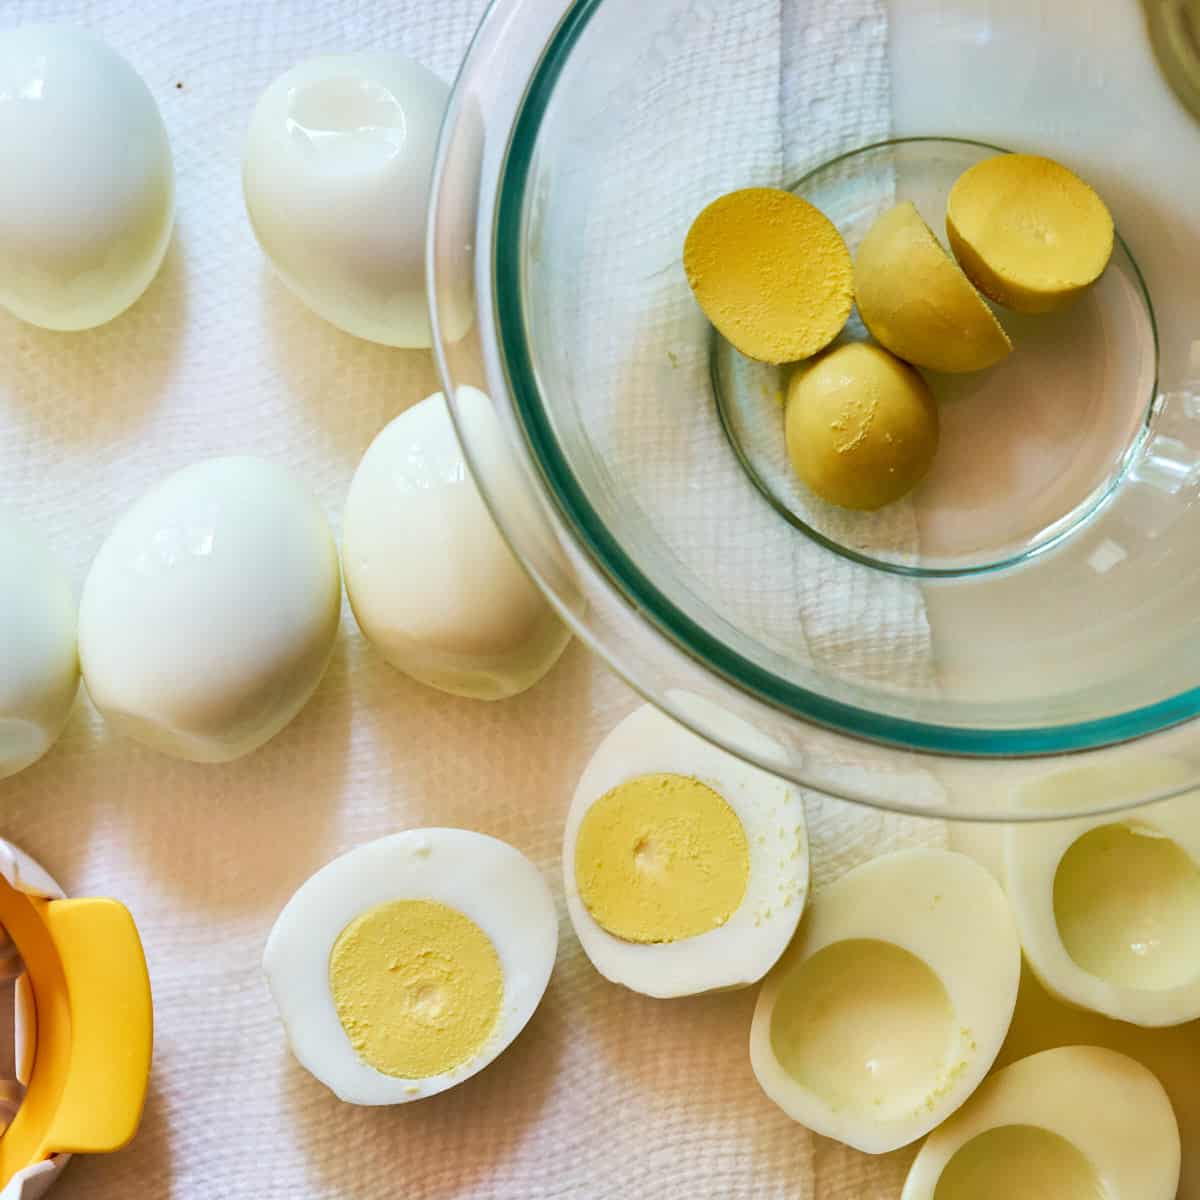
Hard Boil, peel, and halve the eggs, scooping the yolks into a bowl
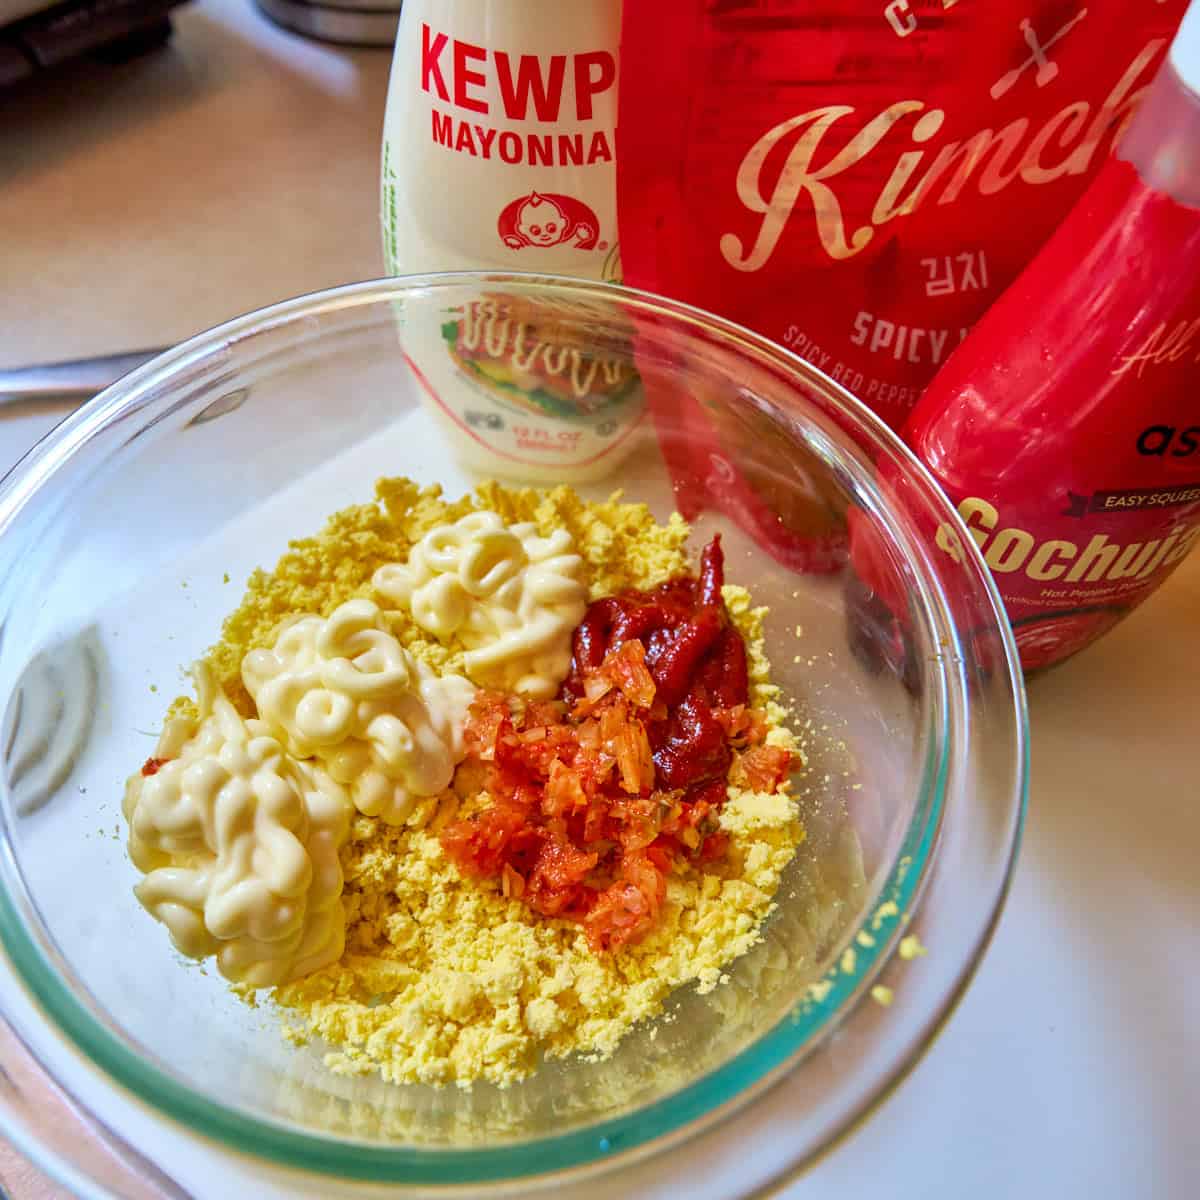
Mash the yolks, then mix in the other ingredients

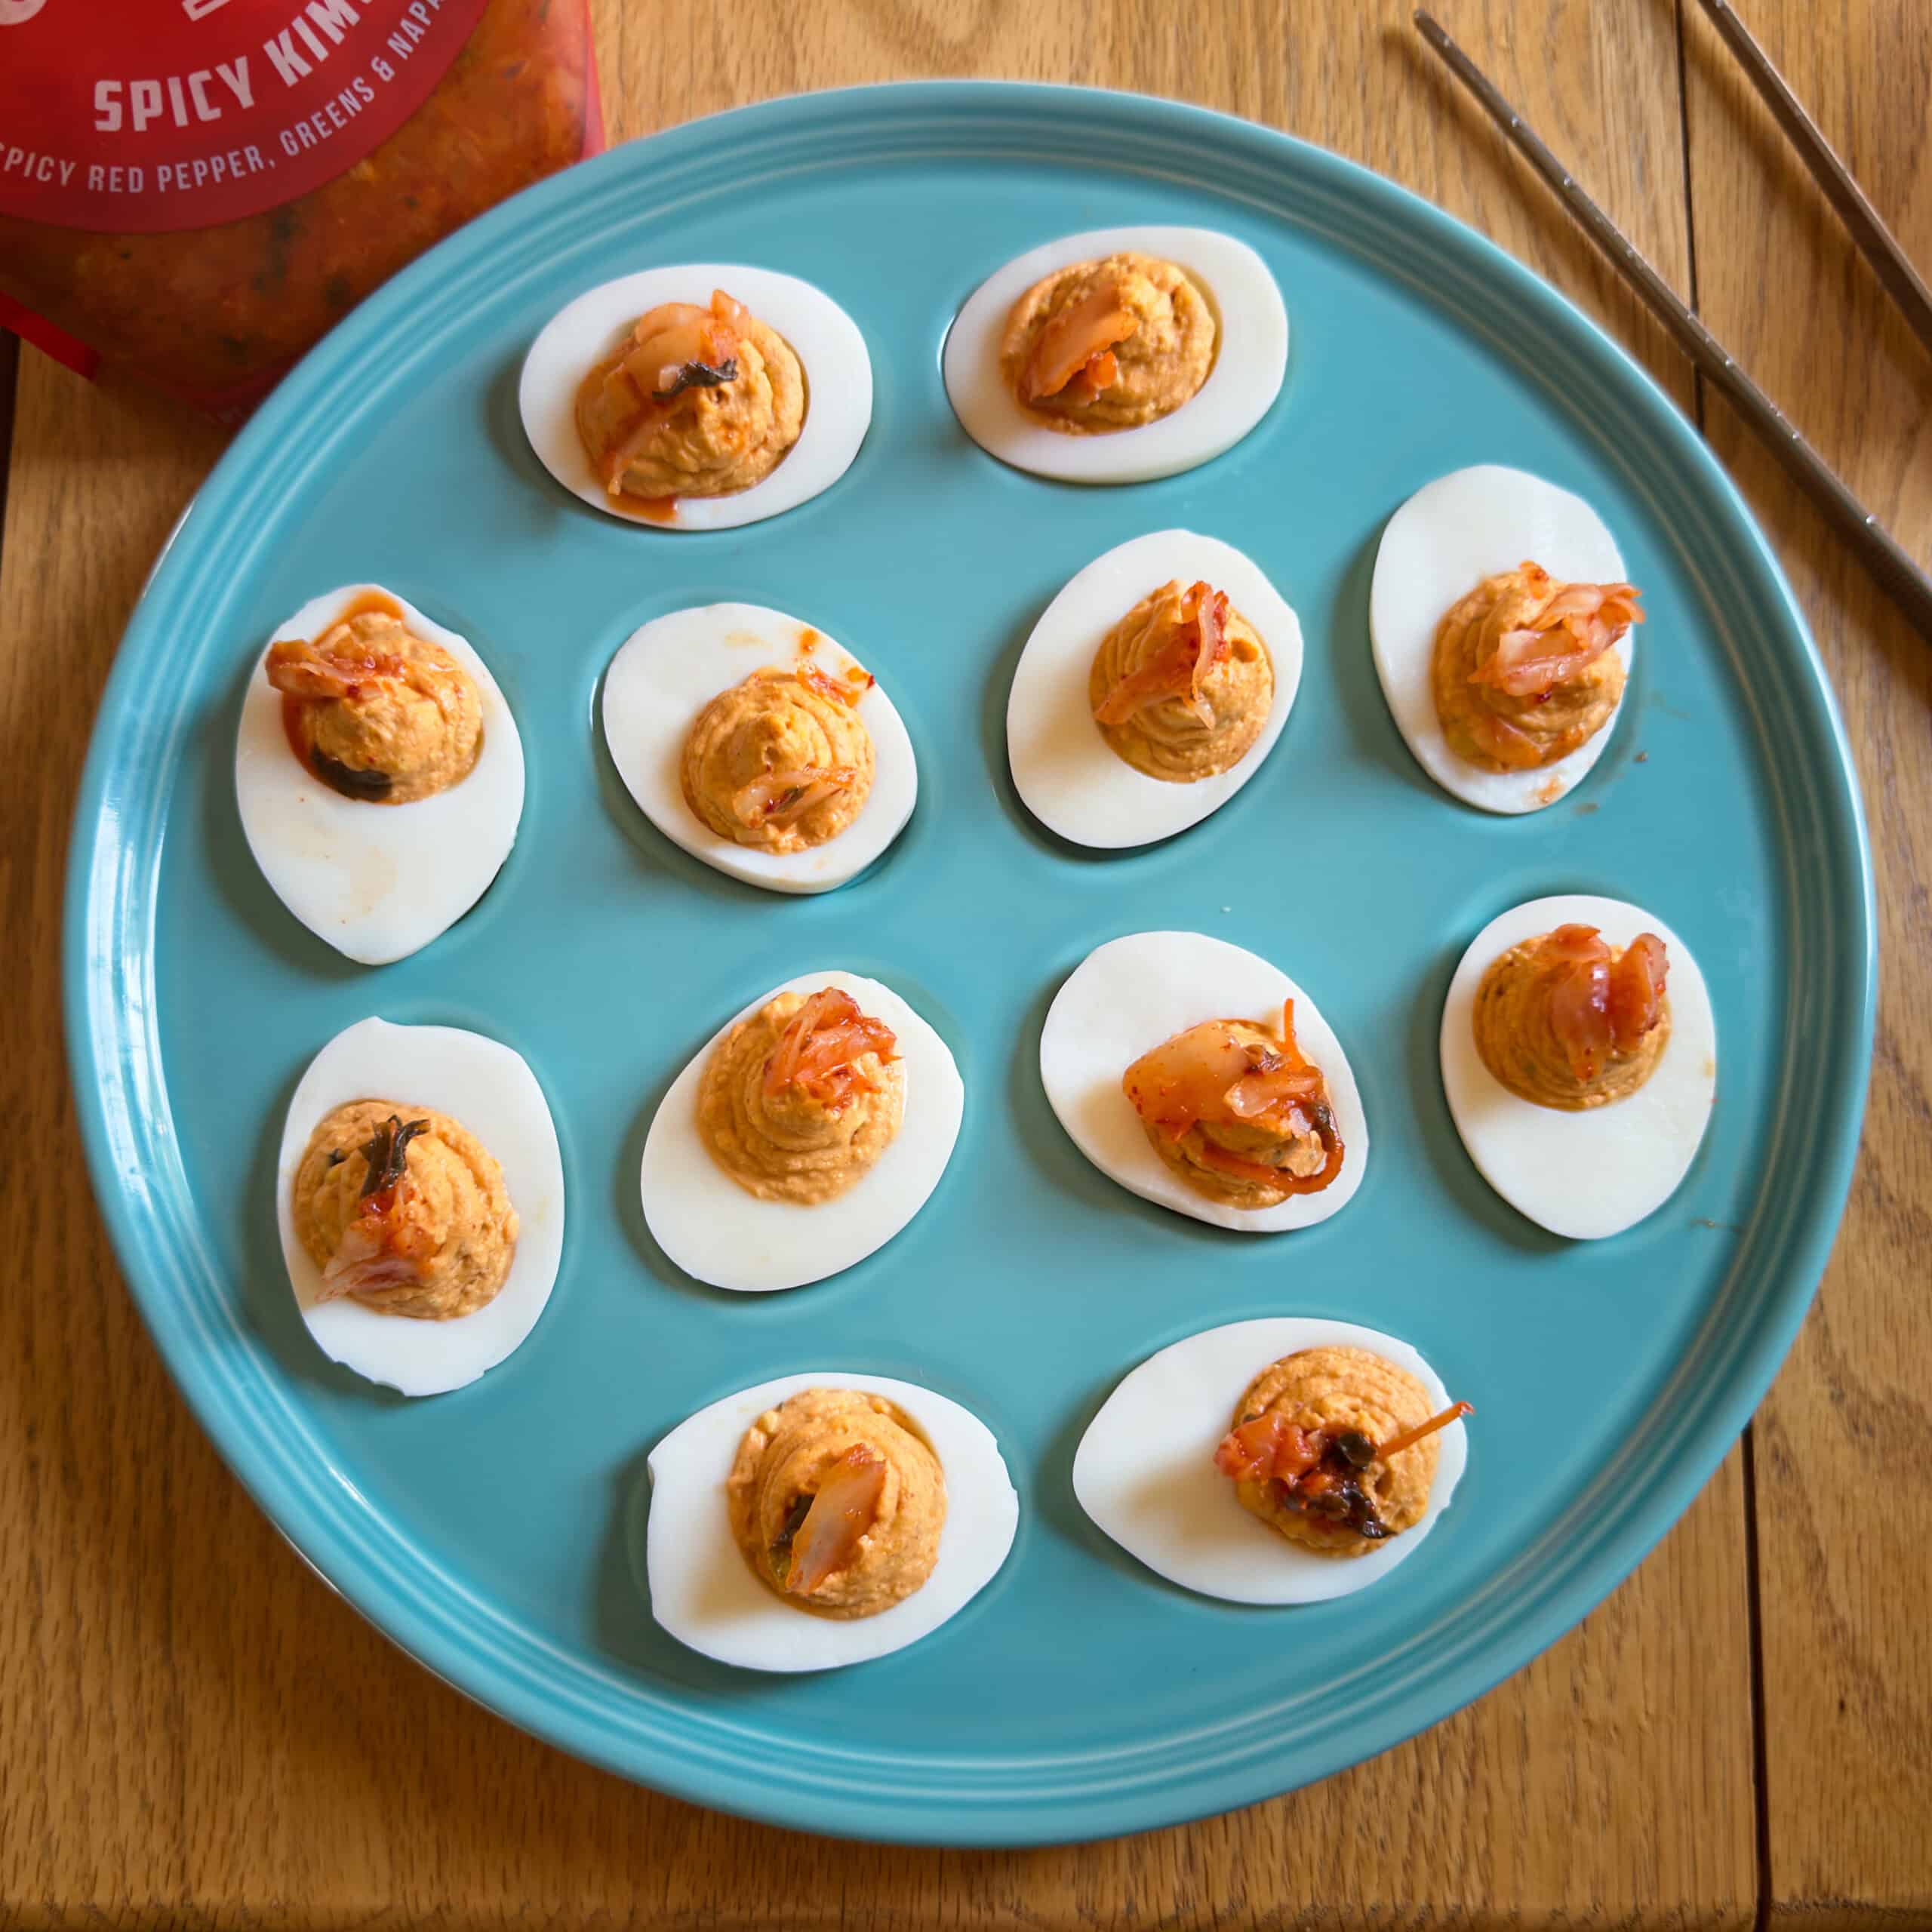
Pipe the filling into the eggs and top with sliced Kimchi
INGREDIENTS
- 6 large eggs
- 3 tablespoons Kewpie mayonnaise (or regular mayo)
- 1 tablespoon Gochujang paste
- 1 tablespoon finely minced Kimchi
- Kimchi, sliced thin, for garnish
- Sliced chives or green onions, for garnish (optional)
INSTRUCTIONS
- Hard boil the eggs (Instant Pot 5-5-5 eggs): Pour 1 cup of water into an Instant Pot or another pressure cooker. Put a vegetable steaming basket, rack, or silicone baking sling in the pot, and set 6 large eggs in the basket. Lock the lid and pressure cook on high pressure for 5 minutes ("Manual" or Pressure Cook mode on the Instant Pot). Once the pressure cooking time is over, let the pressure come down naturally for 5 minutes to finish cooking, then quick-release any remaining pressure. Immediately move the eggs to an ice water bath to chill down for at least 5 minutes. (Detailed instructions here: Instant Pot Hard Boiled Eggs).
- Mince the ingredients: While the eggs are chilling in the ice bath, mince the kimchi.
- Separate the yolks and mash the filling: Peel the hard-boiled eggs. Slice the peeled eggs in half lengthwise and gently remove the yolks to a bowl. (Set the whites aside on a plate, cut side up.) Break up the yolks with a fork until they are crumbled. Add the mayonnaise, Gochujang paste, and a tablespoon of the minced Kimchi to the bowl. Stir and mash with the fork until thoroughly combined and most of the lumps of egg are gone. At this point, the egg halves and filling can be covered and refrigerated for up to a day.
- Pipe the filling into the eggs, garnish, and serve: Scoop the filling into a pastry bag with a large tip, or a quart-sized zip-top bag with a flat edge. (The new "stands on its own" bags are not good for this.) Twist from the top of the bag to force all the filling down, then snip off ¼ inch of that corner of the bag. Squeeze the bag to pipe the filling into an egg half, making a heaping mound of filling. Repeat until all the egg halves are filled. (Any leftover filling is a chef's treat.) Top each egg with a few slivers of sliced Kimchi (and an optional slice of chive or green onion.). Serve and enjoy!

Instant Pot Kimchi Deviled Eggs Recipe
- Total Time: 40 minutes
- Yield: 12 deviled eggs 1x
Description
Instant Pot Kimchi Deviled Eggs. Deviled eggs with Korean flavors from Kimchi and Gochujang, with the eggs cooked using the Instant Pot 5-5-5 method.
Ingredients
- 6 large eggs
- 3 tablespoons Kewpie mayonnaise (or regular mayo)
- 1 tablespoon Gochujang paste
- 1 tablespoon finely minced Kimchi
- Kimchi, sliced thin, for garnish
- Sliced chives or green onions, for garnish (optional)
Instructions
- Hard boil the eggs (Instant Pot 5-5-5 eggs): Pour 1 cup of water into an Instant Pot or another pressure cooker. Put a vegetable steaming basket, rack, or silicone baking sling in the pot, and set 6 large eggs in the basket. Lock the lid and pressure cook on high pressure for 5 minutes ("Manual" or Pressure Cook mode on the Instant Pot). Once the pressure cooking time is over, let the pressure come down naturally for 5 minutes to finish cooking, then quick-release any remaining pressure. Immediately move the eggs to an ice water bath to chill down for at least 5 minutes. (Detailed instructions here: Instant Pot Hard Boiled Eggs).
- Mince the ingredients: While the eggs are chilling in the ice bath, mince the kimchi.
- Separate the yolks and mash the filling: Peel the hard-boiled eggs. Slice the peeled eggs in half lengthwise and gently remove the yolks to a bowl. (Set the whites aside on a plate, cut side up.) Break up the yolks with a fork until they are crumbled. Add the mayonnaise, Gochujang paste, and a tablespoon of the minced Kimchi to the bowl. Stir and mash with the fork until thoroughly combined and most of the lumps of egg are gone. At this point, the egg halves and filling can be covered and refrigerated for up to a day.
- Pipe the filling into the eggs, garnish, and serve: Scoop the filling into a pastry bag with a large tip, or a quart-sized zip-top bag with a flat edge. (The new "stands on its own" bags are not good for this.) Twist from the top of the bag to force all the filling down, then snip off ¼ inch of that corner of the bag. Squeeze the bag to pipe the filling into an egg half, making a heaping mound of filling. Repeat until all the egg halves are filled. (Any leftover filling is a chef's treat.) Top each egg with a few slivers of sliced Kimchi (and an optional slice of chive or green onion.). Serve and enjoy!

- Prep Time: 20 minutes
- Cook Time: 20 minutes
- Category: Side dish
- Method: Pressure Cooker
- Cuisine: Korean
Would you like to save this recipe?
Nutrition
- Serving Size: 1 egg
- Calories: 59
- Sugar: 0.4 g
- Sodium: 92.4 mg
- Fat: 5 g
- Carbohydrates: 0.2 g
- Fiber: 0 g
- Protein: 3.2 g
- Cholesterol: 94.4 mg
Related Posts
As I mentioned above, this recipe depends on the Instant Pot Hard-Boiled Eggs technique, my favorite way to make hard-boiled eggs. I usually hard boil a dozen eggs and make two types of deviled eggs; one would be this recipe, and another would be my Traditional Deviled Eggs, or Instant Pot Wasabi Deviled Eggs, or (if you're a Green Eggs and Ham fan) my Instant Pot Pesto Deviled Eggs. If you're looking for some heat, try my Instant Pot Cajun Deviled Eggs.
To see the rest of my deviled egg recipes, check out my Instant Pot Deviled Eggs Recipes, or see my complete list of Instant Pot and Pressure Cooker Recipes.
Enjoyed this post? Want to help out DadCooksDinner? Subscribe to DadCooksDinner via email and share this post with your friends. Want to contribute directly? Donate to my Tip Jar, or buy something from Amazon.com through the links on this site. Thank you.


Mike Vrobel says
Want an extra-spicy deviled egg? Try this recipe!