
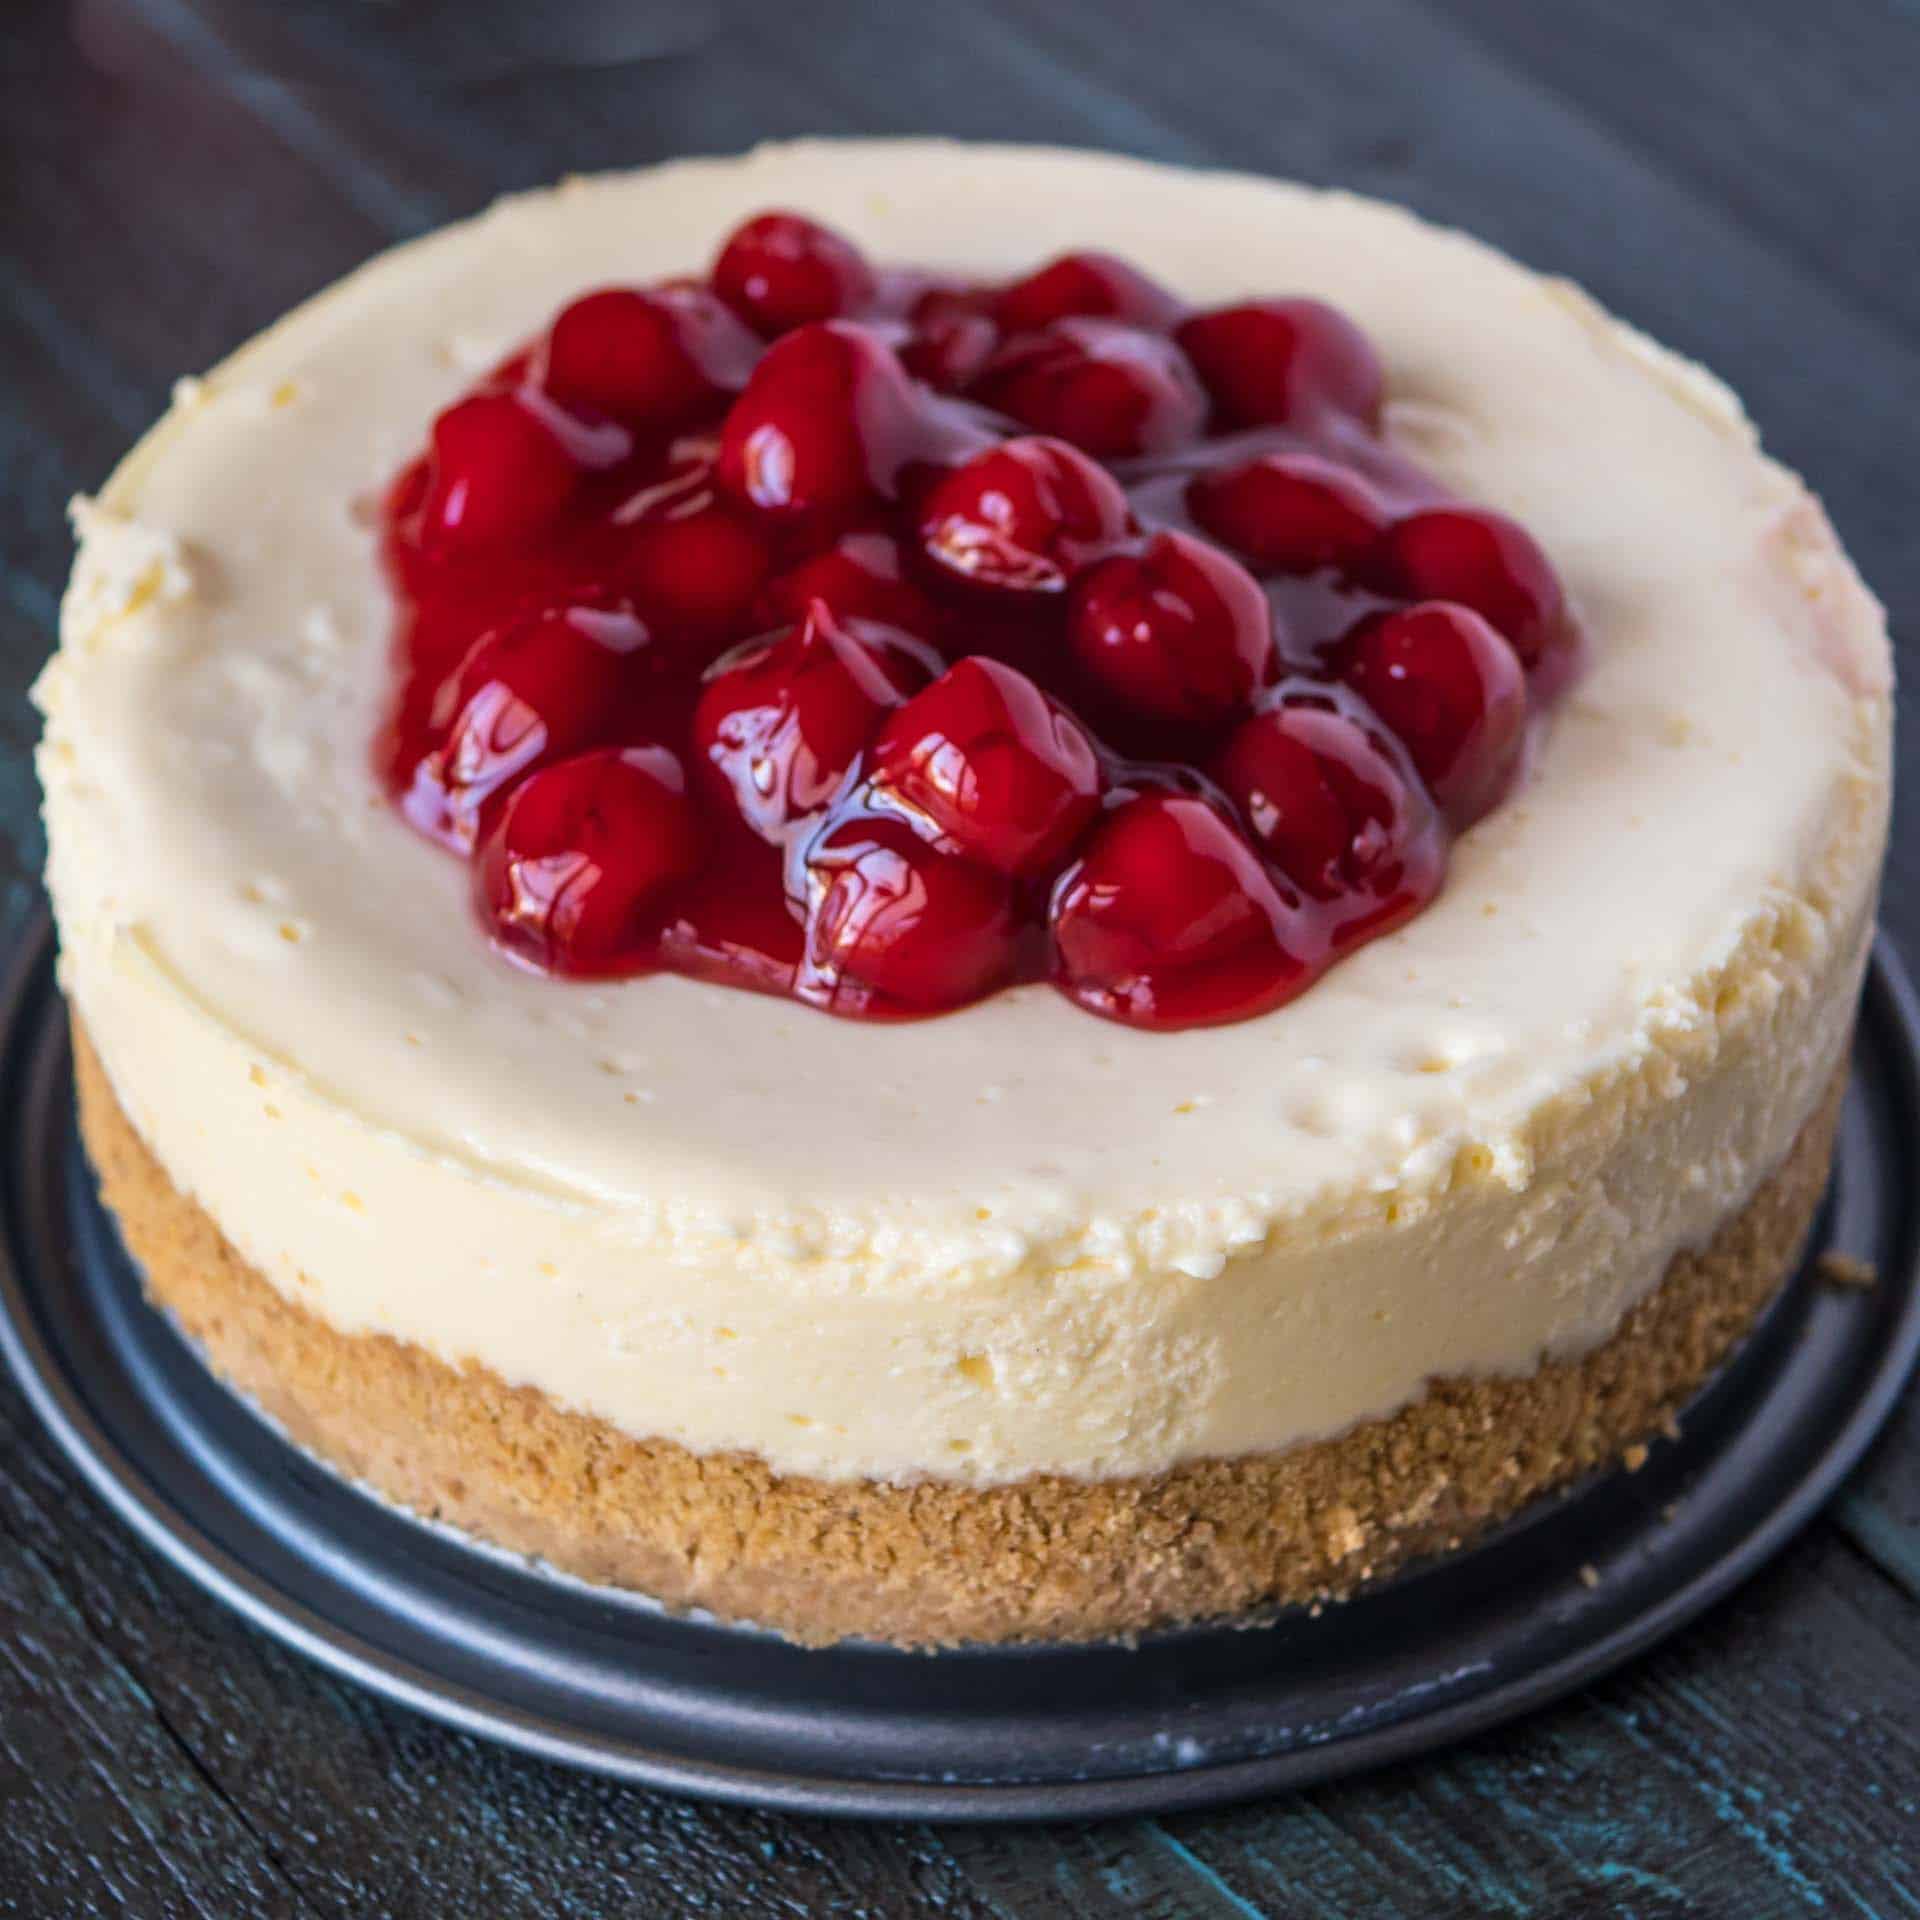
Instant Pot New York Cheesecake. Yes, you can make cheesecake in the Instant Pot. Yes, it's fantastic.
Pressure cooker cheesecake was a bridge too far. I mean…who in their right mind would bother to make a cheesecake in a pressure cooker?
(Looks embarrassed, hesitates, then slowly raises hand)
Would you like to save this recipe?
Jump to:
- Ingredients
- How to Make Instant Pot New York Cheesecake
- Serving Suggestions
- Storing Leftovers
- Can I freeze a New York cheesecake made in the Instant Pot?
- Equipment
- Should You Use a Push Pan or a Springform Pan?
- Tips and Tricks
- Instant Pot New York Cheesecake - Recipe
- What do you think?
- Related Posts
- 💬 Comments
I resisted this idea for a long time, but the pressure cooker does a fantastic job with cheesecake. You know how you're supposed to cook a cheesecake in a water bath? The pressure cooker does the same thing, pressure steaming the cheesecake, resulting in evenly cooked cheesecake. No cracks, no overdone edges - perfectly creamy cheesecake. The best cheesecakes I've ever made.
Pressure cooker cheesecake is hard to mess up. (And, even when I messed up, everyone gobbled down the "failures".) Pressure cooking steams the cheesecake at 240°F to 250°F, a much lower temperature than you get in an oven, so it is difficult to overcook. My most consistent results were at 35 minutes under pressure; they never overcooked, and came out creamy and smooth all the way through.
Want to impress your guests with something completely out of left field from the pressure cooker? Make a cheesecake.
Ingredients
Crust
- ¾ cup graham cracker crumbs (4 whole graham crackers, crushed)
- 2 tablespoons melted butter
Cheesecake
- 1 pound regular cream cheese, softened (2 8-ounce packages)
- ⅔ cup sugar
- 2 teaspoons corn starch
- 2 large eggs
- ½ teaspoon vanilla extract
- ¼ cup sour cream
Topping
- Cherry Pie Filling (optional)
How to Make Instant Pot New York Cheesecake
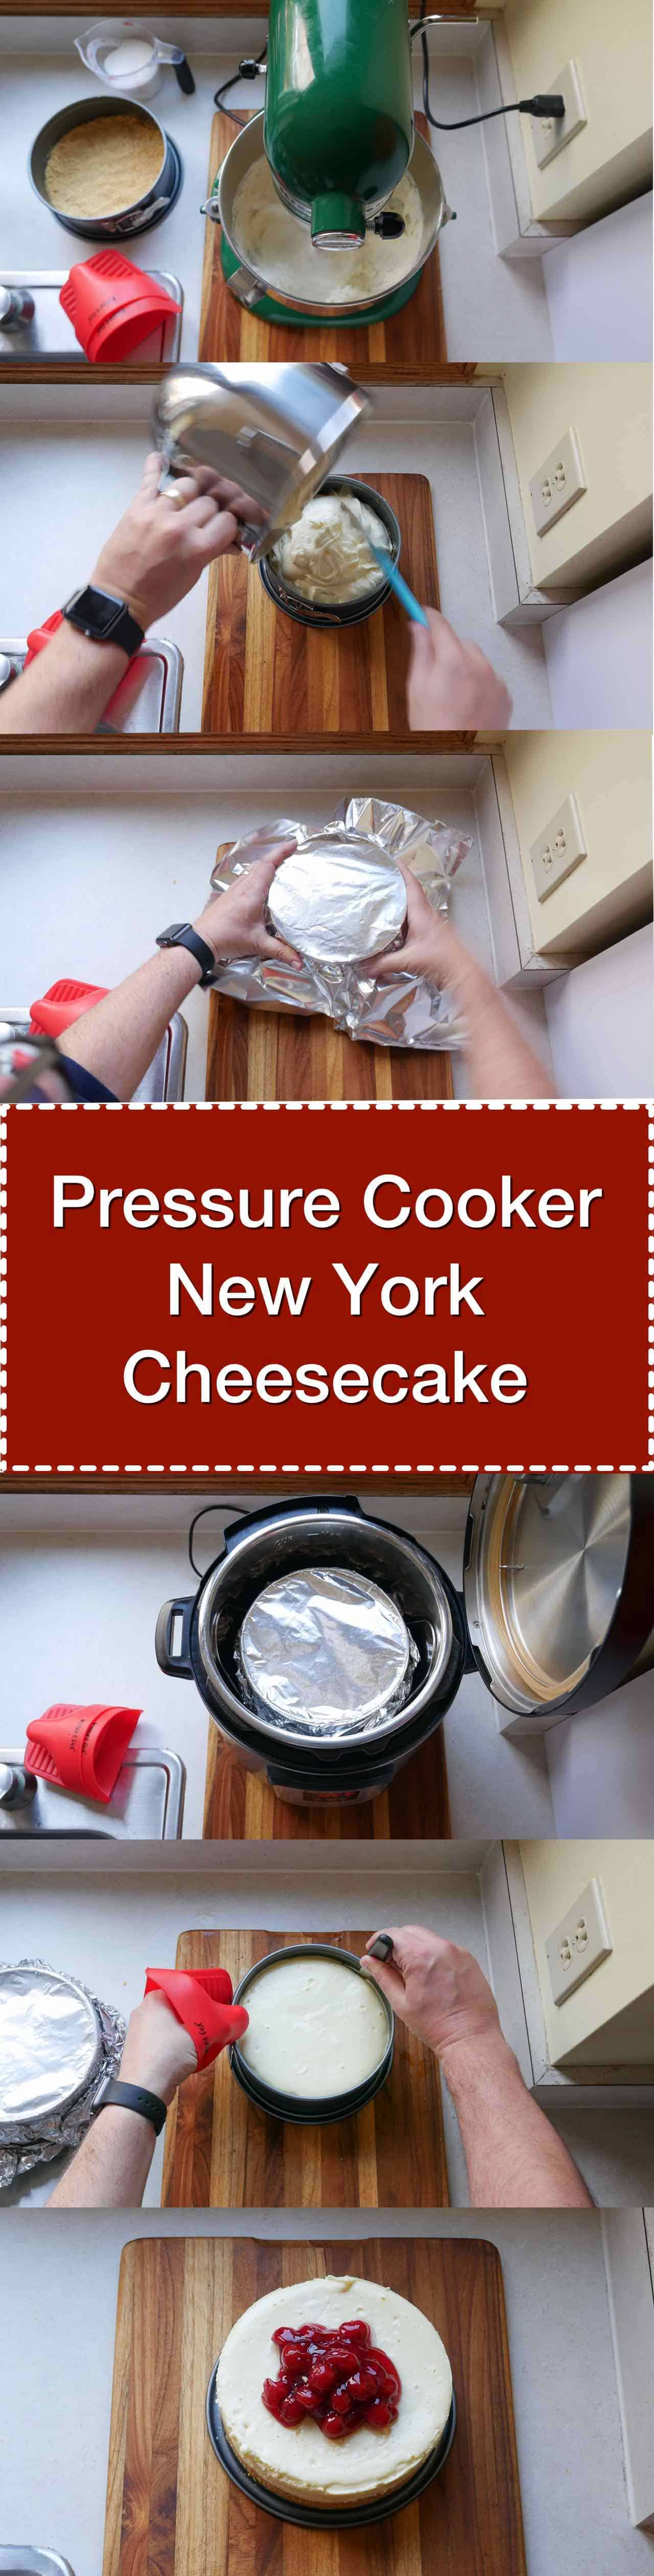
Prep the pan
Spray the 7-inch cheesecake pan with nonstick cooking spray. Mix the graham cracker crumbs and melted butter, then spread the crust mixture evenly across the bottom of the pan. Pack the graham cracker crust down, pushing it up the sides of the pan a little.
Make the cheesecake filling
Soften the cream cheese by leaving it out at room temperature for at least 1 hour (or heat it in the microwave for 20 to 30 seconds, until it is softened). Beat the cream cheese in an electric mixer on medium speed until smooth, about 1 minute. Mix the sugar and corn starch together, then slowly add to the mixing bowl, beating on medium speed until the sugar is completely blended, about 3 minutes. Add the eggs one at a time, beating on low speed until just blended. Stir in the vanilla and sour cream by hand. Pour the cream cheese mixture into the cheesecake pan, then tap the pan on the countertop for about 30 seconds to get rid of air bubbles.
Pressure cook the cheesecake for 20 minutes with a Natural Release
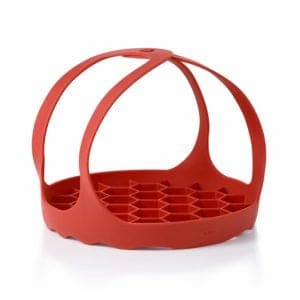
Put the cooking rack or baking sling in an Instant Pot or other pressure cooker, then pour in 1 cup of water. If your rack does not have handles, make an aluminum foil sling to lift the cheesecake: fold a 2-foot long piece of aluminum foil over a few times, until it is a long strip about 4 inches wide. Center the cheesecake pan on the sling and carefully lower it into the pot, setting it on the rack. Lock the lid on the cooker and pressure cook on high for 20 minutes in an Instant Pot or other electric PC ("Manual" or "Pressure Cook" mode in an Instant Pot), or for 16 minutes in a stovetop PC. Then let the pressure come down naturally, about 20 more minutes. (If you're in a hurry, you can quick release any pressure left in the pot after 20 minutes.)
Cool the cheesecake, then serve
Lift the cheesecake out of the pressure cooker. Immediately run a knife around the rim of the cheesecake pan to loosen the cheesecake from the sides. Cool the pan at room temperature for an hour, then refrigerate for at least 4 hours, preferably overnight. Top with the cherry pie filling and serve.
Serving Suggestions
For small dessert servings, I slice the cheesecake into 8 pieces, top with the cherries, and serve. If you have hearty eaters, you can cut the cheesecake into 6 slices. Or, make another cheesecake so people can mix and match different flavors. (See my other cheesecake recipes here: Instant Pot Cheesecake Roundup.
I love cherry on cheesecake, but you can choose your own favorite fruit filling to top your cheesecake. Strawberry an blueberry filling are two of my other favorites.
Storing Leftovers
Cheesecake keeps well in the refrigerator. According to the USDA, cheesecake will keep in the refrigerator for 5 to 7 days. [Source: USDA FMA Data Spreadsheet]
Can I freeze a New York cheesecake made in the Instant Pot?
Absolutely! Wrap the whole cheesecake in plastic wrap and freeze it, then take it out and let it thaw overnight for serving. Or, store individual pieces in air-tight containers or plastic wrapped, and they will thaw out quicker. Cheesecake will last for up to 6 months in the freezer, and it's a great way to have a cheesecake snack whenever you want one!
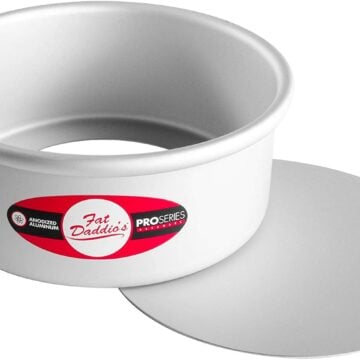
Equipment
- 6 quart or larger pressure cooker (I love my 6 quart Instant Pot)
- 7-inch x 3-inch cheesecake pan, to fit my Instant Pot 6 quart (My favorites are by NordicWare and Fat Daddio)
- Rack for pressure cooker
Should You Use a Push Pan or a Springform Pan?
You can use whichever you like. Springform pans are a little easier to use - you can lift the sides away, where a push pan requires you to lift the center out from the edge, leaving me wearing the outer ring like an armband. But, I find the thick aluminum of the push pans helps the cheesecake cook a little more evenly. I use push pans, but I've made cheesecakes in both and the difference between them is small.
Tips and Tricks
- Soft cream cheese prevents lumps - if the cheesecake is cold, it doesn't smooth out in the mixer.
- After cooking, the cheesecake can be refrigerated for up to 6 days…if it lasts that long.
- The original version of this recipe had you cover the pan with aluminum foil. I removed that instruction; I found the cheesecake cooks more quickly and evenly if the pan is not covered with foil.
Adapted from Philadelphia Classic Cheesecake [Kraft.com]
Print
Instant Pot New York Cheesecake - Recipe
- Total Time: 1 hour 45 minutes
- Yield: 8 pieces of cheesecake 1x
Description
Pressure Cooker New York Cheesecake recipe. Pressure cooker cheesecake? Yes, you want to try it. Perfectly cooked cheesecake in about an hour from your pressure cooker.
Ingredients
Crust
- ¾ cup graham cracker crumbs (4 whole graham crackers, crushed)
- 2 tablespoons melted butter
Cheesecake
- 1 pound regular cream cheese, softened (2 8-ounce packages)
- ⅔ cup sugar
- 2 teaspoons corn starch
- 2 large eggs
- ½ teaspoon vanilla extract
- ¼ cup sour cream
Topping
- Cherry Pie Filling
Instructions
- Prep the pan: Spray the 7-inch cheesecake pan with nonstick cooking spray. Mix the graham cracker crumbs and melted butter, then spread evenly across the bottom of the pan and pack down, pushing the graham crackers up the sides a little.
- Make the cheesecake filling: Soften the cream cheese by leaving it out at room temperature for at least 1 hour (or heat it in the microwave for 20 to 30 seconds, until it is softened). Beat the cream cheese in an electric mixer on medium speed until smooth, about 1 minute. Mix the sugar and corn starch together, then slowly add to the mixing bowl, beating on medium speed until the sugar is completely blended, about 3 minutes. Add the eggs one at a time, beating on low speed until just blended. Stir in the vanilla and sour cream by hand. Pour into the cheesecake pan, then tap the pan on the countertop for about 30 seconds to get rid of air bubbles.
- Pressure cook the cheesecake for 20 minutes with a Natural Release: Put the cooking rack or baking sling in an Instant Pot or other pressure cooker, then pour in 1 cup of water. If your rack does not have handles, make an aluminum foil sling to lift the cheesecake: fold a 2-foot long piece of aluminum foil over a few times, until it is a long strip about 4 inches wide. Center the cheesecake pan on the sling and carefully lower it into the pot, setting it on the rack. Lock the lid on the cooker and pressure cook on high for 20 minutes in an Instant Pot or other electric PC ("Manual" or "Pressure Cook" mode in an Instant Pot), or for 16 minutes in a stovetop PC. Then let the pressure come down naturally, about 20 more minutes. (If you're in a hurry, you can quick release any pressure left in the pot after 20 minutes.)
- Cool the cheesecake, then serve: Lift the cheesecake out of the pressure cooker. Immediately run a knife around the rim of the cheesecake pan to loosen the cheesecake from the sides. Cool the pan at room temperature for an hour, then refrigerate for at least 4 hours, preferably overnight. Top with the cherry pie filling and serve.
- Prep Time: 1 hour
- Cook Time: 45 minutes
- Category: Desserts
- Method: Pressure Cooker
- Cuisine: American
Would you like to save this recipe?
Nutrition
- Serving Size: 1 slice
- Calories: 433
- Sugar: 22.9 g
- Sodium: 318.2 mg
- Fat: 25.6 g
- Carbohydrates: 45 g
- Protein: 6.7 g
- Cholesterol: 113.9 mg
What do you think?
Questions? Other ideas? Leave them in the comments section below.
Related Posts
Pressure Cooker Beef Shank Osso Bucco
Pressure Cooker Day-After-Thanksgiving Turkey Carcass Soup
Pressure Cooker Macaroni and Cheese
Instant Pot Mint Chocolate Chip Cheesecake
Instant Pot Cheesecake with Sour Cream Topping
Instant Pot Carrot Cake
My other Pressure Cooker Recipes
Enjoyed this post? Want to help out DadCooksDinner? Subscribe to DadCooksDinner via email and share this post with your friends. Want to contribute directly? Donate to my Tip Jar, or buy something from Amazon.com through the links on this site. Thank you.


Stacey says
I've made this twice and once again today. Although I forgot the sour cream I think it will be good as usual. Would highly recommend this for any occasion! Very easy & delicious!
Mike Vrobel says
Thanks!
Heather says
I forgot to cover with foil! Fingers crossed it’s good tomorrow 🙂
John L says
This recipe is my go to for desert now! I made the first one for my wife on her birthday, and then immediately began making these often as the family loves them. I've modified the crust over time to include some sugar and cinnamon, as the grahams I purchased were not that sweet. Great move, and a little extra butter in the crust never hurts either. Eventually I began trying to knock some calories from this, and used reduced fat cream cheese... same great taste. Next I'll try the sugar substitute stevia to further reduce calories.
Jacky says
I made this cheesecake recipe yesterday, chilled it overnight and served it for a birthday dinner tonight. IT WAS AMAZING! And like you said, it was the best one I had ever made!!! Thank you so much, Mike. I now own the 7 inch Fat Daddio pan and followed your excellent directions to the letter. The IP makes this dessert so much easier to make successfully - I will make it this way from now on using your perfect recipe!!
Mike Vrobel says
Thank you, I'm glad it worked so well for you!
Nancy says
Hi Mike,
Would it be okay to cook this like your IP lemon cheesecake, I.e., no foil and high pressure for 20 minutes with a natural release? I’m thinking yes, but want to be sure. I have the recommended 7” springform pan. Thanks for your recipes and advice.
Mike Vrobel says
Yes, absolutely. I wrote this recipe before I learned to leave the foil off.
Kman18 says
Thank you for this recipe!
I just made this for my wife exactly as per your recipe in a 6qt IP Duo Nova, with the Nordic pie pan and it’s delicious!
Some thoughts/questions:
My crust came out barely 1/3 the thickness of the crust in your photo above. Any suggestions (aside from increasing the graham cracker and butter amounts)?
Do you think this could take a little lemon zest mixed in with the cheese filling?
The rack that came with my IP has handles but when opened up they don’t allow the Nordic pan to sit flat. Is buying one of those silicon slings worth it/safe?
If I found another 7” spring form pan that was just a little shorter in height, do you think we could stack two in there at the same time, and would I need to increase the pressure time?
Thank you again for a great recipe!
Mike Vrobel says
The crust looks higher in mine because I pack it against the side of the pan to make it look taller. Yes, lemon zest is a good add-in. The silicone slings are definitely worth it - I own multiples. And, I don't think you should stack a second pan; I cook my cheesecakes ahead of time, so I just cook one, then the other.
Kman18 says
Thank you, caught your reply just in time ( : >). Two in a row it is!
Tammy says
This was the 1st recipe I used to make a cheesecake and it is out of this world!
I want to attempt it now in the mini ramekins.
I've seen other recipes but I liked yours so much I'm scared to try any of the others right now so I'm gonna stick with this one for now.
Diana says
Thank you, Mike! I used this recipe for my first-ever cheesecake and it was terrific! For many years, I wanted to bake a cheesecake, but was afraid of all the problems I read about. So I never tried. I was intrigued with your recipes for the IP ... so plunged in. Your recipes are always easy to follow, including this one. I took it to a dinner party and it was a big hit. This cheesecake is creamy and delicious, and (importantly for me), not too sweet. The only thing I changed is that I made a fresh cherry topping -- I started with frozen bing cherries, so it was very quick and easy. Thank you, Mike! Cherry sauce recipe: https://addapinch.com/fresh-cherry-sauce-recipe-add-a-pinch/
P.S. I also followed your more recent cheesecake recipes and did not use the foil cover, and adjusted the time.
Mike Vrobel says
Great! I'm glad it worked for you.
Jan MacKay says
I have been looking for a great pressure cooker NY cheesecake recipe and now I have one! Big hit and so good. Thank you so much for testing and perfecting the recipe. FYI I have an 8 quart Mealthy using a 7 inch spring form pan.
Rita says
The New York Cheesecake I make in oven doesn't have a bottom crust.
Would all the cooking times be the same if I do eliminate the crust, you think??
Mike Vrobel says
I don't know - I've never tried it without the crust. If you do, let me know how it goes.
Steve Crain says
Bought the suggested 7" springform pan and made the New York Cheesecake. Thanks for doing all your research to make this dessert so great. Made it for a guest the other night and was happy with the result. I often try a 'new' recipe on friends and have not had a failure yet with one of yours. Thanks and keep up the great work.
Mr Jim says
I'm going to make this in a 6X3 pushpan in a 3Qt IP... This looks awesome! I'll letcha know how it comes out!
Logan Bear says
I made this for my Dad and he loves it. He says that it's creamier than a baked cheesecake which makes it better. Next time I'm going to add more flavor - like lemon or orange zest or cocoa powder or instant coffee.
Sonia says
I searched high and low for a cook cheesecake recipe and this is the only one I've used . Simple, easy and delicious. Not too much crust and the richness of each slice is to die for. Thank you for sharing.
LeAnn says
This recipe worked perfect the first time!
Thank you!