Things I love: Weber Charcoal Chimney Starter
A chimney starter is the best way to start a charcoal fire. Stuff some newspaper in the bottom, fill the top with charcoal, and light it up; thirty minutes later, the charcoal is ready to use. It's quicker, easier and cleaner than lighter fluid, and the food you cook doesn't wind up tasting like, well, lighter fluid.
The chimney concentrates the heat of the burning paper, and forces it to rise up into the coals. Once the coals start to light, they add to the heat, until all the coals are lit and ready to go. I've used it in almost all weather conditions, from sunny to windy to snowing heavily. The only problems were caused by very high winds, where the fire was blown out before it got the coals started.
*Oh, and I don't use it in heavy rain...but that's more because I don't like grilling in a downpour.
Why the Weber chimney starter![]() ? Two reasons. First, most chimneys are too small. They only hold about three quarts of charcoal. The Weber chimney, filled to the top, holds 5 quarts of charcoal. This is enough to make a single layer of coals across the grate of a Weber kettle, or to make a perfect indirect high heat fire by piling the coals in two piles on the sides of the grill. If you have a smaller chimney, you have to light the coals in two steps - first, use the chimney to get a batch of coals going. Then spread the coals out in the bottom of the grill, pour extra unlit coals coals on top of them and wait ten minutes for those coals to light. I prefer the chimney that holds enough coals that I can just dump and start grilling.
? Two reasons. First, most chimneys are too small. They only hold about three quarts of charcoal. The Weber chimney, filled to the top, holds 5 quarts of charcoal. This is enough to make a single layer of coals across the grate of a Weber kettle, or to make a perfect indirect high heat fire by piling the coals in two piles on the sides of the grill. If you have a smaller chimney, you have to light the coals in two steps - first, use the chimney to get a batch of coals going. Then spread the coals out in the bottom of the grill, pour extra unlit coals coals on top of them and wait ten minutes for those coals to light. I prefer the chimney that holds enough coals that I can just dump and start grilling.
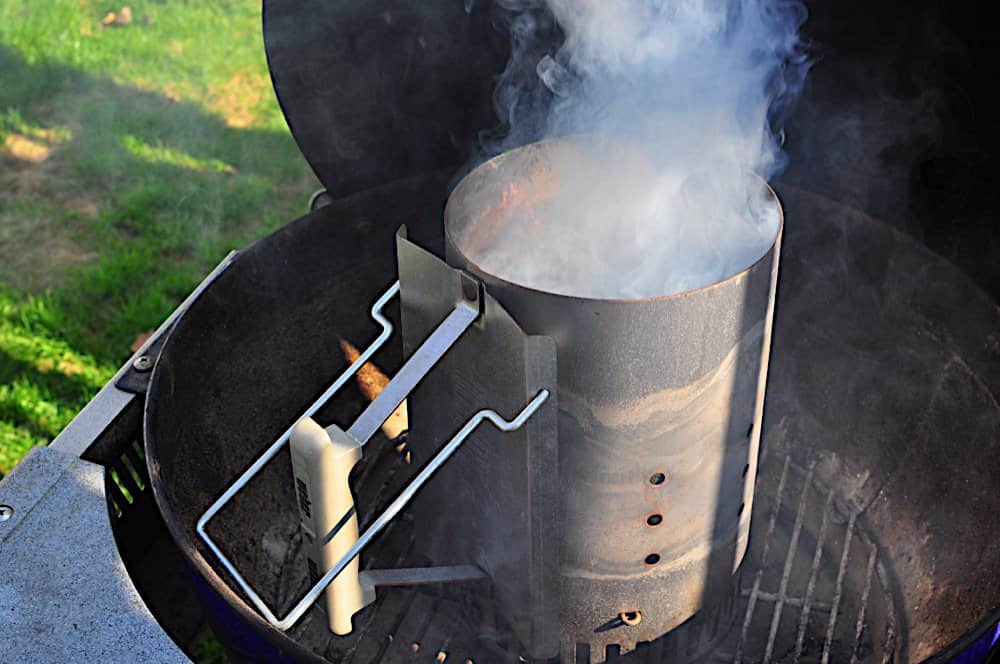
The Weber also comes with a helper handle. This handle is a simple, brilliant addition to the chimney. It helps control a chimney full of hot coals; it is amazing how much extra control comes from that second point of leverage. The coals just go where I want them to go.
So, how do you actually use a chimney? Here are my (foolproof) instructions:
*I'm getting really basic here. It will take you longer to read this section than it will to actually start a chimney of charcoal. If you've ever used a chimney before, skip to the "oil the paper" trick, then move on to another post.
1. Prep the grill: Remove the lid from the grill, remove the grate from the grill, and open the air vents. This lets the air flow to start the fire.
*Also, if I don't do this now, I forget, and smother the coals when I put the lid on later.
2. Put the paper in the bottom of the chimney: Use two sheets of newspaper, loosely wadded up into a ball. The paper should just fit inside the bottom of the chimney.
*I prefer the food section, or the comics, but that's because I'm weird.
**If there is a trick to using a chimney, this is it: Do not use more than two sheets of paper, or crumple the paper into a very tight ball! If the paper is packed too tight, it smothers the fire, and it never really gets going.
3. Oil the paper (optional): If the weather conditions are bad (that is, windy), I pour 1 tablespoon of vegetable oil on the paper. This is a trick I learned from Alton Brown (my hero!). The oil catches fire easily, and burns longer than the paper, and it gives the starting of the chimney a little extra oomph. I usually drizzle a little oil on the paper before I wad it up. Or, if I forget, I pour the oil into the chimney before I add the charcoal.
*Note that this will result in a smoky, greasy fire for the first ten minutes the chimney is burning, so don't do it if you're afraid of smoking out your neighbors.
4. Add the charcoal: Put the chimney, paper side down, on the charcoal grate of your grill. Fill the chimney with charcoal (or fill it to the level you want. Most of my recipes use a full chimney for indirect high heat, or a ¾ full chimney for direct medium-high heat.)
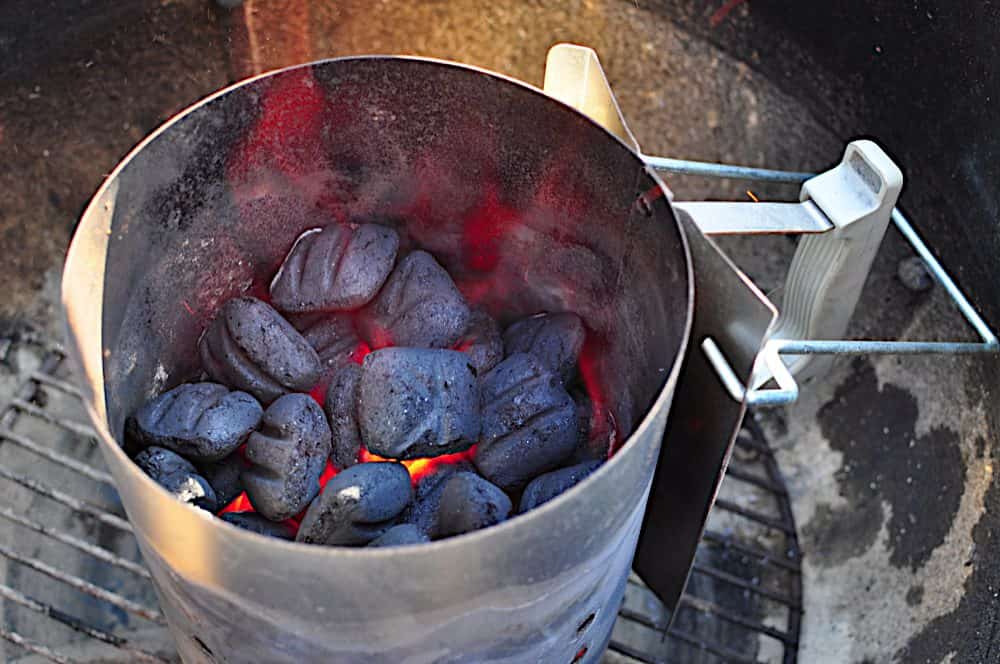
5. Fire it up! Light the paper in the bottom of the chimney in a couple of places. The charcoal will be ready in 20 to 30 minutes. The charcoal is ready when the coals on the top have a coating of white ash on them. They don't need to be completely covered, but the white ash should be visible on most of the top of the charcoal. Spread the coals out in the grill, add the grate, and it is time to grill.
*Oh, and check the chimney after five to ten minutes. If you look through the little holes on the side, you should see a core of coals that are glowing a fiery orange. If you don't see that, you many need to add more paper and try again. Chimney failure has only happened a handful of times during my years of using a chimney, on very windy days. So you can probably skip it. But... checking the chimney is a habit that has saved dinner for me a couple of times.
Notes:
While the Weber chimney is the best choice, any chimney is better than using lighter fluid. If you're desperate, you can use any metal cylinder as a chimney. I've seen chimneys improvised out of coffee cans; cut the top and bottom off the can, use the pointed end of a bottle opener to punch a ring of holes in the bottom of the can, stuff the newspaper in the bottom, and fill the rest of the can with charcoal.
Next week, I'll show how to set up different types of fires in a charcoal grill. Stay tuned!
What do you think? Questions? Other ideas? Leave them in the comments section below.
Related Posts:
Things I Love: Why Weber Grills?
Basic Technique: Direct Heat Grilling (coming soon)
Basic Technique: Indirect Heat Grilling (coming soon)
Weber Charcoal Chimney Starter![]()
*Enjoyed this post? Want to help out DadCooksDinner? Subscribe using your RSS reader or by Email, recommend DadCooksDinner to your friends, or buy something from Amazon.com through the links on this site. Thank you!

Nick says
Any recommendations on a bigger chimney (something larger than the Weber)?
Mike Vrobel says
No, sorry, it’s the biggest one I know of.
Vincent says
Thanks for the tips on using a charcoal chimney!
Mike V says
You're welcome!
Sharon says
What kind of charcoal should I purchase? Plain or with starter? I am new to this game.
Thank you
Mike V says
Plain charcoal - not with starter. Match Light charcoal is soaked in lighter fluid, and that's what the food will taste like - lighter fluid. Stay away from it!
MikeV @ DadCooksDinner says
@Anonymous (John K)
Thank you for stopping by Stan Hywett and saying hello. I enjoyed talking with you too; always nice to chat with a fellow grilling fanatic.
@Greg:
That's a great idea. And, it goes well with your picture; now I have an image of Godzilla lighting a chimney of charcoal stuck in my head...
Greg says
If you have an outdoor propane burner you can just set the chimney on top of the burner and let it rip.
No need for the newspaper.
Anonymous says
I couldn't agree more. A chimney starter is the only way to go, and the Weber is the best. When I think of all those years of petroleum tasting grilled foods I made....makes me wish I had learned this trick sooner. Plus, it's safer!
Enjoyed meeting you at the SHH Farmers Market!
John K.
Akron, OH