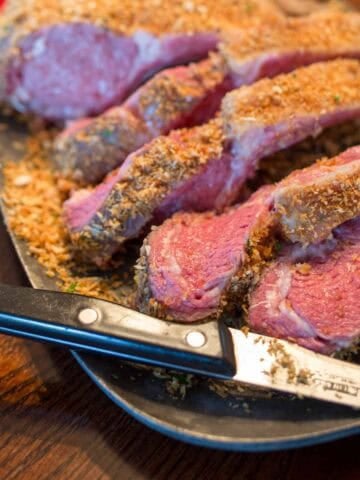
Sous Vide Short Ribs. After some testing, I figured out that 48 hours is the perfect time to sous vide short ribs if you want tender, fall-off-the-bone beef ribs. Then I sear them on my grill to get a browned crust. 48 hours of sous vide is a long time to wait, but it's almost zero effort to get these amazing short ribs.
Would you like to save this recipe?
Jump to:
Ingredients
- 4 thick-cut bone-in beef short ribs. (Look for roughly 6-inch long, 2-inch thick short ribs)
- 2 teaspoons fine sea salt
- ½ teaspoon fresh ground black pepper
Instructions
Season the short ribs and seal them in a vacuum bag
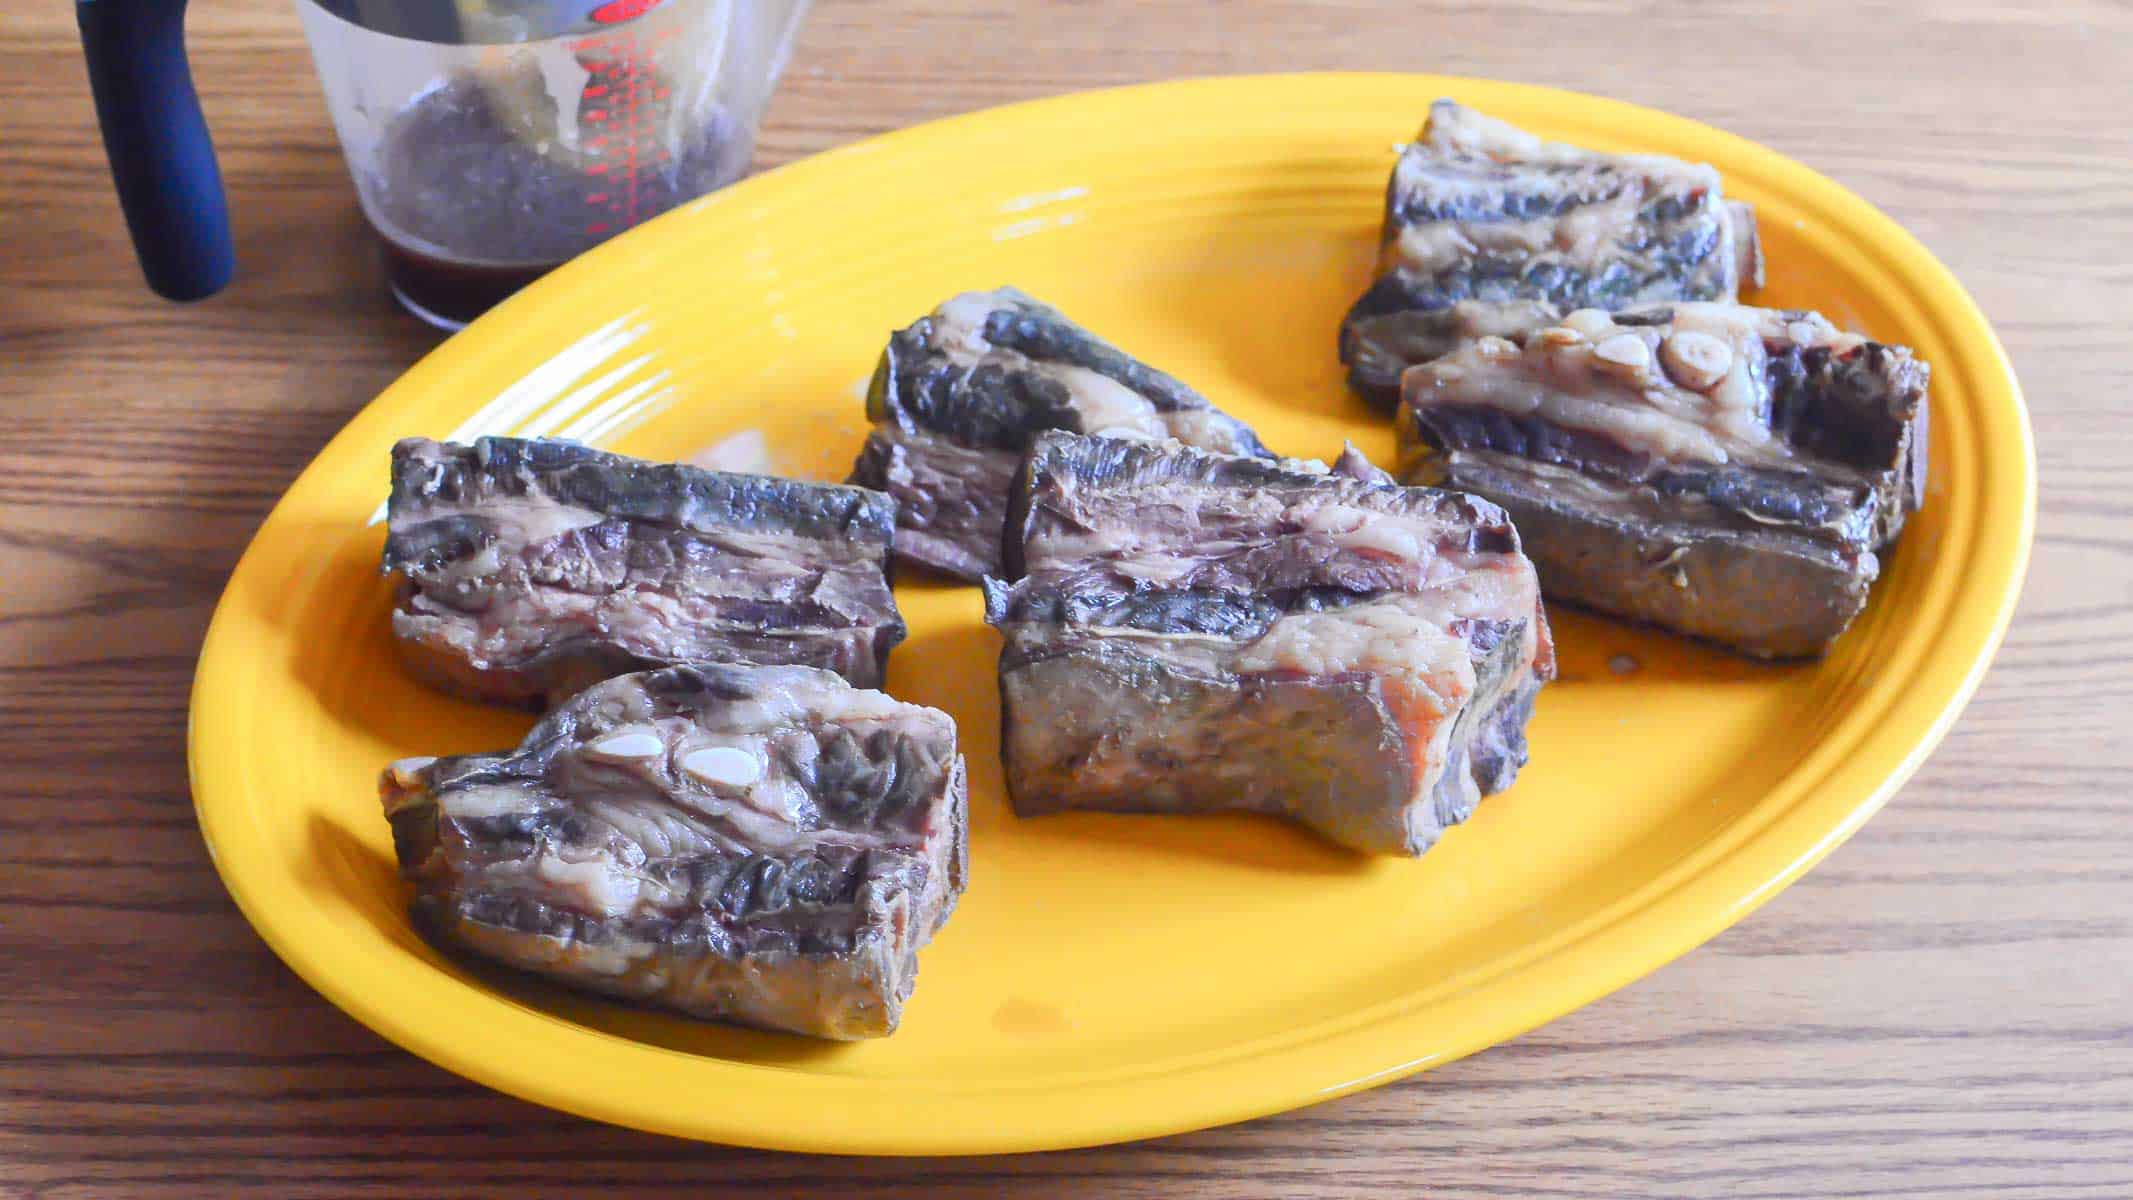
Sprinkle the ribs with the fine sea salt and fresh ground black pepper. Put the ribs in a vacuum bag, and vacuum seal the bag.
Sous Vide the short ribs for 48 Hours
Set a sous vide bath to 140°F/60°C. Put the bag with the ribs into the water bath and cook for 48 hours. (Try to go for at least 36 hours, or up to 72 hours).
Set the grill up for direct high heat cooking (450°F or higher)
Set a grill up for cooking on direct high heat, and clean the grill grate. For my gas grill, I preheat with all the burners on high for 15 minutes, then brush the grate clean with my grill brush. For charcoal, I fill a charcoal chimney with coals, light them, wait for gray ash, then pour the coals into a thick pile, about two coals deep, on one side of the grill.
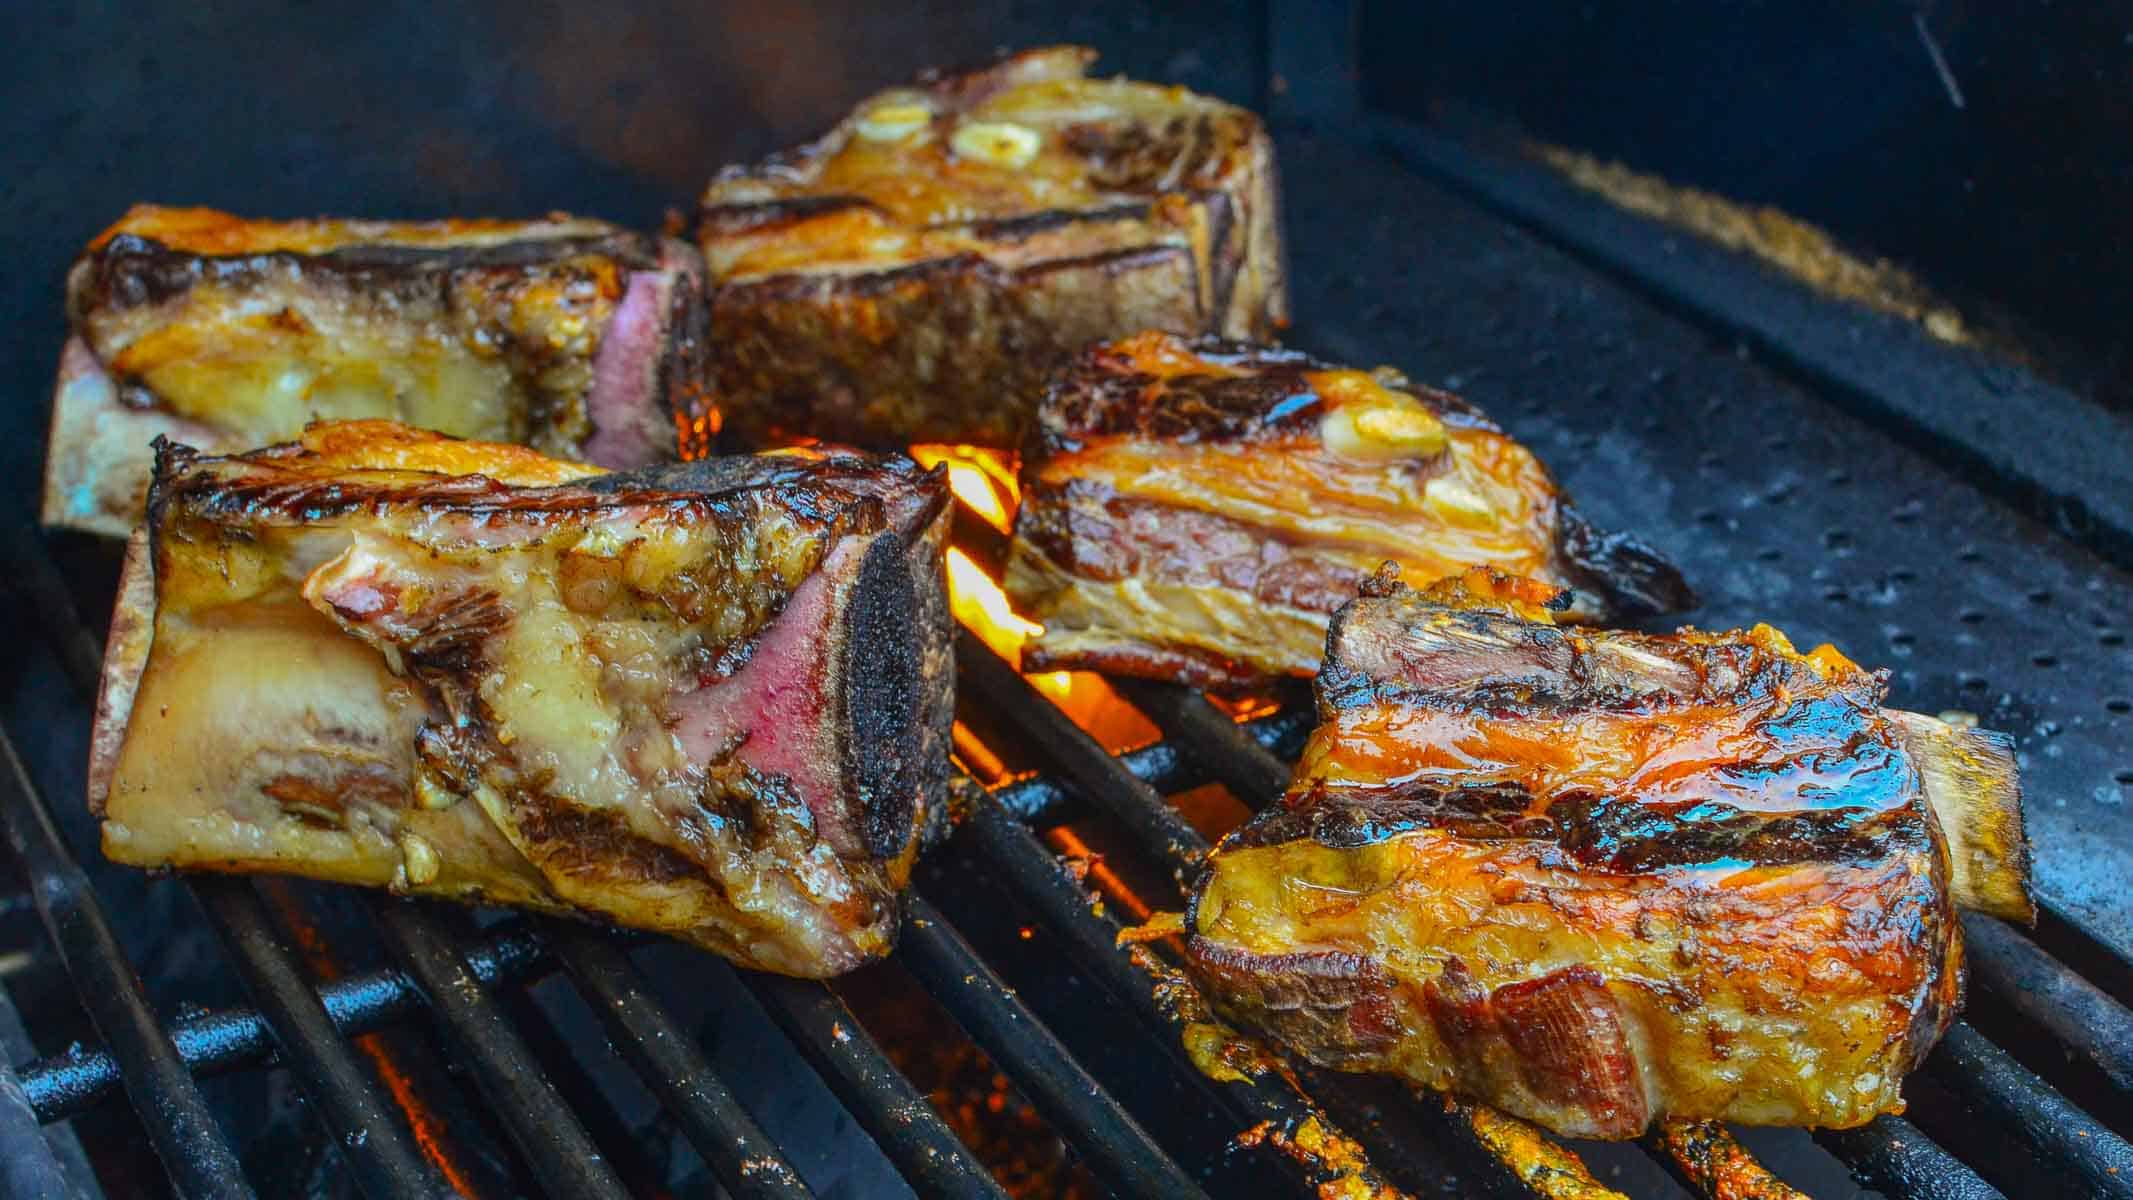
Sear the ribs over direct high heat
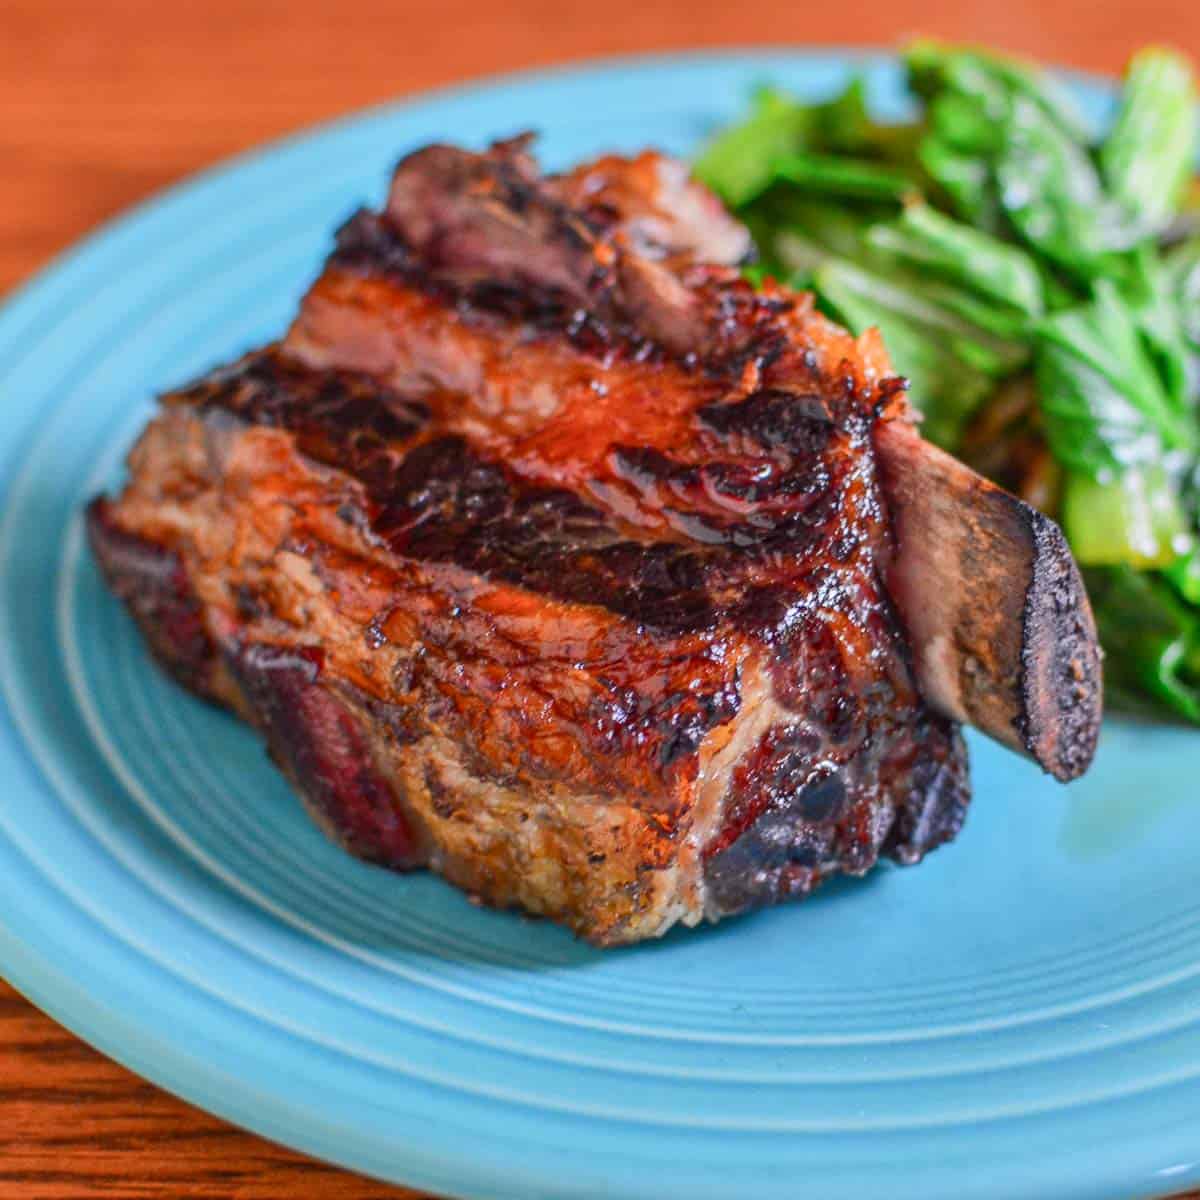
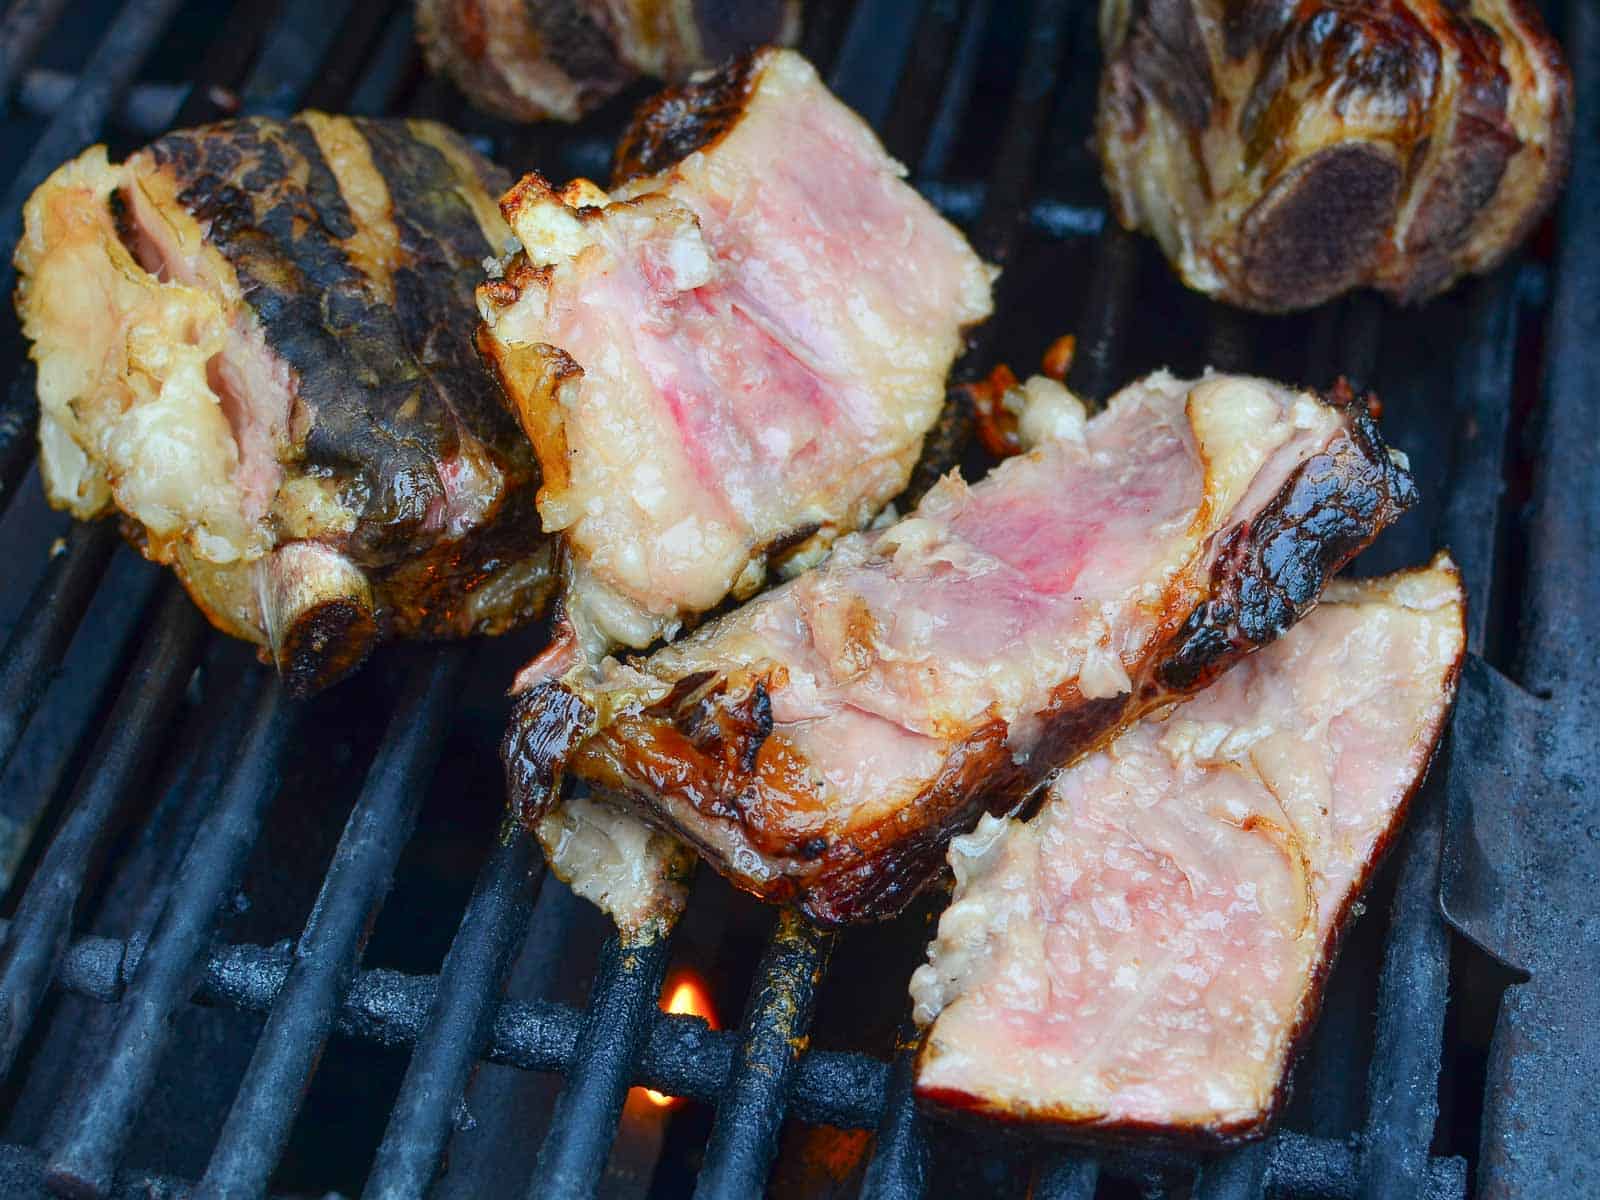
Gently remove the ribs from the bag - they will be fall-apart tender - and thoroughly pat dry with paper towels. Put the ribs on the grill over direct high heat and sear, turning to a new side every minute, until the ribs are well browned on all sides, about 4 minutes. Serve and enjoy!
Equipment
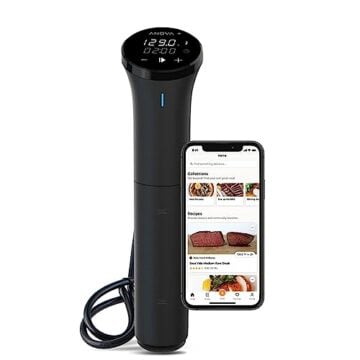
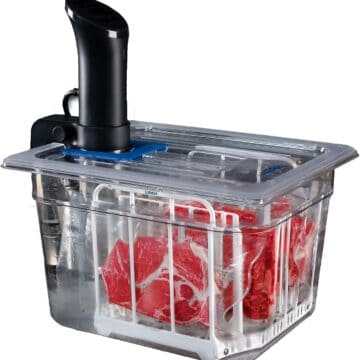
Sous vide machine: You need a sous vide immersion circulator and a sous vide container (or large pot) that can hold the steak with enough room to circulate the water.
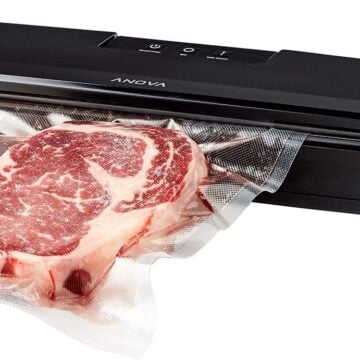
Sous vide bag: You need food-safe plastic bags for sous vide, and you need all the air out of the bag to cook efficiently. The best way to do this is with a vacuum sealer. I use gallon vacuum seal bags. If you don't have a vacuum sealer, you can use freezer Ziploc bags for sous vide. Leave the zip-top of the bag open and slowly lower it into the water bath. The water will push all the air out of the bag as it is lowered. Zip the top of the bag right before it reaches the water level.
Grill: I use my grill to get a good sear on my sous vide steaks.
OR - Cast-iron pan or heavy-duty skillet: Don't have a grill? A ripping hot cast iron skillet is also suitable for searing; sear the steak in a hot skillet for 1 to 2 minutes per side to give it a good crust. (A quality stainless steel pan, like an All-Clad fry pan, also works for searing. It doesn't hold as much heat as stainless steel, but it's close. And a stainless steel pan is a lot easier to maintain.)
24 vs 48 vs 72 hour grilled short ribs
I love braised short ribs, and I love grilled, thin cut short ribs. Sous vide cooking lets me combine the two, by cooking the ribs at medium temperature (140°F), then finishing with a quick sear on the grill. The problem with cooking short ribs to tenderness at 140°F is it takes a LONG time. Suggested cooking times went from 24 to 72 hours in the water bath. Which one should I use?
Why not all three? Three days ahead of time I set the water to 140°F. Then I dropped a bag of short ribs in the cooker every 24 hours, giving me a range of cooking times. How did it turn out?
- 24 hour short ribs were tough and chewy. Not long enough.
- 72 hour short ribs were too tender. The lines of fat holding the meat together melted; the ribs fell apart when I tried to flip them on the grill. But…the results were really, really tender.
- 48 hour short ribs were the winner. They were tender, but held together enough to sear on the grill. If you value tenderness over everything, and have the steady hands of a neurosurgeon, you can extend the sous vide time to 72 hours. But, don't be surprised if the ribs collapse on the grill.
Short Ribs Q&A
There are two major types of short rib cuts. Flanken cut and cross cut. Flanken cut short ribs are cut between the bone, so each piece has a long bone running along the bottom. (That bone makes a great handle). Cross cut short ribs, like it says in the name, are cut across the bones, so each piece has many short slices of bone along the bottom. Thick cut short ribs, like I call for in this recipe, are usually flanken cut, but not always. Both cook the exact same, so it doesn't really matter which you get.
I have good luck with the grill, but a ripping hot pan will also work. For my gas grill, I preheat for 15 minutes, then sear for 4 minutes, flipping every minute and rotating halfway through to get a crosshatch of grill marks. Charcoal browns even better, because it burns hotter than gas, but it's also a lot of work for a quick sear. I light a chimney full and pack it in on one side of my grill, in a pile two coals deep. That's real heat - it sears in a minute a side.
A searing tip from Modernist Cuisine at Home, thanks to reader JC. After sous vide cooking, before removing the ribs from the vacuum bag, cool the bag down with an ice water bath or by running cold water over it for a few minutes. That way, the exterior is cold before it hits the grill, making it even harder to overcook. Now, I have to admit, I usually don't bother with this step; I make sure to get the ribs browned and off the heat quickly so they don't overcook.
Sous vide cooking is safe at this long, low cooking time because the 140°F temperature is hot enough to pasteurize the meat, killing any bacteria. In fact, 131°F/55°C or above is hot enough to pasteurize beef. Don't cook for these long cooking times - more than a couple of hours - at temperatures lower than 131°F, or bacteria on the surface of the meat will be able to grow. (I cook this recipe at 140°F because I prefer the texture when the short ribs were cooked to medium, not medium-rare.)
Absolutely. While you're searing them on the grill, brush them with a coat of your favorite BBQ sauce. (Or use my Homemade Easy BBQ Sauce recipe to make your own).
Here's the recipe. This may be the shortest ingredient list I've ever posted. It has three ingredients, if you count salt and pepper as two of the ingredients. Simple doesn't meant bland - these ribs are overwhelmingly beefy.
Print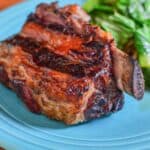
Sous Vide Short Ribs (48 hours) Recipe
- Total Time: 48 hours 5 minutes
- Yield: 4 servings 1x
Description
Sous Vide Short Ribs. After some testing, I figured out that 48 hours is the perfect time to sous vide short ribs if you want tender, fall-off-the-bone ribs.
Ingredients
- 4 thick-cut bone-in beef short ribs. (Look for roughly 6-inch long, 2-inch thick short ribs)
- 2 teaspoons fine sea salt
- ½ teaspoon fresh ground black pepper
Instructions
- Season the short ribs and seal them in a vacuum bag: Sprinkle the ribs with the fine sea salt and fresh ground black pepper. Put the ribs in a vacuum bag, and vacuum seal the bag.
- Sous Vide the short ribs for 48 Hours: Set a sous vide water bath for 140°F/60°C. Put the bag with the ribs into the water bath and cook for 48 hours. (Try to go for at least 36 hours, or up to 72 hours).
- Set the grill up for direct high heat cooking (450°F or higher): Set a grill up for cooking on direct high heat, and clean the grill grate. For my gas grill, I preheat with all the burners on high for 15 minutes, then brush the grate clean with my grill brush. For charcoal, I fill a charcoal chimney with coals, light them, wait for gray ash, then pour the coals into a thick pile, about two coals deep, on one side of the grill.
- Sear the ribs over direct high heat: Gently remove the ribs from the bag - they will be fall-apart tender - and thoroughly pat dry with paper towels. Put the ribs on the grill over direct high heat and sear, turning to a new side every minute, until the ribs are well browned on all sides, about 4 minutes. Serve and enjoy!
- Prep Time: 5 minutes
- Cook Time: 48 hours
- Category: Sunday Dinner
- Method: Sous Vide
- Cuisine: American
Would you like to save this recipe?
Nutrition
- Serving Size: 1 rib
- Calories: 1101
- Sugar: 0 g
- Sodium: 759 mg
- Fat: 102.7 g
- Carbohydrates: 0.2 g
- Protein: 40.9 g
- Cholesterol: 215.5 mg
Related Posts
Sous Vide 48 Hour Baby Back Ribs
Sous Vide Boneless Ribeye Roast
Sous Vide Chuck Steak (24 hours to tenderness)
Sous Vide Flat Iron Steak (24 hours to tenderness)
Sous Vide Grilled New York Strip Steaks with Herbs
Sous Vide Grilled Chicken Breasts with Japanese Glaze and Dipping Sauce
Sous Vide Pork Steak
Click here for my other sous vide recipes.
Enjoyed this post? Want to help out DadCooksDinner? Subscribe to DadCooksDinner via email and share this post with your friends. Want to contribute directly? Donate to my Tip Jar, or buy something from Amazon.com through the links on this site. Thank you.

John Dent says
I don't normally post comments on recipe sites, including AllRecipes dot com, which is my main go-to resource for everything, except BBQ and sous vide. I'm compelled to write something here because of all the short rib methods I've tried this is absolutely head and shoulders above all the rest.
I bought my short ribs at Sam's Club in a vacuum bag with two racks of 3 ribs each. We're talking HUGE! The package weighed in at about 14 lbs and cost $115. The only reason I was willing to spend that much on short ribs was because of the outstanding quality of all the meat I buy at Sam's. In the raw I could see extensive marbling and internal fat is a big plus. Because each of the 3 rib slabs was too large to fit in my sous vide tank I cut them into 6 individual ribs, each about 3 inches thick. Before proceeding with the seasoning and vac bagging I removed all the silver skin and bigger chunks of fat that I knew from experience wouldn't render well. I kept the seasoning simple with salt/pepper/garlic powder. I've found that combination is perfect for most beef cuts and allows the beef flavor to dominate. Having just watched a video review of Goldee's short ribs that were smoked on an offset wood smoker I really wanted that kind of result, but without all the work and hassle. So, I put the two seasoned ribs on my RecTeq pellet smoker at the lowest setting (180 degrees) for two hours to infuse the mesquite flavor and produce a 1/4 inch smoke ring. The meat was then ready for vac bagging and its 48 hour water bath. Like the author stated I allowed the ribs to cool before vac bagging, so they were nice and tight, which allows for max water to meat heat transference. In my online research analyzing the results from various cooking temps and time I determined that 48 hours at 140 degrees was, indeed, the optimum sous vide strategy. At about the 40 hour mark I noticed the bag was becoming looser and at 48 hours it was pretty puffy. That didn't concern me because I knew the ribs were already pasteurized and sterile at 140. I pulled them about an hour before dinner, cut a corner of the bag to drain off the juice (saved for French dip sandwiches) and then dumped them onto my cutting board. The first thing you'll notice about the ribs is the meat had not shrunken on the bone like it ALWAYS did in the oven, slow cooker or on the smoker. One of the secrets of sous vide is that minimal juices escape from the meat to only evaporate into thin air. This is why everything sous vide turns out perfectly cooked. The most surprising thing was the internal color. I expected the short ribs to be super tender, but I didn't expect the deep burgundy color, which was a very pleasant surprise. The outside of the ribs retained the appetizing looking dark color produced by the smoker and the aroma was still smoky. To make a long story longer I'll close this review by saying I don't believe there exists a better way to produce this result. I wanted super tender, flavorful, but NOT fall off the bone mushy and got it. PERFECTION!!
I've got 4 short ribs left uncooked that I've vac bagged and frozen for another time. Now that I've got the PERFECT method for short ribs it's time to experiment with different rubs and smoke flavors. Truly, the best thing about achieving perfect results from sous vide is that it's absolutely repeatable each and every time I fill the tub and plug in my Anova. You shouldn't be intimidated in the least because sous vide is a total no brainer and anybody can achieve perfect results. My only regret is that I didn't discover it sooner. Thank you, Mike Vrobel, for solving my short rib dilemma as I had basically given up on every other method I had tried.
My best to all serious home cooks. This is one you can take to the bank.
Mike Vrobel says
Thank you, I’m glad you enjoyed it!
Jimaindefiance says
On the 140 degree chicken....is there a problem because it isn't cooked to 160-165 degrees?
Thanks for the articles on this topic
Jimaindefiance
Mike V @ DadCooksDinner says
Thanks for sharing - good to know. The cheap Ziploc vacuum bags seem to have disappeared in my neck of the woods, but now that I know I could use them, I'm going to search a little harder.
ljk says
I bought the Dorkfood DSV and like it. Use it with a slow cooker. Also use the very cheap Ziploc vacuum bags which work just fine.