Judy Rodgers had the courage of her convictions and the guts to keep things simple.
David Tanis
This post is in remembrance of Judy Rodgers, who passed away earlier this month. Judy is a huge influence on my cooking; The Zuni Cafe Cookbook is one of my go-to reference books, and the meals I ate at the Zuni Cafe still linger in my memory.
My first meal at Zuni - roast chicken with bread salad - is still my favorite restaurant meal ever. Perfect roast chicken is simple, but not easy, and that was perfect roast chicken.
Judy introduced me to early salting. I call it dry brining, even if it isn't a brine, and I use it everywhere. There's nothing better than a simple roast chicken, salted the night before cooking, roasted hot and fast.
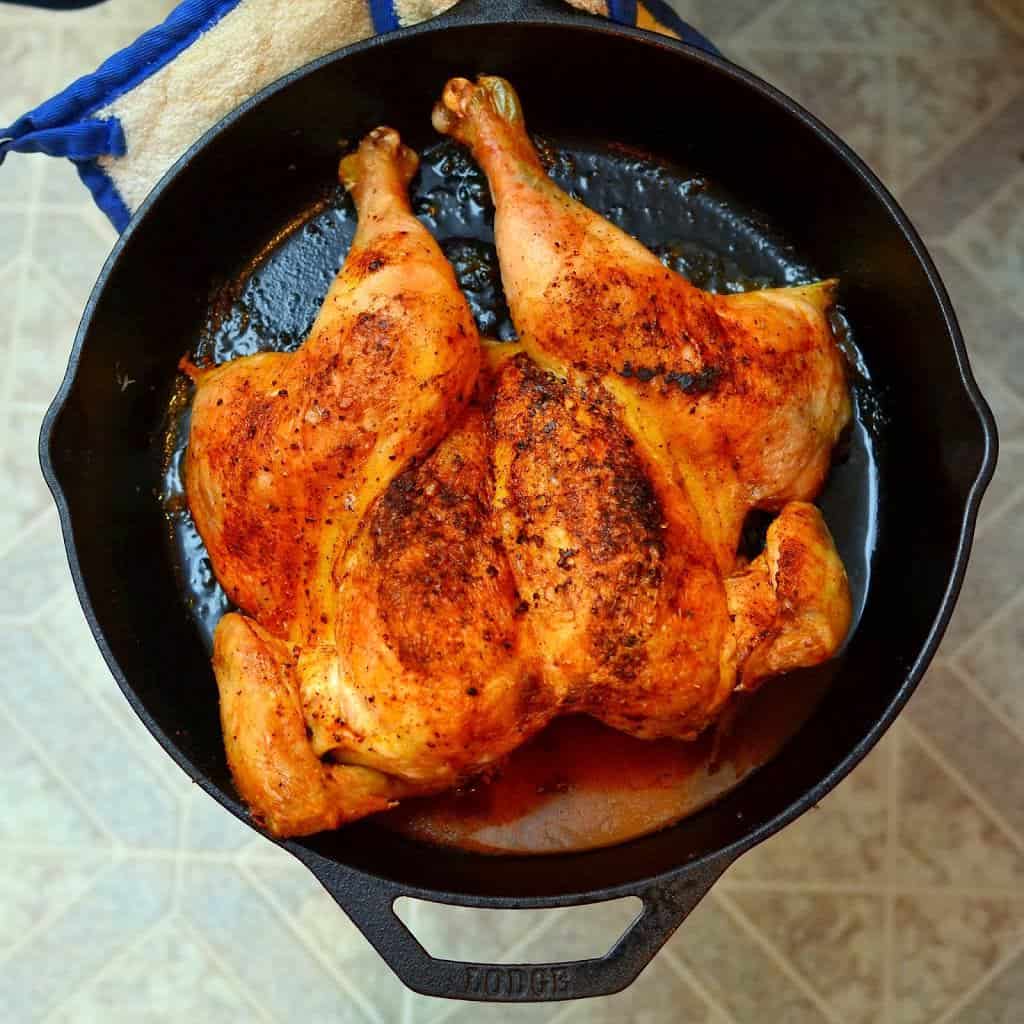
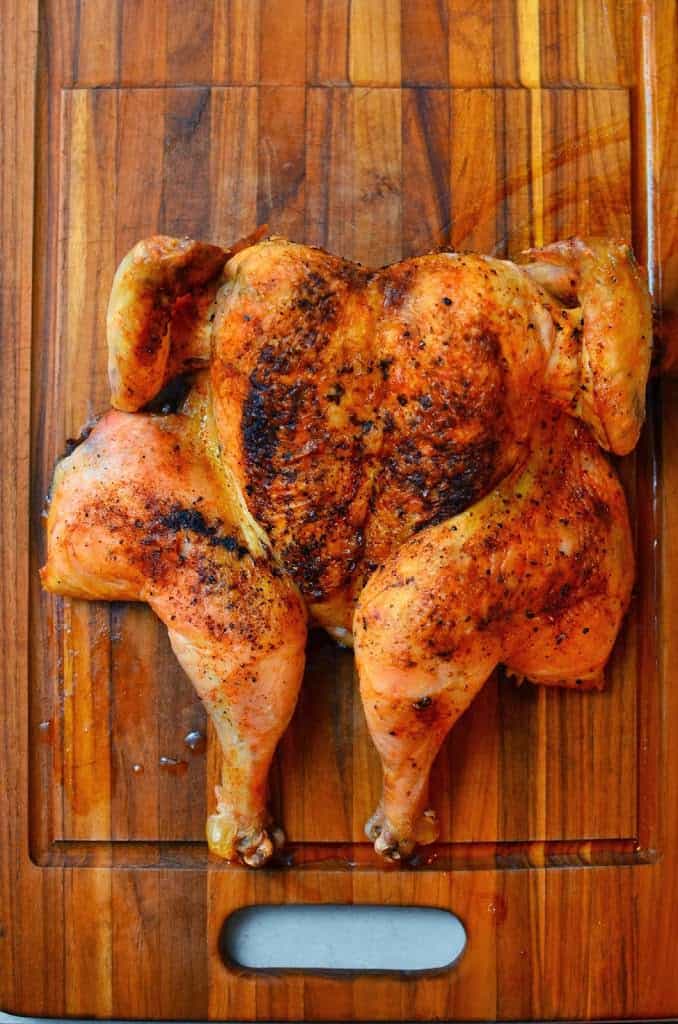
Now, I'm not following Judy's exact recipe here; I don't have Zuni's super-hot brick oven. Instead of roasting the whole chicken, I'm butterflying it, browning it in a heavy, cast iron pan to crisp up the skin, then sliding that pan into the oven to finish roasting. Simple, delicious. Maybe not the perfection of a Zuni roast chicken, but the perfect meal for a cold night, and a fond farewell.
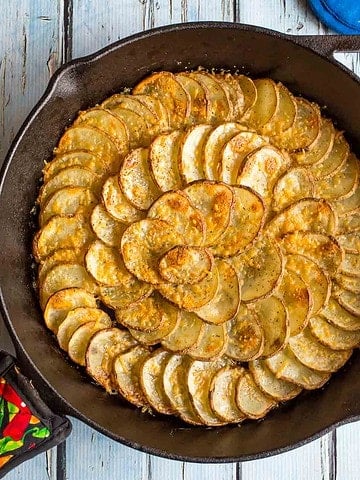
Recipe: Cast Iron Roasted Butterflied Chicken
Inspired By: Judy Rodgers, Zuni Cafe Cookbook
Equipment
- Large cast iron skillet (or a heavy, oven safe frypan)
- Poultry shears
- Probe thermometer (optional, but makes it easy to tell when the chicken is done)

Cast Iron Roasted Butterflied Chicken
- Total Time: 4 hours 45 minutes
- Yield: 4-6 1x
Description
Cast Iron Roasted Butterflied Chicken recipe - the best way to roast a chicken in the oven.
Ingredients
- 4-pound chicken
- 1 tablespoon kosher salt
- ½ teaspoon smoked Spanish paprika
- ½ teaspoon fresh ground black pepper
- 1 teaspoon vegetable oil
Instructions
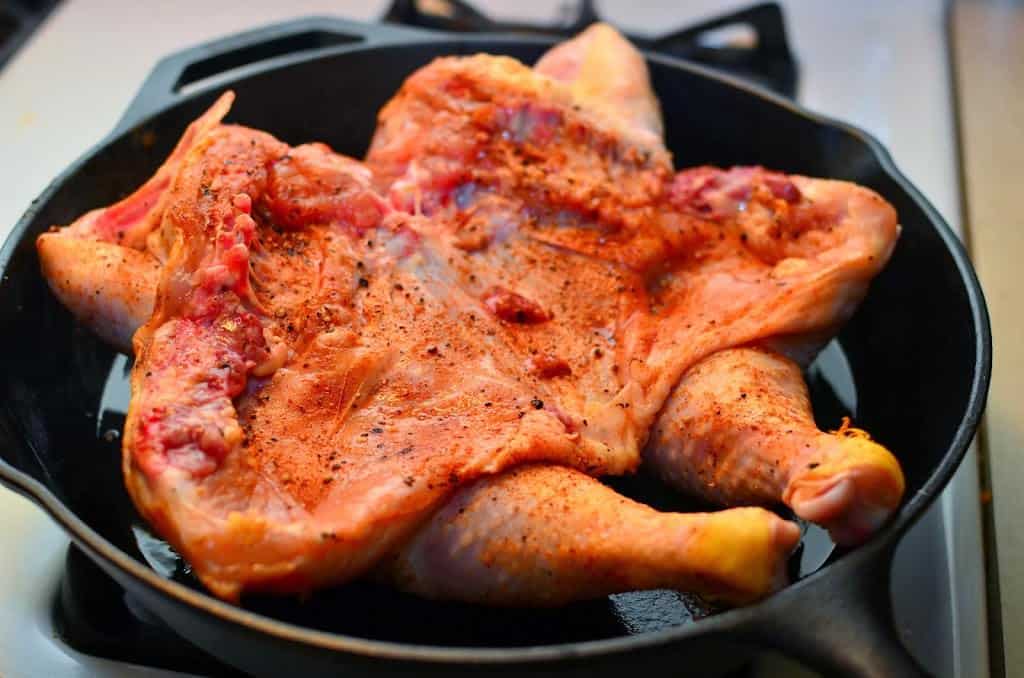
- Butterfly and dry brine the chicken: Butterfly the chicken: cut out the backbone, then flatten the breastbone by pressing down hard with the back of your hand. Fold the wing tips back under the wing. Mix the salt, paprika, and pepper, then sprinkle evenly over the chicken, concentrating a little extra on the breasts and thighs. Put the chicken on a rack over a baking sheet, and refrigerate for 4 to 24 hours - overnight is best.
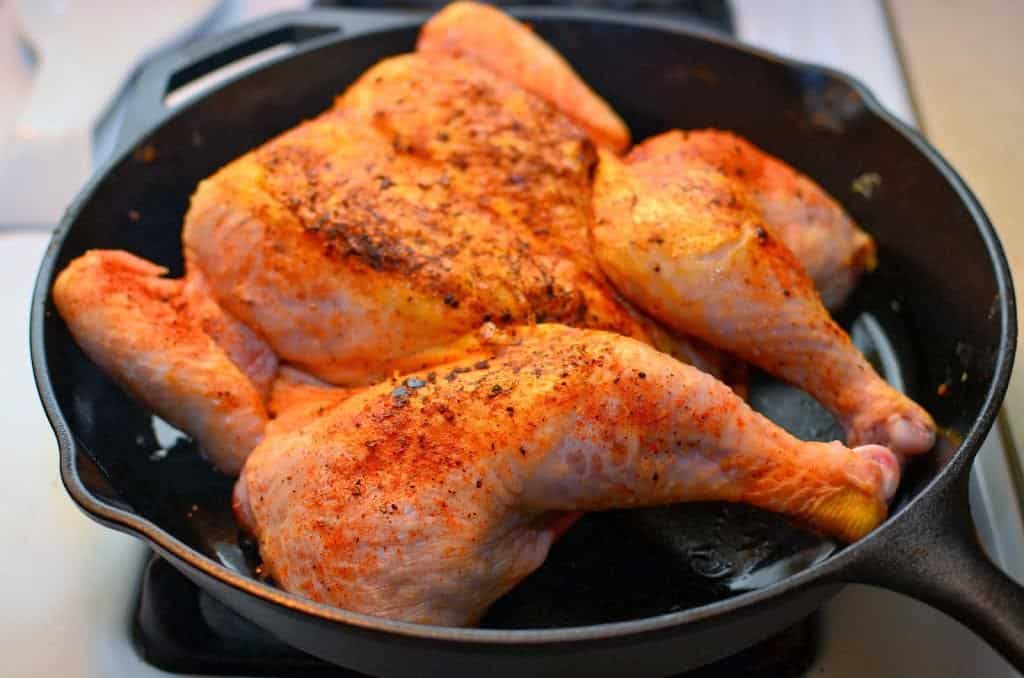
- Sear the chicken: Heat the oven to 400°F. Heat the cast iron pan over medium heat until hot, about five minutes, then add the vegetable oil and swirl to coat the pan. Lay the chicken in the pan skin side down and let it sear for four minutes, or until the skin is crisp and brown. Gently flip the chicken skin side up - the skin should release from the pan if it is browned properly; if it sticks in spots, use a metal spatula to gently scrape it loose from the pan.
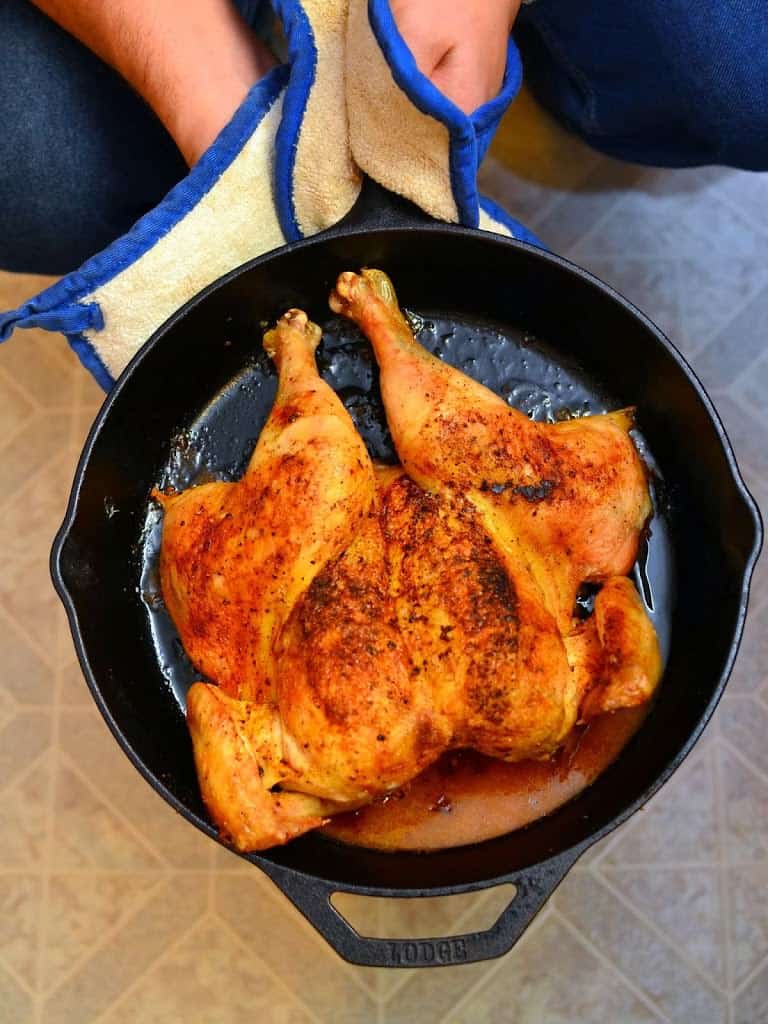
- Roast the chicken: Slide the pan into the oven. (If you have one, insert a probe thermometer into the deepest part of the breast.) Roast the chicken until it reaches 160°F to 165°F in the breast, and 170°F or higher in the joint between the thigh and the drumstick, about 40 minutes.
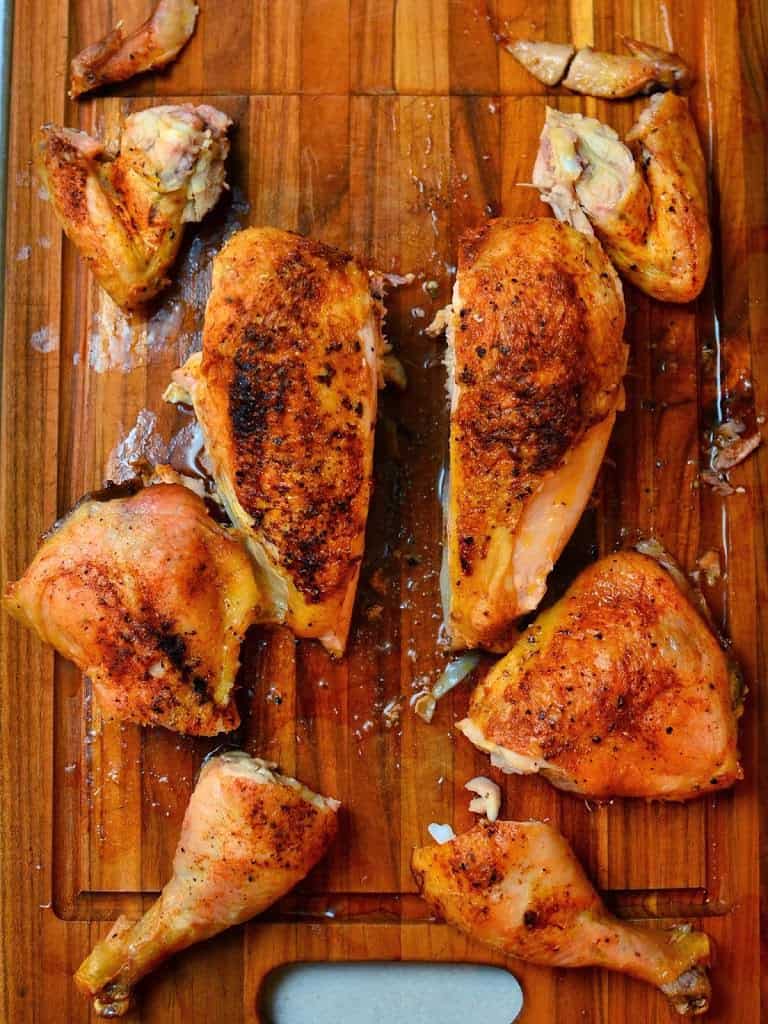
- Rest, carve and serve: Remove the pan from the oven, and lift the chicken onto a carving board. (Again, slide a metal spatula under the chicken to scrape loose any places it sticks to the pan.) Pour the juices from the pan into a gravy separator. Let the chicken rest for 15 minutes, then carve and transfer the chicken to a serving platter. Add the juices from the carving board to the gravy separator, then pass the defatted juices at the table.
Notes
For more butterflying details, see my How to Butterfly A Chicken Video.
- Prep Time: 4 hours
- Cook Time: 45 minutes
- Category: Main
- Cuisine: American
Would you like to save this recipe?

Notes
- The roasting juices are perfect drizzled over quick baked potatoes.
- This chicken was larger than I expected - about five pounds - and it was crowding the pan. A smaller, four pound chicken will fit better.
What do you think?
Questions? Other ideas? Leave them in the comments section below.
Related Posts
Quick Baked Potatoes
Grilled Butterflied Chicken with Dry Brine
Baked Chicken Thighs with Mustard and Herbs
*Enjoyed this post? Want to help out DadCooksDinner? Subscribe to DadCooksDinner using the RSS or Email options on the right, recommend DadCooksDinner to your friends, buy something from Amazon.com![]() through the links on this site, or donate through my tip jar. Thank you.
through the links on this site, or donate through my tip jar. Thank you.

Sheldon says
This has been my go to cooking instructions for a cast iron butterflied chicken for a couple of years now (just getting around to rating). Consistently crispy juicy and quick cooking chicken method.
Mike Vrobel says
Thank you, I’m glad you enjoy it!
Michael Cravens says
Super legitimate recipe. The suggestion to strain the juices at the end puts this over the top. Dont worry if you dont have the separator, run with it. So good!
Mike Vrobel says
Thank you!
John Baratta says
I've done this a few times now. Both in the oven and out on my charcoal grill/smoker. Both times it came out perfect with the meat sliding off the bone and man so juicy. The important step is to do the rub and let it sit in the fridge. I like to prep it in the morning before work and then start it right after I wrap up work so it's had a solid 8 hours to sit in the fridge with the salt, pepper and paprika on the skin. Also, I've used spatchcock/butterfly chicken from Wholefoods both times that I've had in my freezer chest.
Mike Vrobel says
I’m glad it works so well for you!
Sophia says
Perfect!
JB says
Hard to believe that something so simple tastes so good. Best roast chicken ever!!
Mike Vrobel says
Glad it worked for you!
Sammy says
Fabulous! I made this yesterday for Thanksgiving. There are only two of us and we prefer chicken over turkey. I only used Kosher salt rub and left it uncovered in the fridge 24 hours. Our 4.75 pound chicken cooked at 400 degrees for 40 minutes and was perfectly done. (Instant read thermometer) I usually use our smoker at 425 degrees for Spatchcock chicken, but due to rain I used this recipe. Big bonus is that I got yummy juices for gravy. By the way, Whole Foods will happily butterfly your chicken, giving you the back for stock.
Mary Juson says
This will be the second time I’m making this chicken! We liked it so much the first time, we decided it will be a regular dish we have often. It’s so easy to dry brine and comes out so flavorful!! I was searching for a whole chicken recipe that I can use in my braiser and this recipe is perfect!!
Eugenia says
So easy. So good!!! Thank you
Aaron Friedman says
I used a wet brine because I didn't have time to let it sit overnight. It came out great. Thank you.
Marie Nixon says
My first attempt at spatchcocking a chicken. It is really easy. This recipe turned out great. The smallest chicken I could find was 6 lbs. so I made 1 1/2 times the rub. I followed all of the other recipe instructions. My oven has the convection roast feature so I used it. I was rewarded with a beautiful and moist roasted chicken. Delicious!
Megan says
Thanks, Mike! I use this recipe frequently. Never any complaints from my picky husband and toddler. It's now basically the only way I'll cook chicken!
Mike Vrobel says
You’re welcome!
Lindsay Manzella says
Best roasted chicken I've ever made. Thanks for the recipe!
Erka says
My chicken was a little large, but it still turned out SOOOO GOOOD! super juicy and delicious. Definitely my new go to for chicken.
erika says
Made this tonight. Super easy and faster than traditional roasting. Love the crispy skin. Will add this to the rotation with different seasonings. Thanks!
Amy says
I made this for dinner tonight and it was wonderful! My family raved over it! Will make this as a regular meal. Thank-you for the recipe!
Terry Howard says
I love cooking in a cast iron skillet and I love that this recipe took a shorter time than the rotisserie chicken. Of course, I did NOT marinade it for an hour and it was just delicious.