Thank you to Certified Angus Beef for the New York Strip steaks used in this week’s posts.
I want my steak grilled, and cut thick. I want pink meat surrounded by a browned crust, with a hint of char at the edges. Thick steaks need special handling - don’t cook them over direct heat. The outside will burn before the inside reaches even the bloodiest rare.
Years ago, I learned the Sear and Move technique:
- Set the grill up with a two zone fire, one zone of high heat, and another without any heat at all.
- Start the steak directly over high heat, and sear it until it is nicely browned on both sides.
- Move the steak to the indirect zone, away from the direct heat. Close the lid, and cook to ten degrees below your target temperature - 125°F gives me medium-rare with carry-over heat.
This is how I’ve cooked steaks for years, and it does give me that beautiful pink center, and a crackling brown crust. But…it also gives me a bulls-eye of doneness between the two. There is a band of gray surrounding the pink center. That didn’t bother me, until…sous vide came along.
I’m spoiled by sous vide steak, cooked to the exact temperature I want, edge to edge pink, with a sear on the outside.
Now I’m experimenting with the Reverse Sear method, simulating low and slow sous vide cooking on the grill by reversing the heat order of grilling:
- Set the grill up with the same two zone fire, high heat on one side, no heat on the other.
- Start the steak on the indirect heat side, away from the fire. Close the lid, and cook until the steak is twenty degrees below your target temperature - 115°F for medium rare.
- Move the steak over the fire on the direct heat side, and quickly sear the outside, about two minutes a side, flipping often. Carry over heat plus the searing will take you to the final temperature.
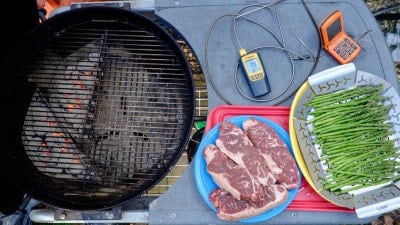
Note that both methods rely on a good probe thermometer - don’t trust a steak to a ticking clock, and the uncertainty of a grills’ internal temperature. A thermometer is the only way to be sure. That said, probes can burn out in the heat of a grill. Unless your probes are rated for high temperatures, keep them away from the fire on the indirect side of the grill.
I’ve enjoyed my Reverse Sear steaks - I loved the even pink in the middle - but I noticed that I wasn’t getting quite the same grilled crust. And, they certainly seemed to take longer - sometimes much longer - to finish cooking. Is the reverse sear really worth it? That’s when a care package arrived from Certified Angus Beef - a box of four gorgeous New York Strip steaks. 1 Time for a head to head test - what method reigns supreme?
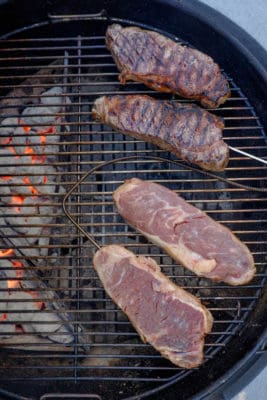
I fired up my trusty Weber kettle, baskets of charcoal pushed to one side. The steaks go on the grill grate - two over the coals, two over indirect heat.
Griller’s log:
- Steaks on the grill: 5:42PM - Sear and move over direct heat, Reverse Sear over indirect heat. Lid closed except when flipping every two minutes
- Sear done - 5:48PM - 6 minutes elapsed. Move the Sear and Move steaks to the indirect heat side of the grill. 2
- Sear and Move complete: 5:56PM - 14 minutes elapsed - 125°F internal, take the Sear and Move steaks off the grill. (Reverse Sear steaks at 95°F internal). 3
- Reverse done: 6:02PM - 20 minutes elapsed - 115°F internal. Move over direct heat to sear, flipping every minute.
- Reverse Searing complete: 6:06PM - 24 minutes elapsed - Reverse Sear steaks are browned, take them off the grill. 4
Looks aren’t everything…
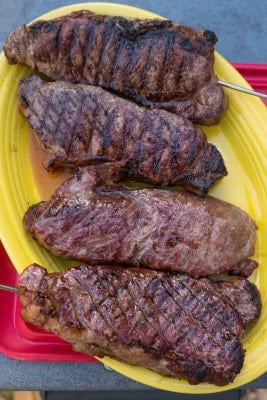
Here’s how they looked:
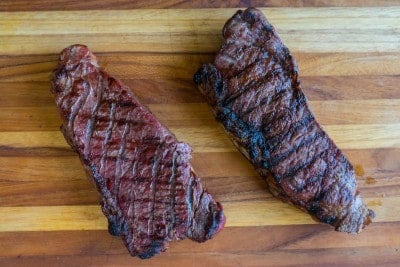
The Sear and Move steak was noticeably darker; its sear is a dark brown. The Reverse Sear was less seared - and the sear had a reddish-brown color. I let them rest for 15 minutes, then cut them open:
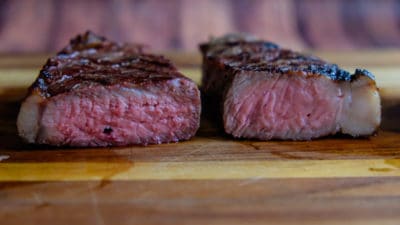
The Reverse Sear has more pink, but the Sear and Move steak was closer than I thought it would be - only a narrow band of gray around the outside, most noticeable on the top left.
…how do they taste?
Next comes the taste test - also known as Saturday night dinner. My wife, who loves the charred edges of steak, went directly for a Sear and Move piece. I tried them both. There was a distinct difference in flavor - the Reverse Sear steak was noticeably more tender, with a buttery flavor. 5 The Sear and Move steak had the charred crust, but the Reverse Sear crust isn’t bad. I was a fan of the Reverse Sear, and its combo of the buttery meat and browned crust . My wife, however, tried a piece of the Reverse Sear, said “mmm…that’s good”, and immediately went and demolished her Sear and Move steak. She wants an extra-charred crust more than the buttery interior.
How do you like your steak?
So, which is better? Um…it depends. Yes, I know, Mr. Wishy-Washy. But…it really does depend on what you’re looking for:
Sear and Move if you want…
- Quicker cooking - done in under 15 minutes
- Thick, dark crust on the outside
- Good pink center - but a little well done around the outside edges
Reverse Sear if you want…
- Beautiful pink edge to edge
- Tender, buttery meat
- Decent sear on the outside
- To take your time, relax, and enjoy a beverage while the steak slowly comes up to temperature
Recipes
Want to try both methods yourself? Stay tuned for later this week...
- Grilled Thick Cut New York Strip Steak, Sear and Move Style
- Grilled Thick Cut New York Strip Steak, Reverse Seared Style
What do you think?
Questions? Other ideas? Favorite way you cook your steak? Talk about it in the comments section below.
Related Posts
Grilled Tomahawk Steak - Long Bone Ribeye, Reverse Seared
Grilled Cowboy Chop - Double Cut Ribeye, Reverse Seared
Grilled T-Bone Steaks With Olive Oil, Lemon, Garlic, and Rosemary Marinade
Enjoyed this post? Want to help out DadCooksDinner? Subscribe to DadCooksDinner via eMail or RSS reader, recommend DadCooksDinner to your friends, and buy something from Amazon.com through the links on this site. Thank you.




Brian says
When I do reverse sear I baste the steak with a bit of butter before I put it over the hot side of the grill. I love a charred crust too, the reddish crust visually make me feel like I baked a steak.
I found a little controlled flare up thanks to the butter helps visually and with the taste of the crust.
Thanks for a great article.
Michael says
I've done both methods and ended going back to sear and move. I value the crust more than anything and there were times where I could not achieve it without overcooking the steak using the reverse sear method. Sometimes it just takes longer to get a good crust.
Raising internal temperature on the other hand is much easier to control.
Wei Chen says
I am for "sear and move," but my steak often come out like the one on the left. maybe I should try your method on the right so I get better char on the out side. what I did was that I only grilled 4 minute one side and 2 minutes the other on high heat (steak started around 50-60F and ended around 115F) and then move to the low temp zone to reach the desired temperature. takes about 20 mintues total depending on how I wanted them. I also used a marinade, maybe that changed everything, since the heat would have to evaporate that extra layer of liquid before directly reaching the surface.
Joachim Licameli says
You taught me something just with the picture of the charcoal baskets. Thanks!
When I was in cooking school, we called "sear and move" by the name "roasting." And it's a great way to develop bold flavor. You have also demonstrated that one of the chief benefits of searing is to shorten the cooking time.
What if you sear on a cast iron griddle? You would at least eliminate flare up risk, yes?
Thanks for a good article, Mike!
Mike V says
You're welcome! Re:searing on a griddle - yes, I could. But I get better searing with the direct radiated heat from the coals. So, trade offs.
Rita says
A good, timely article, Mike.
For the Reverse Sear, I wonder if taking the steak to 110° indirect, or even a bit lower, instead of 115° before the sear, and then searing a little longer would give you a deeper sear similar to the Sear and Move Method?
Mike V says
Good question. It might - I'll try that next time. My worry is more the gray band of meat inside the steak - will searing longer undo the reverse sear, edge to edge medium-rare?
Rita says
Yes, it might create a slightly wider gray area on the surface but how much, I wonder.
Another option is to use a frozen steak, which works pretty well for me. Burgers too. But mine are usually about 1 inch thick. Another piece of the puzzle. 🙂
Chris L says
"and quickly sear the outside, about two minutes a side, flipping often"
Does that mean 4 minutes total, flipping often & evenly (like every minute or so)? And just wondering, would you flip it less often at first on account of the meat sticking to the hot grates, even if well oiled?
Mike V says
Recipe with details coming Thursday, but, about 4 minutes total, and it doesn't stick due to the pre-cooking.