Pulled pork is my gateway to low and slow barbecue. Brisket is fantastic, and I lust after ribs, but pulled pork is easy and delicious. If you want to find out why people become barbecue fanatics, make yourself some pulled pork.
How? Well, if you have a real barbecue pit or smoker, it’s easy. (And you don’t need me to explain how to do it - you’re already an expert.) I learned how to make barbecue on my Weber Smoky Mountain. The WSM makes it easy to keep a low fire going for the eight to twelve hours necessary for real barbecue. But, that was back when I was a barbecue fool - I was doing ten hour cooks almost every weekend.
Eventually, I moved on from my barbecue phase. (Also known as having kids. Suddenly, finding time for a ten hour cook every weekend was…difficult.) My poor WSM was neglected, and when I didn’t clean it out after my last cook of the year, all sorts of interesting things started growing inside. (I tried to clean it out, but I was never able to stop the spread of white fuzz.)
That’s when switched to doing barbecue on my kettle grill. It’s not as easy, but it’s definitely doable, and when I use the kettle as a regular grill it burns off anything left over from smoking.
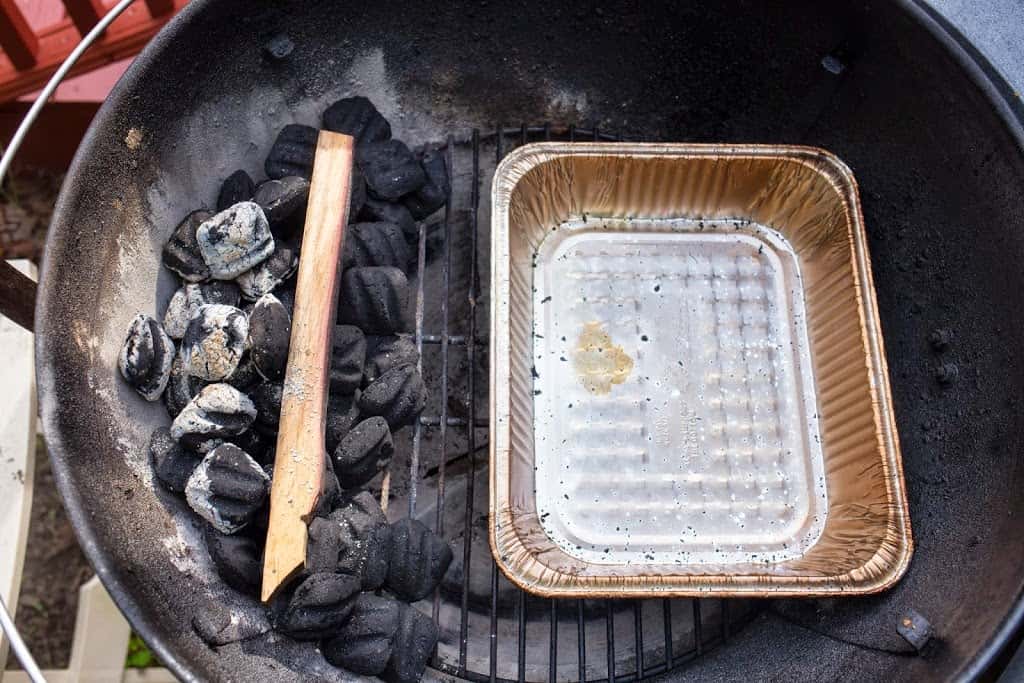
The trick to using a kettle grill as a smoker is the Minion Method. Make a big pile of unlit coals, add a small amount of lit coals to the top, and use the airflow through the grill to control the temperature. The unlit coals provide fuel for the entire cook, as the fire slowly spreads through the pile. Opening the vents increases the temperature by speeding up the spread of the fire; closing the vents decreases the temperature by slowing down the spread of the fire. I start with my bottom vent half closed and my top vent half open to get the heat going. Once it hits 250°F I close the top vent down to halfway open, and control the fire by opening and closing the top vent. (Never close the vent all the way - you’ll smother the fire.) The Minion Method provides steady heat for eight to twelve hours of cooking, depending on how much charcoal you add to the grill.
I learned the Minion Method from the Virtual Weber Bullet website - it is the way they control the temperature on the WSM. It adapts pretty well to the kettle grill. If you dive deep into barbecue, you want to switch to a true barbecue smoker, and the WSM and the Virtual Weber Bullet are great places to start looking.
I use two other tricks to bring the cooking time down.
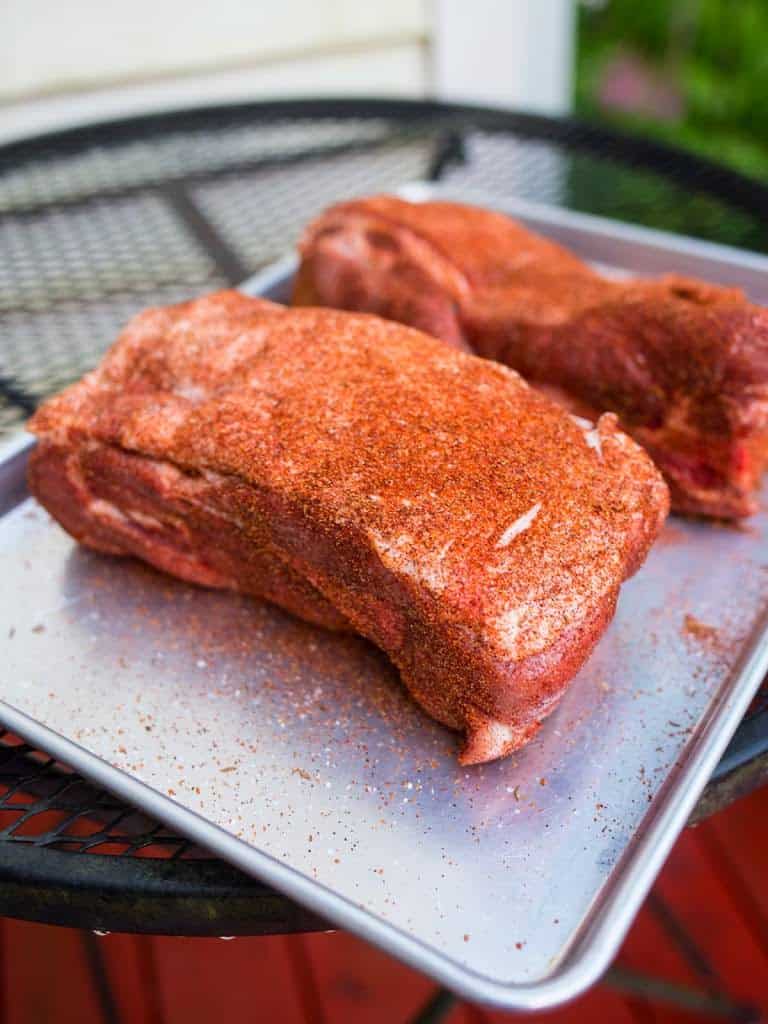
First, I buy a whole (8 pound) pork butt roast and ask my butcher to cut it in half. The two smaller roasts cook a lot faster than the entire roast.
“Faster” is relative - 8 hours for two roasts, vs 12 hours for one huge one. This *is* low and slow barbecue we’re talking about, after all.
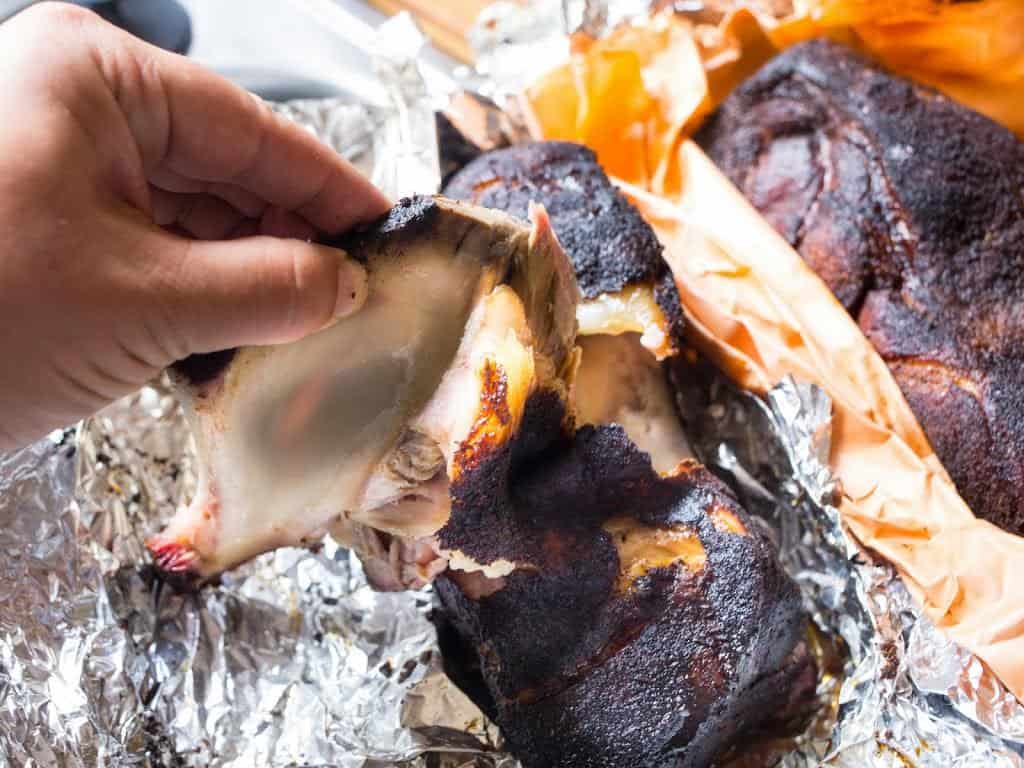
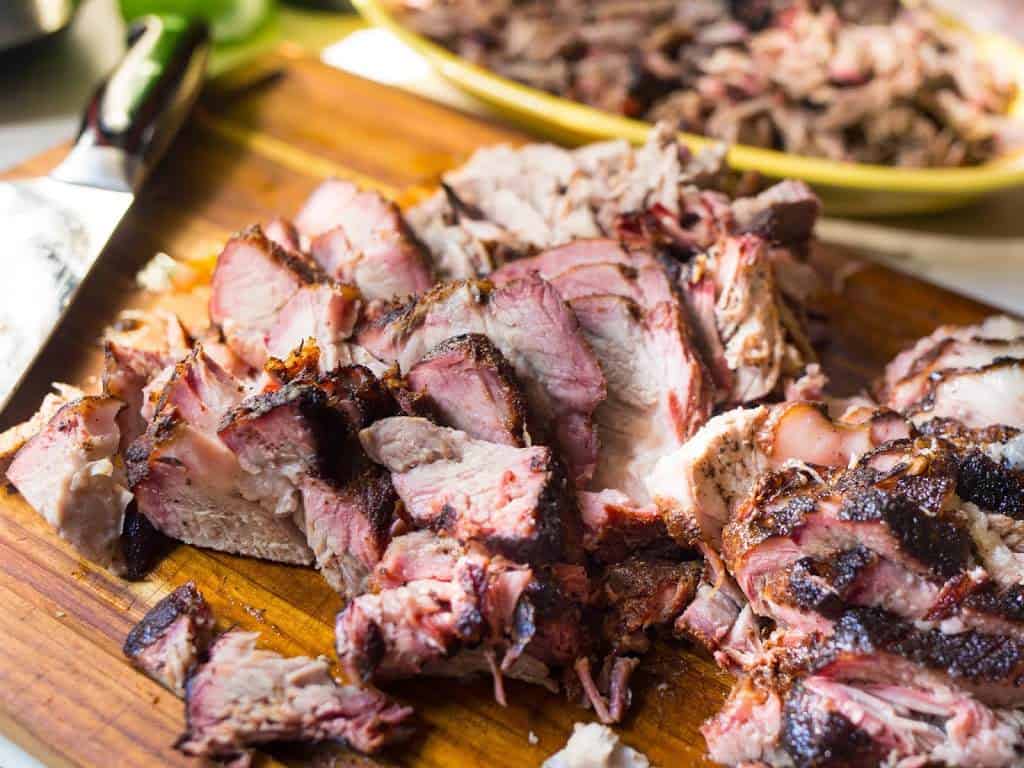
The final trick is the Texas crutch - wrapping the pork in aluminum foil once it reaches 150°F. This speeds up the cooking time by avoiding the dreaded “barbecue stall”, where the internal temperature gets into the 160s, then sits there for hours before the temperature starts climbing again. Wrapping the pork in foil traps the heat, braising the pork, and speeding the cooking time. I want 195°F internal for tender, sliceable pork shoulder, and 205°F for pullable pork. (I’m shooting for 205°F in this recipe.)
Now, pork shoulder is forgiving. As long as you get it to 205°F internal, and cook it for hours, the results will be great. If the heat spikes up to 400°F, or down to 225°F, the pork will be fine; it will just change the cooking time. Get the temperature back between 250°F and 300°F as soon as you can, but it’s not the end of the world if the grill is running hot or cold.
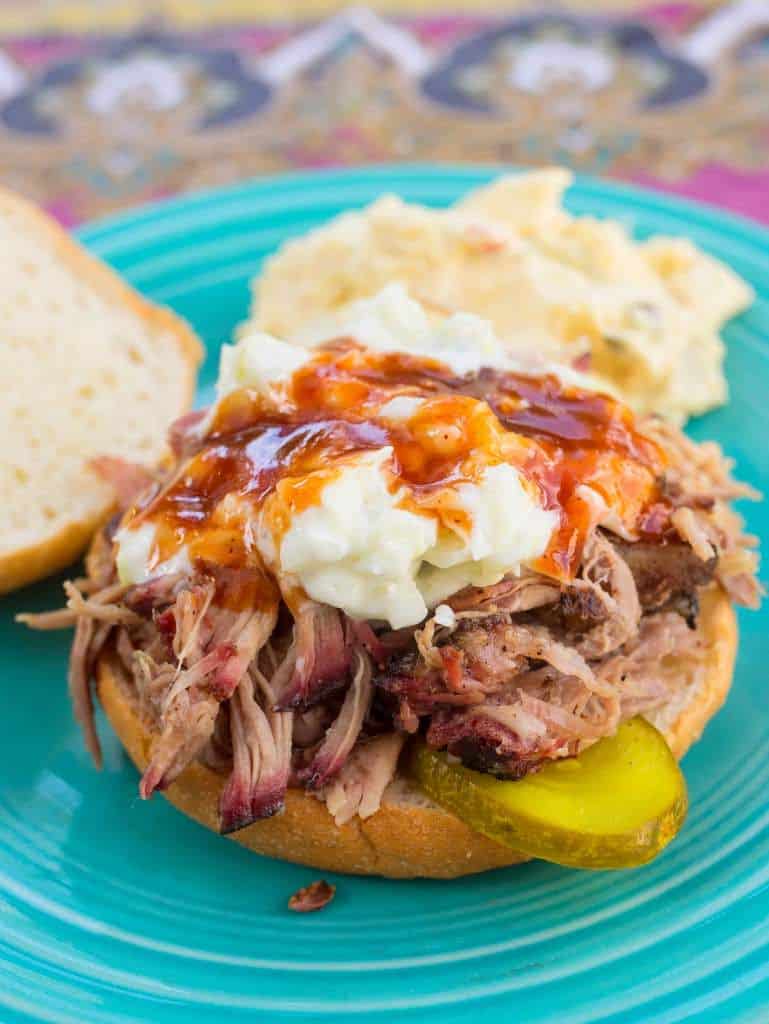
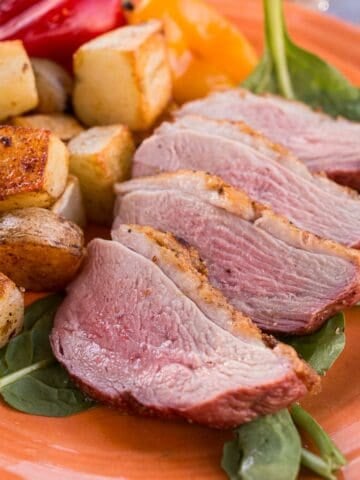
And, when you’re done? Shred the pork with a pair of forks, mixing the delicious, mahogany bark from the outside of the roast with the tender meat on the inside. (If you’re in a hurry, get a pair of Bear Paws.) Serve on cheap white buns with your favorite sauce, and (traditionally) dill pickle slices and cole slaw. Finally, consider the purchase of a WSM as you devour your awesome low and slow pork.
Recipe: BBQ Pulled Pork on a Kettle Grill (Grilling Basics)
Equipment
- Kettle Grill (I love my Weber Performer)
- 2 fist sized chunks of smoking wood or 2 cups soaked wood chips (preferably hickory; oak, apple, or cherry are also good)
- 9 by 13 aluminum foil pan
- 18" wide heavy duty aluminum foil
- Probe thermometer (not absolutely necessary, but it makes it easy to check the pork’s temperature without opening the lid)

BBQ Pulled Pork on a Kettle Grill (Grilling Basics)
- Total Time: 8 hours 20 minutes
- Yield: 12-16 servings 1x
Description
BBQ Pulled Pork on a Kettle Grill recipe. How to make low and slow barbecued pork shoulder on an everyday kettle grill.
Ingredients
- 2 (4-pound) bone in pork shoulder roasts (one 8 pound pork butt roast cut in half)
Barbecue rub (just enough of my homemade rub for this recipe)
- 2 tablespoons kosher salt
- 2 tablespoons paprika
- 2 tablespoons brown sugar
- 2 teaspoons chili powder
- 2 teaspoons ground black pepper
- 1 teaspoon garlic powder
- 1 teaspoon onion powder
- ½ teaspoon dried thyme
Serve with
- Barbecue sauce (I love my homemade Easy BBQ Sauce and Carolina Mustard Sauce on pulled pork)
- Cheap white hamburger buns
- Dill pickle chips
- Cole slaw
Instructions
- Rub the pork shoulder: Sprinkle a heavy coat of the rub over the pork butt roasts. Pat the rub onto the meat to help it stick, and work it into any natural seams in the meat. (Don’t actually “rub” the roast, or most of the spices will wind up on your fingers.)
- Set the grill up for indirect low heat: Set your grill up for indirect low heat, 250°F, with a drip pan on one side of the grill and the fire as far over on the other side as you can get it. In my kettle grill, I open the bottom vents a crack, with the blades of the ash sweeper covering ¾ of the rectangular holes. I make a tight pile of 80 unlit coals on ⅓rd of the charcoal grate, about three coals deep. (This is about ¾ of a charcoal chimney’s worth of coals.) Put the two chunks of smoking wood on top of the unlit coals. Next, I light 10 coals in my chimney starter; when the coals are lit and covered with gray ash, I pour them on top of the unlit coals. Then I set the drip pan on the other side of the charcoal grate, add my grill grate, and brush it clean. I put the lid on the grill immediately, and set the top vent to halfway open.
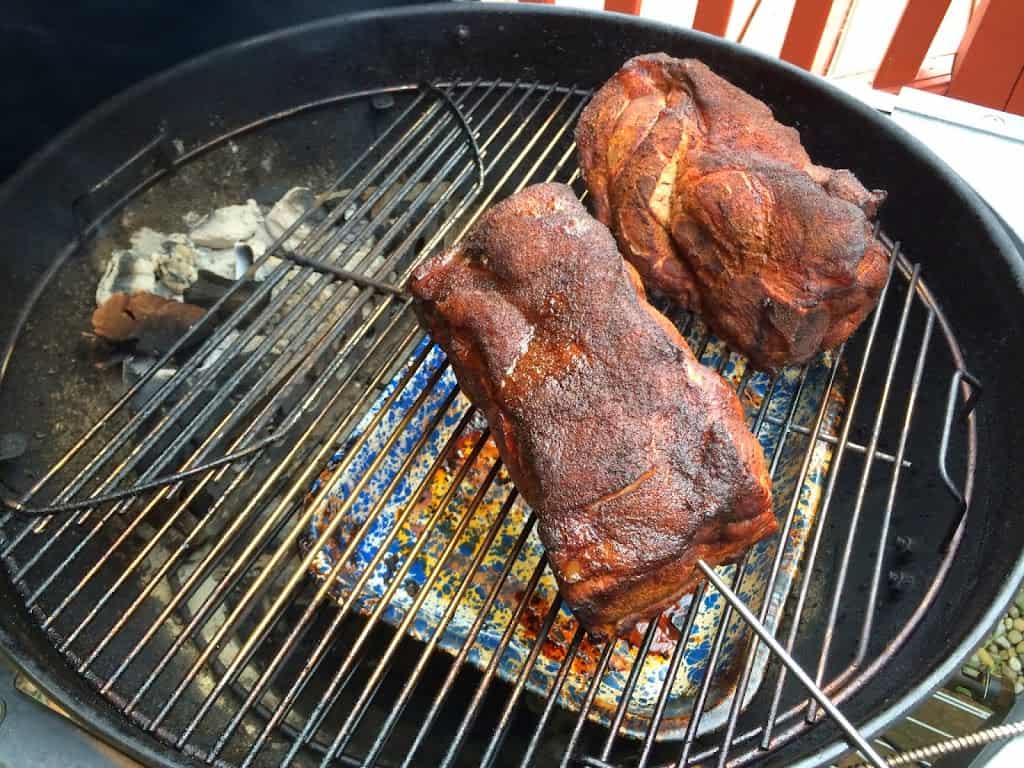
- Cook the pork roasts: Put the two pork butt roasts on the grill over the drip pan and close the lid. Adjust the top vent to stabilize the temperature at roughly 250°F; let the temperature settle for fifteen minutes between vent adjustments. Once the temperature is stabilized, check the grill every hour to make sure the vents don’t need to be tweaked. (It’s OK if the temperature fluctuates; I try to keep it at 250°F, but anything between 225°F and 300°F is OK. Keep the lid closed - every time you lift the lid, heat will escape and the air you let in will cause the coals to heat up. I try not to open the lid until it is time to wrap the roasts.)
- Wrap the pork roasts and finish cooking: Cook the pork butts until they reach a temperature of 150°F in the thickest part, about four hours. Then, wrap the butts tightly with aluminum foil, put them back in the grill, increase the heat to 300°F by opening the vents more, and cook until they reach an internal temperature of at least 205°F, about four more hours. (Poke the probe thermometer through the foil and deep into the roast. Total cooking time is about eight hours for two four pound roasts. It is fine if the grill gets hotter once the roasts are foil wrapped - up to 350°F is OK.)
- Rest the roasts: Take the roasts off of the grill, put them snug against each other, and wrap both roasts in a single piece of aluminum foil to catch any leaking juices. Wrap a large towel around the foiled roasts to keep them warm. (I use a bath towel from our rag pile.) Let the roasts rest for one hour.
- Pull and serve: Unwrap the roasts and transfer them to a cutting board. Using two large forks, shred the roasts into bite sized pieces of pork, stirring the blackened bark from the outside with the shredded meat from the inside. Taste the shredded meat, and sprinkle with salt and pepper if the roast tastes bland. To serve, pile the pork on a hamburger bun. Top with sauce, cole slaw, and a couple of pickle chips, and dig in.
- Prep Time: 20 minutes
- Cook Time: 8 hours
- Category: Barbecue
- Cuisine: American
Would you like to save this recipe?
Notes
- Can I do this on a gas grill? Yes, absolutely. It’s a lot easier to maintain the temperature, but you won’t get as much smoke flavor. Gas grills allow too much airflow, and airflow means that the smoke escapes. That’s OK - set your grill for 250°F, follow the instructions, and you’ll still get good pulled pork. It just won’t be as amazing as it is on a charcoal grill.
- What do I do if the fire’s running too hot? (Too hot means over 300°F, and you *really* want to keep it below 350°F). First, try closing down the vents as much as possible, without closing them all the way. (If you close them entirely, the fire will smother, and go out.) If closing the vents doesn’t help, add two cups of hot water to the drip pan - the water will absorb some of the heat and bring the temperature down.
- What do I do if the fire’s running too cold at the beginning? (Too cold means below 225°F, and you really want to keep it above 200°F) Open up the top vent all the way. If that doesn’t help, lift the lid, make sure the coals are lit (you should see some glowing embers), and leave the lid off of the grill for five minutes to get the fire going.
- What do I do if the fire’s running too cold after a few hours? Open the lid and check on your charcoal - is it all burned to ash? Add another 20 coals to the fire, leave the lid open for five minutes to get them started, then close the lid. (At this point, you may have to add more coals every hour or two to keep the fire going.)
- I can’t get this vent adjusting thing to work? If you’re patient enough, you can start with a low fire (40 coals lit), and add twelve coals to the fire every hour to keep the heat going. For shorter cooks this is how I maintain the fire…but adding coals every hour for eight hours gets repetitive, and opening the lid every hour slows down the cooking. It will take closer to five hours to get the roast to 150°F, and closer to ten hours to finish at 205°F.
What do you think?
Questions? Other ideas? Leave them in the comments section below.
Related Posts
Grill Smoked Baby Back Ribs
Grill Smoked Pork Western Ribs
Rotisserie Pork Shoulder with South Carolina Mustard BBQ Sauce
Instant Pot Pulled Pork
Enjoyed this post? Want to help out DadCooksDinner? Subscribe to DadCooksDinner via eMail or RSS reader, recommend DadCooksDinner to your friends, and buy something from Amazon.com through the links on this site. Thank you.

Dave says
Hi there,
Thanks for this great recipe. Could I ask how and where you are measuring the cooking temps? When you say 250 and then 300 later on, is this around the meat? If I measure near the fire its 50 degrees hotter than the meat side.
Worked out fine first time I did it but I was just wondering about the temps.
Mike Vrobel says
Air temperature away from the meat. I use a thermometer clipped to the grate, or the lid thermometer. (And it is also a case of “close enough is good enough.”)
Rich B says
Mike,
Can I just cook the shoulder longer without putting it in aluminum to get it past that 160 degree mark you talked about? Seems after I’ve cooked it with foil, I don’t have that crispy bark I’m looking for to mix with the meat once I shred it.
Thanks!
Mike Vrobel says
Yes, you can skip the foil and cook longer.
Rick Kemna says
Like you said pulled pork is an easy way to make great BBQ. What makes it even easier is to pull it with a Kitchenaid stand mixer while it's still piping hot with a dough hook on the mixer.
Steve Miller says
Will this work on the rotisserie?
Mike V says
Yes, it will:
https://www.dadcooksdinner.com/rotisserie-pork-shoulder-with-south-carolina-mustard-barbecue-sauce/
Mike Vrobel says
Thanks
Mike V @ DadCooksDinner says
Thanks for the recommendation - I've always wanted to try one of those out...
JJ says
I use the Minion Method on my kettle, but cheat with The Smokenator. Easily get 5-6 hrs of cook time on one load of coals. Have had several great cooks w/ St. Louis Spares this summer, and also chicken legs. Might do a whole shoulder at some point. http://www.smokenator.com/
craig t says
I also throw in a whole onion or 2, so I can easily fish it out after cooking... After pulling add liberal amount of Penzey's Arizona Dreaming spice blend. They also have a natural smoke granual, but I haven't tried it yet..
craig t says
Its unconventional but I pressure cook a butt or shoulder in guineas for 1hour or so and let the pressure drop naturally. I trim the fat cap off before cooking. After it cools pull it with 2 forks and you got pulled pork in a delisious juice.
Missing the smoke but the guineas makes up for it and it's a short cook with no fussing around watching the fire...
FYI. Pork for tacos at a "real Mexican" restaurant is boiled for hours not cooked on a grill or smoked. Pressure cooking cuts the time dramatically
Mike V @ DadCooksDinner says
Briquettes - Kingsford blue bag. (I haven't had much luck with lump and the Minion Method.)
craig t says
Are u using lump charcoal or brickettes
Mike V @ DadCooksDinner says
Great! Glad you enjoyed it.
Dan del Sobral says
Made this tonight - turned out well! Worked fine on the gas grill, but just like you said, not as smoky. I really liked the way the spice rub turned out.