DadCooksDinner

  • Home
  • Rotisserie
  • Recipes
  • Tools
  • Books
  • Merch
menu icon
go to homepage
  • Recipes
  • Books
  • Tools
  • Merch
  • About
subscribe
search icon
Homepage link
  • Recipes
  • Books
  • Tools
  • Merch
  • About
×
Home » Recipes

March Winter Farmer's Market Reminder

March 17, 2010 by Mike Vrobel Leave a Comment

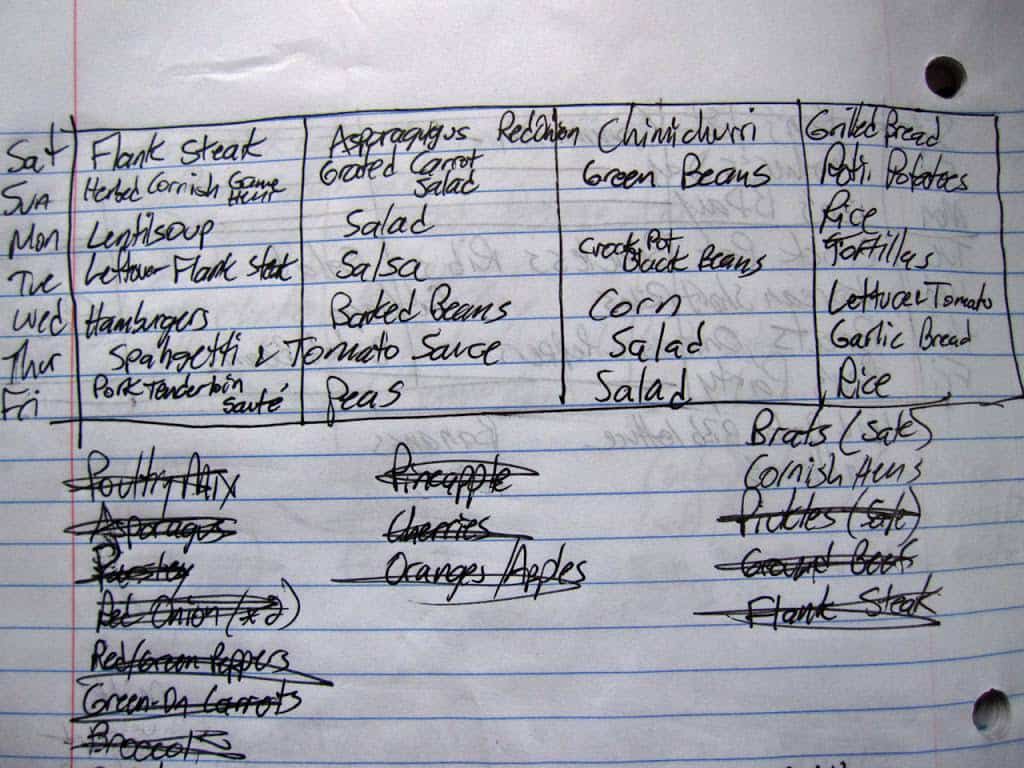
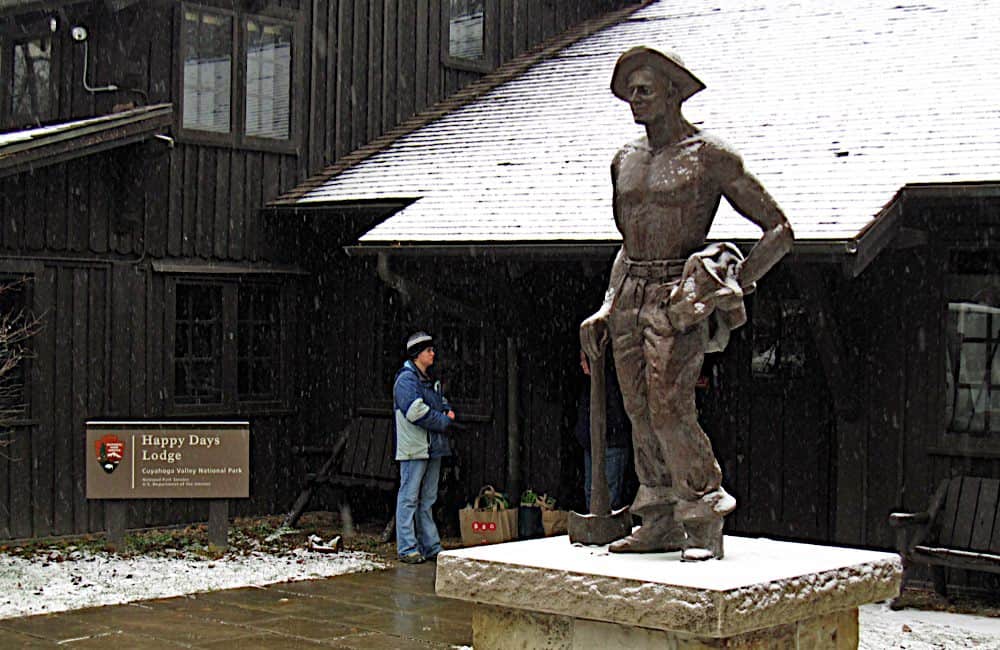
The March Winter Farmer's Market in the Cuyahoga Valley National Park is this weekend.  It is on Saturday, March 20th from 9AM to noon. The market is located in the Happy Days Lodge, 500 W. Streetsboro Road in Peninsula, Ohio.
*If you don't live in Northeastern Ohio, make sure to find your own local winter farmer's market.

Here's my post about the market, including a map: Winter Farmer's Market in the Cuyahoga Valley
Here's the official site for the market: Cuyahoga Valley Countryside Conservancy

See you there!

Slow Cooker Corned Beef and Cabbage

March 16, 2010 by Mike Vrobel 10 Comments

Slow Cooker Corned Beef and Cabbage

Slow cooker corned beef and cabbage is my St. Patrick's day tradition.
*At least, that's what we've always called it, "corned beef and cabbage". It is really a mix of vegetables - cabbage, carrots, onions and potatoes.

When I started cooking this meal myself, I'd buy the biggest corned beef I could find and squeeze it into the pot. Now that I'm older (and...wiser?), I buy a small corned beef. Somewhere along the line I realized: even though I love corned beef, the best part is the vegetables. The corned beef flavors everything else in the pot, giving the vegetables its wonderful pickled, meaty flavor.

Now, this is not an authentic Irish meal. The Irish original is bacon and cabbage. When the waves of Irish migration to the United States happened, they couldn't find bacon like they had in the old country.  But their Jewish neighbors had something that was very similar - corned beef. In other words, this is Irish-American cooking, just like spaghetti and meatballs is Italian-American, and burritos are Tex-Mex. That doesn't mean it isn't a delicious combination, and it defines "St. Patrick's Day" for me.

Looking to speed things up? Try my pressure cooker corned beef and cabbage recipe instead.

Equipment

  • 6 quart or larger slow cooker (Crock Pot brand is fine, but I like my fancy one from All-Clad)
Ingredients
Ingredients
Layer 1: Corned beef surrounded by potatoes
Layer 1 - Corned beef surrounded by potatoes
Layer 2 - carrots and onions scattered on top
Layer 3 - Cabbage on top
Cooked cabbage
Cooked cabbage
Slice and serve
Slice and serve
Is it ready yet?
Is it ready yet?

Variations

  • Simple version: Skip everything except the corned beef, cabbage, and ½ cup of water or beer.
  • Skip the potatoes: Potatoes are not slow cooker friendly - they either cook to mush, or don't cook enough and are rock hard in the middle. I include them in this dish because, well, it doesn't seem like it would be very Irish without potatoes. I use whole redskin new potatoes. I think the skin keeps them from overcooking, and the small size lets them cook all the way through. Sometimes I just leave them out, which leaves more room for the vegetables I really love, the cabbage and the carrots.
  • Other starchy root vegetables: Parsnips, turnips, rutabaga, sweet potatoes - they're not very Irish, but they all go well in the slow cooker. Cut into 2 inch chunks, and add to the cooker with the rest of the vegetables.

Notes

  • Serve with soda bread and mustard. Oh, and lots of Guinness. A little Bushmills or Jameson's for an after dinner drink would be a good idea as well.
  • Cue Michaleen Flynn in The Quiet Man - "Sorry, my mouth is like a dry crust, I can't continue this post...I don't suppose there's a drop of anything wet in this house?"
  • You don't really need to use beer in the crock; it tastes fine with plain water. But it just feels right to cook with beer on St. Patrick's day.

What do you think? Questions? Other ideas? Leave them in the comments section below.

Related Posts:
Slow Cooker Beef Barbacoa
Slow Cooker Pork Pot Roast
Instant Pot Cabbage
Okonomiyaki (Japanese Cabbage Pancake)

Enjoyed this post?  Want to help out DadCooksDinner?  Subscribe using your RSS reader or by Email, recommend DadCooksDinner to your friends, or buy something from Amazon.com through the links on this site.  Thank you!

Much Depends on Dinner - Michael Ruhlman at TEDxCLE

March 15, 2010 by Mike Vrobel 1 Comment

I've been trying to explain why dinner is so important for over 200 posts now. As usual, Michael Ruhlman says it much better than I can:

"Don't underestimate how powerful the routine act of cooking can be."
-Michael Ruhlman, TEDxCle

See Michael's other thoughts on the importance of cooking at ruhlman.com

Michael Ruhlman: Why I Cook
Michael Ruhlman: Why I Cook Part II - The Cooking Imperative (The above video is from this post.)

What do you think? Questions? Other ideas? Leave them in the comments section below.

Chicken Legs Provencal A La Pebrade

March 11, 2010 by Mike Vrobel 5 Comments

Here is another recipe in my A Week In Provence series

As I've said before, I love dark meat chicken. I was excited to learn a new technique for cooking it when I was with Patrick Payet at Famous Provence.
*Patrick said that this recipe would work well with chicken legs, and he was right. The original used rabbit, not chicken. See the notes section at the bottom for details.

The technique is to cook using a hybrid of baking and braising.  Start the chicken in a hot oven, and halfway through the cooking time add liquid to come halfway up the chicken. This technique gives you tender, braised meat with crispy, browned skin, and the braising liquid becomes a delicious sauce! The pan drippings combine with white wine, vinegar, tomatoes and onions to give you a sweet, earthy sauce with a sharp edge.

Recipe: Chicken Legs Provencal a la Pebrade

Equipment:

  • 13 inch by 9 inch baking dish (Pyrex is what I use; Emile Henry would be more authentic.)

Ingredients:

  • 4 chicken legs, trimmed of excess fat
  • 2 teaspoons kosher salt
  • 1 teaspoon fresh ground pepper
  • ¼ cup Dijon mustard
  • 2 teaspoon herbes de provence
  • 2 teaspoon olive oil
  • (optional) giblets from chicken legs (or giblets from a chicken, or 2 chicken livers)
  • ½ cup white wine
  • 1 tablespoon white wine vinegar
  • 14.5 ounce can diced tomatoes
  • ½ medium onion, sliced thin

Directions:
1. Prepare the chicken legs: Start by preheating an oven to 400*F. Put the chicken legs in a 13 by 9 inch baking dish. Sprinkle the legs evenly with the salt and pepper, then coat with the dijon mustard. (I put 2 teaspoons of mustard on each leg, then smear it over the leg with my hands.  If you want to be neat about it, you can brush it on with a pastry brush.) Arrange the legs in the baking dish so they are in one layer and skin side up. Sprinkle the herbes de provence evenly over the legs, then drizzle with the olive oil.
*If you are using the optional giblets, put them in the pan with the chicken legs.  Chicken legs usually come with a little bit of the giblets still attached, which is where I get them for this recipe.  I carefully cut them loose from the edge of the thigh.  See the pictures below.

Removing the giblets
Chicken legs ready for the oven

2. Cook the chicken legs: Put the baking dish in the oven, and cook for 25 minutes. Pour the white wine, vinegar, and diced tomatoes over the chicken. (You want the liquid to come no more than half way up the chicken. Add more or less wine as necessary.) Scatter the sliced onions on top of the chicken, return he dish to the oven, and cook for another 25 minutes. Baste the chicken with the juices in the pan, then cook for 10 more minutes.

Adding tomatoes, onions and liquid
Basting
Mashing the giblets

3. Serving: Remove the pan from the oven. Put the chicken legs on a platter, then scoop the tomatoes and onions onto the platter using a slotted spoon. Pour the liquid in the pan into a gravy separator, and let the fat rise to the surface, about five minutes. Pour the liquid over the chicken, then serve.
*If you have the optional giblets, move them small bowl, and mash to a paste with a fork.  Pour the defatted liquid into the bowl with the giblets, and whisk to combine, then pour over the chicken and serve.

Chicken and sauce ready for the table

Variations:
*Skinned chicken: Replace the chicken legs with 8 chicken thighs, and peel the skin off before cooking them. This is more faithful to the original version (rabbits are sold skinless), and you can skip the defatting step in the recipe. The mustard coating will protect the chicken while baking.
*I don't do this with chicken legs because it is hard to get the skin off of the drumsticks.

*Italian style: Italy and provence are very close together, so they share a lot of flavors. Skip the dijon mustard, replace the white wine vinegar with balsamic vinegar, and replace the herbes de provence with a mix of fresh thyme and rosemary.

Notes:
*Rabbit: In the original, Patrick used rabbit legs. Rabbit legs are smaller than chicken legs, so you have to use more of them (I would go with six), and you only cook the recipe for 40 minutes (20 min, add wine, 20 min, done). I use chicken legs because they work well with the technique. Rabbit is really hard to find in my area. When I did find it, it wasn't as good as the rabbit in provence.
*Finally, I don't have to worry about anyone having a "Oh no! We're eating Bugs Bunny!" reaction.
**For some reason, no one ever has a "Oh no, we're eating Foghorn Leghorn!" reaction.
***Update: I wrote this post a couple of weeks ago.  I didn't know the New York Times was about to publish Hip-Hop Cuisine - Rabbit for Dinner, and kick off Rabbit Week on the food blogosphere. If I had known, I might have tried to find some rabbit.  I could have been on the cutting edge of food!

What do you think? Questions? Other ideas? Leave them in the comments section below.

Related Posts:
Steam-sauteed leeks
Baked Chicken Thighs with Mustard and Herbs


Adapted From:
Patrick Payet, and my week at the Famous Provence  [famous-provence.com].

*Enjoyed this post?  Want to help out DadCooksDinner?  Subscribe using your RSS reader or by Email, recommend DadCooksDinner to your friends, or buy something from Amazon.com through the links on this site.  Thank you!

Steam Sauteed Leeks

March 9, 2010 by Mike Vrobel 5 Comments

*Here is another recipe in my A Week In Provence series

When I think of leeks, I think of French food. Leeks, a relative of onions and garlic, are one of the key aromatics in French cuisine. Leeks aren't as strong tasting as onions; they add a more subtle base of flavor to any number of wonderful French dishes.
*Leek and potato soup is the recipe Julia Child chose to go first in "The Art of French Cooking"

I've always used leeks like I use onions. They were a supporting player, something to add depth to a dish, not something you eat on their own. That is, until Patrick showed me how to make them into a simple side dish. Leeks, boiled until tender, sauteed in butter. The result is very sweet, with a mild hint of garlic and onion to it.
*Patrick, being French, boiled them in a large pot of water, drained them, then sauteed them in butter. That's too much work for me on a weeknight, so I use the steam-saute technique I learned from Pam Anderson to get the same effect.

Recipe: Steam Sauteed Leeks

Equipment:

  • Fry pan with a lid

Ingredients:

  • 3 to 4 leeks, depending on thickness (I used four because mine were thin, about 2 inches around)
  • ⅓ cup water
  • ½ teaspoon kosher salt
  • ½ teaspoon ground pepper
  • 1 tablespoon butter (optional, but pretty plain without it)

1. Trim and clean the leeks:Trim the root end off of the leeks, as close to the end of the leek as possible. For the leeks to hold together while cooking, keep the end of the leek where it all joins together. Trim the stems off of the leek where they turn dark green; the dark green is very tough, and not good to eat. Cut the leek in half lengthwise. Under cold running water, separate layers of the leek and rinse out all the dirt that is trapped inside.
Yes, there will be a lot of dirt. Make sure you get it all, or your leeks will be gritty.

2. Steam the leeks: Put the halved leeks in the pan in a single layer, cut side down. Add ⅓ cup water and the butter to the pan, then sprinkle the leeks evenly with the salt and pepper. Cover the pan, and put over medium-high heat. Wait for the water to come to a boil, then cook, covered, for 5 minutes.

3. Saute the leeks: Remove the lid, and check the bottom of the leeks. They should be well browned, and most of the water should be evaporated. (If not, continue to cook cut side down until the leeks are well browned.) Flip the leeks, and cook another 3-5 minutes, until they are tender all the way through. Check for doneness with a paring knife - it should glide through the thickest part of the leek without resistance.

Variations:
*Olive Oil: Substitute olive oil (or any other vegetable oil) for the butter, or do half butter, half oil.

*I want to be really healthy version: Cut the butter back to 1 teaspoon. I wouldn't eliminate it entirely. Even a little butter adds a big hit of flavor to the leeks.

*Lemon leeks: Zest a lemon. Cut it in half, and squeeze its juice over the leeks after they are done cooking. Sprinkle 1 teaspoon of the zest onto the leeks, and serve.

Notes:
*Why do leeks need such careful cleaning? Why is there so much dirt trapped in there? While leeks are growing, dirt is piled up around their stems to protect them from sunlight. This is what keeps the bottom of the leek white, which is the good part - the green leaves are tough and inedible. As the leek grows, it is pushing itself up through this pile of dirt, trapping it between the layers of the leek. So, to have an edible leek, you need the dirt trapped between the layers.

*Which leads to my leek buying advice. Because the white part is the only edible part, buy leeks with as much white on them as you can. The dark green part is just going to be trimmed off, so make sure you are getting enough white leek to be worth it.

*Instead of throwing away the dark green leaves, I rinse and save them. They make an excellent replacement for onions when making chicken stock. I save them in a ziploc bag in my freezer, right next to my ziploc bag with leftover chicken bones, waiting for my next batch of stock.
You do make your own stock with leftover chicken bones, right?

What do you think? Questions? Other ideas? Leave them in the comments section below.

Related Posts:
Sauteed Swiss Chard
Sauteed green beans
Barbecued Frozen Corn

Inspired by:
Cooking with Patrick Payet in Provence
Pam Anderson: How to Cook Without a Book


*Enjoyed this post?  Want to help out DadCooksDinner?  Subscribe using your RSS reader or by Email, recommend DadCooksDinner to your friends, or buy something from Amazon.com through the links on this site.  Thank you!

A Week In Provence

March 8, 2010 by Mike Vrobel 2 Comments

Gordes, France
Gordes, France
Gordes, France

*Apologies to Peter Mayle for the title.

A few years back, Diane, my loving wife, gave me my 40th birthday present. She sent me off for two weeks in France while she stayed home to watch the kids.
*Yes, she loves me.  A lot.

I went looking for a cooking school in Provence; I've been in love with the region ever since reading Patrick Mayle's books, and the Provencal influence on Judy Rodgers and Alice Waters make me think of the area as my culinary True North.
*That, and I'm a long time fan of the Tour de France, watching Greg LeMond, Miguel Indurain, Marco Pantani and Lance Armstrong hammer their way across France. Seeing Mont Ventoux off in the distance was one of the high points of my trip.

I found Patrick Payet and Famous Provence through the internet, entirely by chance. I was going to be there in early March, not exactly peak time for Provence, and he was the only one I could find who had cooking classes that time of year. I signed up, bought my airline tickets…and waited, impatiently, for my flight to France.

I stayed in a house just outside Roussillon, where the ochre deposits give the hills an amazing burnt orange color. Across the valley at night, I could see the twinkling lights of Bonnieux and Lacoste. Due to a scheduling mishap, I was the only student there. Another group was supposed to be staying the same week I was, for a cooking and hiking tour in the hills of the Luberon. But, at the last minute they delayed their trip by a week. As a result, I got to spend the entire week one-on-one with Patrick.


Patrick stops by to visit his old restaurant

Patrick was a gracious host, and a genial tour guide by day.
*Patrick went to college in Los Angeles, so his English is great. It is much better than the French I had crammed into my head in a year's quick study, preparing for the trip. It may even be better than mine…
He took me all over Provence; I saw farmer's markets, bakeries, the Papal Palace in Avignon, the corkscrew museum in Menerbes, the Lavender museum in Coustellet, and the weekly antiques market in L'Isle Sur la Sorgue. We walked and talked as I learned the history of all the little hill towns in the Vaucluse. We would eat lunch over a newspaper and a bottle of beer (for him) and a glass of rose (for me) at small restaurants. Patrick seemed to know everyone - he had business partners, connections, family members, and old friends almost everywhere we went.
*I loved the markets and grocery stores. The Les Halles market in Avignon was gorgeous - it reminded me of our own West Side Market, only larger and better lit. It is housed in its own permanent structure in the middle of downtown, a couple of blocks from the Papal Palace.

Les Halles, Avignon

After touring Provence in the morning, we'd return to the house for the afternoon, and I could relax for a while. Then, at 4PM, we'd start cooking. Patrick would turn into a stern task master, demanding to know why my potatoes were cut ½ inch thick when he asked for ¼ inch. I learned how to cook vegetables the French way (boil in lots of salted water until well cooked, then drain and saute in a little butter), how to make clay pot chicken using dough to seal the lid shut, and how to cook rabbit. More important, I learned how a former restaurateur organizes himself in the kitchen, makes things ahead of time for use later in the week, cleans as he goes, and creates works of art on the plate, making sure each sprig of asparagus is just so before serving.
*Patrick makes a brief cameo in Peter Mayle's A Year in Provence, from when he owned the restaurant Le Tonneau.

What was all this cooking for? Every night, at 8PM on the nose, we would serve the dinner we were preparing. Some nights, it was just me, Patrick, and his wife, Babeth; other nights, Patrick had organized a dinner with friends from the area. These dinners were the highlight of the trip - I got to be a temporary local, having dinner as the only American in the room. We dined with a sports psychologist who had studied at the University of Texas, an engineer who worked on satellite launches in Brazil, Babeth's son, the college student, who despised both of the choices in their upcoming presidential election (Selogene Royal and Nicolas Sarkozy), and any number of neighbors and friends. I got tips for where to eat in Paris, heard dirty jokes, listened lectures on the political system in France, held forth on where I thought the stock market was headed, and enjoyed an entertaining story about a lost dog who preferred his new owner. I learned that, if you're done with a glass of wine, you leave it about a third full, otherwise it will be filled for you. Again and again. I was raised to clean my plate, and this led to a couple of tipsy evenings before I got the hang of it. (Either that, or the UT graduate was trying to get back at me for mentioning that I rooted for Ohio State.) My French wasn't good enough to keep up with the conversation, but their English was always good enough to explain what was being said, if I looked too lost.*
*That said, my favorite conversation was with the engineer, who spoke as little English as I speak French. We had a great time, trying to discuss satellite launches in Cape Canaveral (him) and computer programming (me) even though we didn't have more than 100 words of common language between us. Just goes to show you - a geek is a geek, regardless of language barriers.

Mike and Babeth

I must have done well enough for Patrick's drill sergeant side, because on my last day in Provence, Patrick asked me to stay for the next week, when the hikers would arrive. He said I could stay, free of charge, to work as his kitchen assistant, and spend another week learning. It was very, very tempting. But all I had seen of Paris was through the window of the TGV as I zoomed from the Airport to Avignon. Reluctantly, I had to turn down Patrick's generous offer, because I had to see Paris.
I didn't realize how badly I had to see Paris…but that's another story, for another day.

I'll leave you with my favorite quote from Patrick. He was struggling with the corkscrew, trying to remove the foil from a bottle of wine. I asked if I could have it, then used a trick I had learned at a winery in Napa Valley. If you grab the foil on the top of a bottle of wine, and pull hard, it will usually pop right off. No messing with foil cutters or anything like that. I did this, and the foil popped right off the top. Patrick looked shocked.

What are you doing? Louis XIV is rolling over in his grave!

I explained where I learned the trick, and he said:

Napa…pfft. What do they know about wine? Talk to me when they've been making it for centuries.

Someday, I'm going back, and the first thing I'm going to do is go visit my friend. Patrick, thank you for a wonderful week!

Patrick and I working in the kitchen

Related Posts:
Steam-sauteed Leeks (Coming soon)
Chicken Legs A La Pebrade (Coming soon)

Inspired by:
Patrick Payet and Famous Provence [Famous-Provence.com]
Peter Mayle - A Year in Provence (really, just about every book Peter's written)

*Enjoyed this post?  Want to help out DadCooksDinner?  Subscribe using your RSS reader or by Email, recommend DadCooksDinner to your friends, or buy something from Amazon.com through the links on this site.  Thank you!

Pressure Cooker Short Ribs

March 4, 2010 by Mike Vrobel 61 Comments

Pressure Cooker Short Ribs | DadCooksDinner.com
Pressure Cooker Short Ribs

Short ribs, braised until they are melt-in-your mouth pieces of beefy goodness, are one of my favorite meals. But they are a little finicky for a home cook.
*I had Michael Symon's short ribs at Lola's, years ago. It is one of the best meals I've ever had at a restaurant, and I've been working on my short ribs at home ever since.

Part of why they are so delicious is they are loaded with fat. When cooking short ribs, there has to be a plan to get rid of the fat, or the ribs and the sauce will be much too greasy. Once again, the pressure cooker comes to the rescue.

Pressure Cooker Short Ribs | DadCooksDinner.com
Trimming the fat

Why pressure cook short ribs? First, they're done with 45 minutes under pressure, instead of the 3 to 4 hours of simmering they would need. Pressure cooking seems to break down the collagen in the meat better as well - I like how tender the ribs are after pressure cooking.
*Thanks to the pressure cooker, all the collagen from the bones winds up in the sauce as well.  The sauce, once it is defatted, is rich, luxurious, and full of beef flavor.

Finally, there is the fat issue. The best way to get rid of all the extra fat is to cook the short ribs, then refrigerate them overnight in their sauce. The fat will come to the surface and congeal into an easily removed fat cap. This is where the shortened cooking time from the pressure cooker really comes in handy. I can make my short ribs in about an hour, end to end, the night before I want to serve them. I make them while I clean up tonight's dinner, and they are ready to go for dinner tomorrow.

*Don't have a pressure cooker? No problem. See the Variations section for non-pressure cooking options.

Video


Video: Pressure Cooker Short Ribs - Time Lapse [YouTube.com]

Recipe: Pressure Cooker Short Ribs

Equipment:

  • Pressure Cooker (I use a Instant Pot Duo electric
     pressure cooker)
  • Fat separator (You need a big one
    , at least 4 cups in size).

Notes:

  • Don't have a pressure cooker? Replace step 3 with: Put the ingredients in a dutch oven and bring to a boil. Cover the dutch oven, and move to a 325°F oven. Cook in the oven for 2 to 3 hours, until the ribs are tender. Remove from the oven, and continue with step 4.
  • If you want to speed up the browning, use two pans. I brown one batch in the pressure cooker while I brown another batch in a fry pan. Then, I saute the onions in the pressure cooker, while I heat up the water (or chicken broth) in the fry pan. This loosens up the browned bits in the fry pan, so I get their flavor in the final stew.
  • Thin ribs: My grocery store usually sells ribs that are 2 to 2 ½ inches thick...but sometimes they are thinner, more like 1 to 1 ½ inches thick. When this happens, I cut the time under pressure down to 30 minutes electric PC/25 minutes stovetop PC.
Pressure Cooker Short Ribs | DadCooksDinner.com
Thin ribs - these should only go for 30 minutes

What do you think? Questions? Other ideas? Leave them in the comments section below.

Related Posts:
Pressure Cooker Chinese Pork with Plum Sauce
Pressure Cooker Chicken Stock (the best way to get chicken stock for this recipe)
Instant Pot Colombian Beef Short Rib Soup
My other Pressure Cooker Recipes

Adapted from:
Lorna Sass Pressure Perfect

*Enjoyed this post?  Want to help out DadCooksDinner?  Subscribe using your RSS reader or by Email, recommend DadCooksDinner to your friends, or buy something from Amazon.com through the links on this site.  Thank you!

Pressure Cooker Chinese Pork with Dried Plum Sauce

March 2, 2010 by Mike Vrobel 5 Comments

I was introduced to the idea of pork and prunes (excuse me, dried plums*), by one of Tom Johnson's cooking classes at the Western Reserve School of Cooking. He did a traditional French pork and prune dried plum dish. Then, in a different class, he did a Chinese lamb and dried plum stew. Both dishes were excellent - the earthy, fruity, and sweet flavor of dried plums makes a great backdrop for both pork and lamb.
*Dried Plums is the new name for prunes. The California Dried Plums Association decided that prunes needed a makeover.

Then I came across Lorna Sass's recipe for pressure cooking meat in gingered plum sauce. Now, instead of a recipe that simmers for two hours, I have a recipe that is cooks for 15 minutes under pressure. This combination of Tom and Lorna's recipes has made a a regular appearance in my kitchen ever since.

Recipe: Pressure Cooker Chinese Pork with Dried Plum Sauce

Cook time: 70 minutes

Equipment:

  • Pressure Cooker (I use my Fagor Duo 10 Quart pressure cooker)
  • Hand Blender (Not absolutely necessary, but it helps when making the sauce)

Ingredients:

  • 3 to 4 pound pork shoulder roast, cut into 1 ½" to 2" cubes, trimmed of as much fat as possible
  • 2 tablespoon soy sauce
  • 1 teaspoon vegetable oil
  • 1 onion, chopped
  • 4 cloves of garlic, peeled and smashed
  • 1 inch fresh ginger, grated
  • 2 scallions, trimmed and cut into 1 inch lengths
  • 2 cups chicken stock (preferably homemade chicken stock) or water
  • 2 cups pitted dried plums (also known as prunes)
  • 2 tablespoon soy sauce
  • 1 tablespoon seasoned rice vinegar or dry sherry

Directions:
1. Season and sear the pork in two batches: In a large bowl, toss the cubes of pork with 2 tablespoons of soy sauce. Heat 1 teaspoon of vegetable oil over medium-high heat in your pressure cooker pot until it is shimmering. Add half the pork, and sear for 2 minutes per side, or until well browned. (I treat the pork cubes as if they have four "sides", so this should take about 8 minutes.)  Remove the browned pork to a bowl. Add the second half of the pork to the pot, and sear for 2 minutes per side. Move the second batch into to the bowl with the rest of the browned pork. Pour off all but 2 tablespoons of the oil and fat in the cooker.

2. Saute the aromatics: Add the onion, garlic, ginger and scallions to the pot, and saute for five minutes, or until the onions are softened. Add the chicken stock to the pot, increase the heat to high, and scrape the bottom of the pot to loosen any browned bits from the bottom.

Toss pork with soy sauce
Aromatics
Mix until well combined


3. Pressure cook the stew:Add the seared pork, plums, 2 tablespoons soy sauce and vinegar to the pot, and stir until well mixed. Lock the lid on the pressure cooker. Wait for the pressure cooker to come up to high pressure, then lower the heat to maintain that pressure and cook for 15 minutes. Remove from the heat, allow the pressure to come down naturally for 10 to 15 minutes, then quick release any remaining pressure.

After pressure cooking
Taking the stick to it
Pureed plum sauce

4. Prepare the sauce: Remove the pork to a serving platter with a slotted spoon. Let the sauce rest in the pot for ten minutes, then skim off as much fat as you can from the surface.  Using a hand blender, puree the liquid in the pressure cooker to make a thick sauce.  Taste the sauce, and add more soy sauce or vinegar if you think it needs it.  Pour the sauce over the pork on the platter, and serve.
*Be careful - you get a lot of sauce with this recipe. Don't overflow the platter. Not that I spilled plum sauce all over my counter while I was taking pictures of this recipe for the blog, or anything like that...

Variations:
*Don't have a pressure cooker? Replace step 3 with:

Dutch oven: Put the ingredients in a dutch oven and bring to a boil. Cover the dutch oven, and move to a 325*F oven. Cook in the oven for 2 hours, then remove and continue with step 4.

Slow cooker: Put the ingredients in a slow cooker, and cook on high for 3 hours, or low for 6 hours. Continue with step 4.

*Lamb: From Tom Johnson's original recipe, use 3 to 4 pounds of cubed lamb shoulder (or lamb shoulder steaks) instead of the pork.

*Busy Weeknight Version: Skip the searing in step 1 - just toss the pork with the soy sauce, and add it to the pot in step 3.  You don't get the depth of flavor that seared pork and its fond add to the sauce, but there are enough other flavors in this recipe to make up for it.  Skip the resting and skimming of the sauce in step 4, go straight for the stick blender.  The sauce will be a little fatty, but it still tastes delicious.

Notes:
*As I said in my I love pressure cookers post, every pressure cooker works differently. Make sure you have read your pressure cooker manual before starting this recipe, so you know how to lock it, tell when it's up to high pressure (15 PSI), and how to release the pressure when you're done.

*Instead of browning the pork in two batches, I use two pans. I brown half in my pressure cooker, and half in my fry pan. Then, I saute the onions in the pressure cooker, while I heat up the chicken stock in the fry pan. This loosens up the browned bits in the fry pan, so I get their flavor in the final stew. Also, the pressure cooker comes up to pressure quicker if you add boiling liquid, so I'm heating up my stock at the same time I'm sauteing my onions.

*If you have the time: make the recipe the night before, refrigerate, then reheat.  This gives you two advantages: the flavors combine better after a day of resting, and the fat all congeals on the surface, making it easy to lift off in big chunks.  To do this, finish the recipe through step 3 (pressure cooking), then let the stew cool to room temperature.  Store it, covered, in the refrigerator overnight.  The next day (or up to 3 days later), remove from the refrigerator, and scrape the fat cap from the top of the pot.  Reheat over medium heat until simmering, then, continue with step 4 (remove pork cubes and puree the sauce.)

*I love this plum sauce with white rice. The combination of the sticky, sweet, earthy sauce and the plain white rice gives me that same homey feeling that I get from mashed potatoes and gravy. I'm tempted to save leftover plum sauce, without the meat, just to serve on rice.  It is a huge upgrade over the plum sauce you buy in jars at the chinese grocery.

*Oh, and in a tip of the hat to Tom at ExploringFoodMyWay - yes, that's Sriracha sauce you see in the picture up top.  A spark of heat adds a nice finish to this dish.

*If you're really in a hurry, you can quick release the pressure on the cooker after the 15 minutes of cooking time. But, I think the texture of the pork is a little better if you let the pressure come down naturally.
*And it freaks my kids out when the pressure cooker is unloading steam from high pressure - it is quite loud.

What do you think? Questions? Other ideas? Leave them in the comments section below.

Related Posts:
Instant Pot Korean Short Ribs
Pressure Cooker Chicken Stock (the best way to get chicken stock for this recipe)
Instant Pot Pepper Steak
My other Instant Pot and Pressure Cooker Recipes

Adapted from:
Tom Johnson's Chinese cooking class at the Western Reserve School of Cooking
Lorna Sass Pressure Perfect (And check out Lorna's pressure cooking blog at pressurecookingwithlornasass.wordpress.com)

*Enjoyed this post?  Want to help out DadCooksDinner?  Subscribe using your RSS reader or by Email, recommend DadCooksDinner to your friends, or buy something from Amazon.com through the links on this site.  Thank you!

Things I Love: Pressure Cooker

March 1, 2010 by Mike Vrobel 7 Comments

Things I Love: Pressure Cooker

Kuhn Rikon 12 quart pressure cooker on the left,
Fagor 10 quart pressure cooker on the right


[Update 2016-07-12: Over the years, I've learned a lot about pressure cookers, and my preference changed to electric models. For details, see: Which Pressure Cooker Should I Buy?]
I don't think of myself as a cook who likes gadgets. My favorite kitchen tools are my knife and my wooden spoon. But there are a few gadgety* tools I use often. One of them is my pressure cooker.
*Is gadgety a word? If not, it should be.
**My rotisserie is not a gadget!  It is an essential piece of grilling equipment!

I use a pressure cooker when I need to compress cooking time. When I have a recipe that says "simmer for 4 hours", but I need it done in one hour, my pressure cooker comes out. I view the pressure cooker as the time-bending opposite of the slow cooker. One is useful when you don't have much time; the other is useful when you have a ton of time.

The pressure cooker joined my batterie de cuisine years ago. It was back when Diane was pregnant with Tim, our youngest child. He decided, after only three months of pregnancy, that he was tired of waiting and wanted to join us. Diane was put on bed rest, and only allowed to get out of bed once a day for the last six months of the pregnancy. Ben was three years old, Natalie was one, and I was suddenly Mr. Mom on top of DadCooksDinner.
*After this experience, I marvel at single parents. How do they get through the daily batch of whining, late night wake-up calls, illnesses, and all the other trials that being a parent brings? When I'm tired, cranky, sick, or busy with work, I have Diane to back me up. And vice versa. In this case, I knew I just had to hang on for six months. How do you do it when you have to hang on until eighteen? If you are a single parent, and are reading this, you have my admiration and respect.

My pressure cooker helped me hold on to my sanity. Some people exercise for their mental health; I cook. With the pressure cooker, I could cook stews and chilies when I had a few minutes to myself, after the kids were in bed. I would start them while I cleaned the kitchen, and they would be done in about an hour. Then I could collapse with a good book for the rest of the evening. The next night, I would take them out of the fridge, scrape off the congealed fat, and reheat them on the stove. Dinner was ready in fifteen minutes, and I had leftovers for lunch the rest of the week. For the next six months, I worked my way through Lorna Sass's The Pressured Cook, and Ben, Natalie and I got to bond over trips to daycare and early morning ear infections. Six months later everything was back to normal.* Or as normal as things get with a new baby in the house. The pressure cooker has been in regular use in my kitchen ever since.
*The end result of the bed rest was a healthy baby, born one month early. I can't believe Tim is five years old; it seems like this happened only yesterday. He has the personality you would expect for someone who wanted to be born six months early - stubborn and determined to do things his way.
**I have no idea where he gets that from.

How does it work?
Pressure cookers use the steam from cooking to build pressure in the cooker. The lid has an airtight seal, and locks onto the top of the pot. In the lid is a regulator that will not allow air to escape until it reaches operating pressure at 15PSI (roughly 1.0 bar). Under pressure, water comes to a boil at a higher temperature, 250*F instead of 212*F.  The higher temperature combined with the pressure cooks food much faster than normal. How much faster? Pressure cooking cuts simmering time by two thirds. For example, take my favorite pressure cooker recipe, homemade chicken stock. Normally, chicken stock should simmer for 4 hours. In the pressure cooker, chicken stock takes 45 minutes once you're up to pressure. Chili goes from 3 hours of simmering to 25 minutes under pressure. Pot roast? Done in an hour. Pressure has the amazing ability to compress cooking times.

What does it do well?
The downside to the pressure cooker is the lack of specific control while you're cooking. Once you lock the lid, you can't check on anything until it is done cooking. Don't pressure cook anything that takes careful timing or measuring of temperature.*
*Examples: Chicken breasts, rare beef, or anything ever described with the word "lean".

Pressure cooking is best for braises, stews, chilies, curries, pot roasts, dried beans, and soups. In other words, it is a good replacement for long, slow, wet cooking methods, where overcooking doesn't happen easily.
*If a recipe has the words "simmer for X hours" in it, then it will be perfect for the pressure cooker.

Also, because it needs steam to come up to pressure, it won't work with any recipes involving dry heat. You have to have some liquid in the pot, usually a half a cup or more.

Is it going to explode?
When I tell people I love my pressure cooker, that is always the first thing they ask. Everyone has a story about that time in the 70's when mom's pressure cooker exploded. The lid was embedded in the ceiling, pea soup coated every surface in the kitchen, and mom never used the pressure cooker again.

I know why these stories are from the 70's, but I can't explain why mom was always cooking pea soup. Those were first generation pressure cookers, often called "jiggle tops". They regulate pressure using a weighted regulator, which lifts off the pressure valve when the steam in the cooker is strong enough to lift the weight. The problem is, that valve is the only way for steam to escape.  If something blocks that valve (like, say, a stray pea skin), the pressure keeps building, and building, and...boom.
*They're called jiggle tops because once they are up to pressure, the weighted regulator rocks back and forth, letting a little burst of steam out every time it rocks. And because "jiggle top" is more fun to say than "rocking top".

Starting in the 80's, European companies developed second generation pressure cookers. These cookers have spring-loaded valves to maintain the pressure. No steam escapes from the pressure cooker unless it is over-pressurized; you can tell they're up to pressure by watching the marks on the regulator. They are built with multiple safety systems and release valves, to make sure the pressure will escape before the cooker blows its lid off.
*Worst case, it will hiss and sputter a lot, until you turn off the heat. No more exploding! No more pea soup on the walls!

Which one should I get?
Obviously, you want a second generation cooker. Stay away from all-aluminum models, which are really meant for pressure canning. The brands that are recommended by sources I trust are Kuhn Rikon, WMF and Fagor. Kuhn Rikon is often called the Mercedes-Benz of pressure cookers, and it has the quality and price tag to match that description. I've also read good things about WMF pressure cookers. Both are second generation cookers, but I've never had my hands on either brand. My pressure cooker is the Fagor Duo 10 quart pressure cooker. It has the spring loaded valve and multiple safety systems of a second generation cooker, but you can tell that it's up to pressure once it begins releasing steam, like a first generation cooker. I think of it as a one and a half generation cooker. The Fagor doesn't have a marked regulator, and the constant hissing can get a little annoying.

That said, I haven't upgraded it because I love its size. The Fagor is 10 quarts, and 10 inches in diameter. This is unusual in pressure cookers; most manufacturers stop at an 8 quart capacity, and most cookers are 8 to 9 inches in diameter. And…that brings me to head space. Buy a larger pressure cooker than you think you need. A pressure cooker needs "head space" to come up to pressure - if it is filled over ⅔rds full, there isn't enough space for the steam to build up pressure. So, my 10 quart cooker only gives me 6.6 quarts of usable space. A 8 quart cooker gives you 5 quarts of space, and so on.
*I like the 10 inch diameter because it gives you extra space when you're browning meat to make a stew or braise. It's the difference between having to brown in two batches or three batches.

For that 10 quarts, the Fagor costs around $100. The only other pressure cooker I've been able to find that is 10 quarts (or larger) is the Kuhn Rikon 12 quart family pressure cooker. It is two quarts larger, has a real second generation pressure system, and it has an 11 inch diameter. Why don't I own one? Because it costs $399. I can't justify four times the price for the extra two quarts.*
*Yet. But I'm weakening. I can go an awful long way to justify a purchase when I really, really want something. Everyone seems impressed with the Kuhn Rikon cookers, and I'd love to try one out. Someday, when this blog has made me rich and famous, I'll upgrade.
**Yes, gadget lust is an ugly thing.

RTFM - Read the F(ine) Manual
Read the manual. All pressure cookers work a little differently. The manual will explain how to use the cooker, how to lock the lid so the cooker can come up to pressure, and how to release the pressure so the lid can be unlocked.
*That's another safety feature that has been added. Modern pressure cookers lock until all the pressure is released. That way, the lid can't be forced open while the cooker is still under pressure, causing the aforementioned pea soup explosion.

Pressure Cooking Sources:
My discussion of pressure cooking sources has to begin with Lorna Sass*. She is my pressure cooking guru. Her cookbooks taught to use my pressure cooker, and are resources I still turn to for timings when I'm adapting a recipe for the pressure cooker. The one I recommend to people just starting out is Pressure Perfect; it has the widest range of recipes, and timing suggestions for just about any cut of meat or bean you could think to put in a pressure cooker.
*I own all of her pressure cooking cookbooks, and started with her The Pressured Cook.

And! Part of why I'm writing this post is that I just found out that Lorna has a blog. Check out Pressure Cooking with Lorna Sass [pressurecookingwithlornasass.wordpress.com] for videos with Lorna, and links to other pressure cooker recipes around the web.

Other sources where I've found good pressure cooker recipes are:
The America's Test Kitchen Family Cookbook has a very good section on pressure cooking.
Madhur Jaffrey's Quick and Easy Indian Cooking has a lot of pressure cooker recipes; pressure cooking is very popular in India
Jaques Pepin has a few pressure cooker recipes in his Fast Food My Way and More Fast Food My Way
Alton Brown (my hero!) has done a couple of episodes using a pressure cooker: Pressure and The Big Chili

What do you think? Do you use a pressure cooker? Have any questions? Other ideas you want to share? Leave them in the comments section below.

Related Posts:
Using my pressure cooker to make stock is my "killer app" - I make chicken stock once or twice a month with my pressure cooker.  After roasting a chicken for dinner, I take the carcass and toss it in the pressure cooker while I clean the kitchen.  One hour later...stock!
Pressure Cooker Chicken Stock
Pressure Cooker Turkey Stock
Pressure Cooker Asian Pork with Dried Plums
Pressure Cooker Short Ribs

Inspired by:
Lorna Sass: Pressure Perfect
Fagor Duo 10 Quart Pressure Cooker

*Enjoyed this post?  Want to help out DadCooksDinner?  Subscribe using your RSS reader or by Email, recommend DadCooksDinner to your friends, or buy something from Amazon.com through the links on this site.  Thank you!

Salmon Saute With Tequila Orange Sauce

February 25, 2010 by Mike Vrobel 8 Comments

Let's put the Saute with Pan Sauce basic technique to work again.

If you have been reading this blog, you probably know my first choice for cooking fish is the grill.
*OK, OK, you caught me.  My first choice for cooking anything is the grill.

What do I do when there are two feet of snow on my deck, and I don't feel like shoveling?*  I return to my trusted saute technique.  And I get some salmon.  Salmon's bold, meaty flavor helps me get through a cold winter's night.
*Yes, I know I talked tough in my winter grilling post, but after two weeks of non-stop snow, the last thing I want to do for a quick weeknight dinner is shovel my deck.


Sauteed salmon has a seared, crispy exterior to go with perfectly cooked, tender flesh.  The pan sauce adds the sweet citrus flavor of oranges, butter for a rich mouth feel, and complex undertones from tequila.  Even better, the recipe comes together quickly; it takes longer to read than it does to cook the salmon.

Recipe: Salmon Saute With Tequila Orange Sauce

Cook time: 8 minutes

Equipment:

  • 12 inch stainless steel fry pan (I love my All-Clad 12" fry pan).

Ingredients:

  • 5 to 6 Alaskan salmon fillets, each 1 ½ to 2 inches wide (I used 12 ounces of frozen Alaskan Salmon, and cut it into fillets myself)
  • 1 ½ teaspoon kosher salt (¼ teaspoon per fillet - about a three-finger pinch)
  • 1 ½ teaspoon ancho chile powder (¼ teaspoon per fillet)
  • 2 tablespoon vegetable oil

Sauce ingredients:

  • 1 ½ oz tequila (one shot glass)
  • juice of 1 orange
  • 1 tablespoon unsalted butter (optional)
  • salt and pepper to taste

Directions:
*For an overview, see my Saute with Pan Sauce basic technique
1. Prepare the Sauce: Measure out the tequila and butter, juice the orange, and set aside.

2. Prepare the Salmon: Sprinkle the salt and ancho chile powder evenly over the salmon fillets.

3. Prepare the pan: Heat the oil in your pan over medium-high heat, until the oil is shimmering and just starting to show wisps of smoke.

4. Saute the Salmon: Place the salmon fillets in the pan, skin side up. Shake the pan to get the oil under the salmon, then let sit for 3 minutes, or until well browned. The salmon should release easily from the pan, or it needs another minute of cooking. Flip the salmon, and cook with the skin side down for another 3-5 minutes. The timing on this side depends the thickness of the salmon. Small pieces, roughly 1 ½ inches thick, will be done after about 3 minutes; thick pieces (2 inches or more) need four to five minutes.* Remove the fillets to a plate.
*To determine the doneness, I watch the side of the salmon fillets - you can see the pink, uncooked part getting smaller and smaller. I like my salmon cooked to medium doneness, so I wait until the salmon just looks cooked through on the side. If I have sushi grade salmon, or Copper River salmon when it first hits the market in June, I cook it rare.  I sear the top and bottom, but get it off the heat while I can still see that uncooked line in the middle. See the sauteing picture above - the thick filet in the middle on the left has an uncooked line in the middle; the thinner filets on the right are already cooked all the way up the side.

5. Make the Pan Sauce: Pour off any oil left in the pan. Off the heat, add the tequila to the pan. Wait about a minute, until the tequila stops steaming, then put it back over the heat.* Add the orange juice, and scrape any browned bits of salmon from the bottom of the pan into the sauce. Boil until reduced by half, about 2 minutes. Turn off the heat, and whisk in the butter. Taste the sauce, and add salt and pepper until it is well seasoned.
*If you want to add some showmanship to your cooking, flambe the tequila. Immediately after adding it to the pan, put it back over the heat, and light the tequila with a click lighter or by tilting the pan until the tequila fumes ignite from the burner. Shake the pan occasionally until it stops flaming, then add the orange juice.
**Make sure you have a lid that will cover the pan nearby, just in case. If the fire gets out of control, cover the pan with the lid to smother it.


6. Serve: Serve each salmon fillet with 1 teaspoon of sauce drizzled on top, and pass any leftover sauce at the table.

Serving suggestions:
I served the salmon with mango salsa, quick couscous and a side of steam sauteed green beans.

Variations:
*Margarita sauce: Replace the orange juice with the juice from two limes, and 1 teaspoon of sugar.

*Screwdriver sauce: Replace the tequila with vodka.

*Non-alcoholic sauce: Replace the tequila with 1 cup of chicken broth, preferably homemade.

*Need some other ideas for the sauce?  See the Saute with Pan Sauce basic technique.

*Simple Salmon: Use salt and ground black pepper, and skip the pan sauce.  Squeeze a little lime or lemon over the fish, and serve.

Notes:
*I cook my salmon in a stainless steel pan, instead of a nonstick pan; I get a better sear on the salmon that way.  Just make sure you don't skimp on the oil in the pan when you do this, and give the salmon enough time to develop a good crust - it releases from the pan once it is has that crust built.  Even then, you may have to help it release from the pan by gently working any stuck sections loose.  I like my slotted spatula for that.

*As I've said before, please buy sustainable seafood. In this case, that means Alaskan wild salmon is the right choice for this recipe.

*Thawing frozen salmon: If you follow my advice and buy Alaskan salmon, it is probably going to be frozen, unless you're buying it in season (or have a very good fishmonger available to you.) To thaw, I just leave the vacuum pack in the refrigerator overnight. If you're in a hurry, put the vacuum sealed package of salmon in a bowl under cold running water. It will take about an hour to thaw.
*Does anyone know why my frozen salmon says to remove it from the plastic vacuum package before I thaw it? I never do, and it seems to turn out OK, if not quite as good as when they thaw it at the store.

*Yes, frozen salmon. "Fresh" fish means "Fresh frozen", unless I buy it at the dock, directly from the fisherman. My understanding is that all the fish at the grocery store or fish market is flash frozen at sea, then thawed once it reaches the store. And really, that's OK - it results in higher quality fish. There's no way fish would make it to market in Ohio, all the way from the Pacific ocean, without freezing it to keep it from spoiling.
*Source: Warming Up to Frozen Fish [alaskaseafood.org]

What do you think? Questions? Other ideas? Leave them in the comments section below.

Related Posts:
Pictured with my Mango Salsa
Saute with Pan Sauce basic technique
Pork Chop Saute with Orange Mustard Sauce
Grill Smoked Salmon
Sustainable Seafood

Adapted from:
Pam Anderson How to Cook Without a Book
(And check Pam out at her blog: ThreeManyCooks.com)


*Enjoyed this post?  Want to help out DadCooksDinner?  Subscribe using your RSS reader or by Email, recommend DadCooksDinner to your friends, or buy something from Amazon.com through the links on this site.  Thank you!

Mango Salsa

February 23, 2010 by Mike Vrobel 4 Comments

IMG_1514
Mango Salsa

Salsa is another basic technique that gets used a lot in the DadCooksDinner household. To make a salsa, dice and combine the following: onion, pepper, herbs, and...fruit. Yes, fruit. Remember, tomato is a fruit, not a vegetable.

After tomatoes and tomatillos, my favorite fruit to use in salsa is mangoes. Mango salsa makes a great side dish for chicken, pork, and fish. It has a sweet/hot combination that goes particularly well with grilled food. Also, mangoes make me think of the tropics; I love the effect it has on the the flavor profile a meal.
*Since I'm writing this in February, anything that makes me think of the tropics is a good thing.

Recipe: Mango Salsa

Notes

  • Spicy: Skip the red pepper, and add another diced jalapeno. The sweet/hot taste combination of mango and the jalapeno is why this salsa is one of my favorites. I like it with the red pepper, though, because I like the red/yellow/green color combination you get that way.
  • Onions: Substitute ½ of a red onion, or sweet onion (like a Vidalia onion) for the green onions.
  • Herbs: Substitute ¼ bunch of cilantro or parsley, minced, for the thyme.
  • Pineapple: Replace the mango with diced pineapple.
  • Pitting and dicing a mango: Mangoes are a challenge to dice, if you don't understand their anatomy. Mangoes have a large, flattened oval pit that you have to cut around. The pit follows the shape of the mango - they have a wide side and a thin side. I use the "hedgehog" technique of cutting a mango. I remove the sides of the mango from the pit, then dice them on the skin.
  • To do the hedgehog, start your knife at the top of the mango, slightly to one side of the center line. Cut until you feel the pit, then run your knife along the side of the pit, exiting at the bottom of the mango. Repeat on the other side, cutting another fillet of mango away from the pit. Then, using a dull knife or a spoon, cut the dice into the flesh of the mango, without cutting through the skin. Finally, use a spoon to cut the diced mango away from the skin.
  • See picture above for what this should look like about halfway through. If I'm not explaining this well, check out the National Mango Board's explanation: How To Cut A Mango
  • As I mentioned in the opening, this is a very flexible side dish.  It adds a punch of sweet heat to a dish, and goes really well with sauteed or grilled meat.  You'll see it as the side dish to the salmon saute I'm doing later this week.  It also makes a great topping for a salad - Diane used up the leftovers on her lunch salad the day after the I finished the pictures for this post.

What do you think? Questions? Other ideas? Leave them in the comments section below.

Related Posts:
Quick Red Salsa
Tomatillo Salsa
Toasted Ancho Salsa

Inspired by:
Pam Anderson's basic salsa technique in How To Cook Without A Book
(And check out her blog: ThreeManyCooks.com)

*Enjoyed this post?  Want to help out DadCooksDinner?  Subscribe using your RSS reader or by Email, recommend DadCooksDinner to your friends, or buy something from Amazon.com through the links on this site.  Thank you!

Things I Love: Flat Edged Wooden Spoon

February 22, 2010 by Mike Vrobel 9 Comments

Things I Love: Flat Edged Wooden Spoon

I've been showing you expensive things that I love: my Thermapen, All-Clad Stainless cookware, Shun Bob Kramer Knives. My flat edged wooden spoon is not expensive, but I love it just as much.

I've replaced every piece of kitchen equipment bought before I became a real home cook.* Everything except this simple, flat edged spoon. It was was part of a stir-fry set I bought just after Diane and I got married. It fits in my hand like it was carved just for me, and the slant to the flat edge is perfect for a (right-handed) scrape of the pan.
*Yes, even the stove and the dishwasher. The microwave was the last hold out from our wedding presents, but it finally gave up the ghost a few years back and had to be replaced.
**Oh, and the refrigerator.  We did buy a new one, but the old one just moved down into the basement, to give us backup storage and an extra freezer.  I don't know what we'd do without the second refrigerator - with the five of us, it feels like we'd just have room for milk and eggs.

I use this spoon to deglaze pans when I'm making a pan sauce, and to stir simmering pots with ingredients that might burn. The flat edge scrapes the bottom of pans without scratching them, and I can feel if anything is sticking to the bottom of the pan - the wood transfers a rough feel to my hand. I just have to keep scraping until the rough feeling is gone, and the risk of burning has passed. It is the key to pan sauces and braises - once you have a good browned fond on the bottom of the pan, the flat edge helps lift it off and incorporate it into the sauce.

I worry that I only have the one spoon. I hate it when it's in the dishwasher and I need it. Even worse, it's developing a crack (see the middle of the handle in the pictures.) I've bought many other spoons, but none of them have that "fits just right" feel that this one has. The closest I've come is the Mario Batali risotto paddle (see picture below). It works almost as well, and has the slight angle and flat edge that I like. But it is made out of a soft beechwood; the scraping edge of the spoon is starting to wear down already, and has developed an interesting warp on one side. I've only owned it for six months, so I don't think it's going to last.

The last time I was at Sur La Table, I saw an exact duplicate of my favorite, and I'm going to get a spootle from Jonathan Spoons as recommended by DineInDiva in her blog. I want to try them out, but I don't think they'll be able to replace my old friend.

[Update] It's a sad day at DadCooksDinner. Since I wrote this post, my old friend split in half along that developing crack. Sigh.  After a moment of respectful silence, I ordered both spoons I mention above. I just hope one of them feels as good in my hand as this spoon did.

What do you think? Do you have any kitchen gadgets that feel less like a tool, and more like a member of the family? Tell us about them in the comments section below.

*Enjoyed this post?  Want to help out DadCooksDinner?  Subscribe using your RSS reader or by Email, recommend DadCooksDinner to your friends, or buy something from Amazon.com through the links on this site.  Thank you!

Slow Cooker Pork Pot Roast

February 18, 2010 by Mike Vrobel 32 Comments

Slow Cooker Pork Pot Roast

Slow Cooker Pork Pot Roast

I don't understand why slow cookers bring out the worst in short cut cooking. It seems like most of the recipes go something like this:

Put the meat, a can of cream of mushroom soup, and a package of onion soup mix in the slow cooker. Cook on low for ten hours.

Ugh. While this recipe, and I use that phrase loosely, will give you a cooked piece of meat, that's about all I can say for it.
*I'm trying not to get on another rant about cooking with real food. Why, in the name of all that is good in this world, would you use cream of mushroom soup? Why?

I like my slow cooker recipes to have a little more finesse. Today I'm making pork pot roast, a winter staple in our household. I make sure I brown the roast and saute the onions before putting them in the slow cooker.  These steps give my pot roast a deep, meaty, caramelized layer of flavor.  Then the slow cooker works its magic, tenderizing the meat over the long cooing time.  You get great results without any hands-on work after the initial preparation.

Recipe: Slow Cooker Pork Pot Roast

Equipment

  • 6 quart or larger slow cooker (Crock Pot brand is fine, but I like my fancy ones from All-Clad and KitchenAid)

Seasoning the pork
Seasoning the pork

Searing the pork
Searing the pork

Everything in the slow cooker

Ready to serve
Ready to serve

Variations:
*Simple version: If you're in a big hurry, and you need the dump and cook method, do the following. Skip the browning step; just season the roast, dice the onion, then dump everything in the crock pot and turn it on. It loses the depth of flavor that a good, browned roast gives you, but it also cuts the prep time down to a couple of minutes. The results will put anything involving cream of mushroom soup to shame. Also, skip the settling and pureeing steps - just spoon the sauce over the roast.
*If skipping the browning is the difference between making pot roast and not making pot roast, then go ahead and simplify. But try it with the browning step if you can; I think you'll see why I take the extra time.

*Make ahead version: If you're in a hurry in the morning, but don't want to lose the flavor of the browning steps, you can do them the night before. Do steps 1 and 2, then refrigerate the pork and vegetables overnight. In the morning, take them out of the refrigerator, transfer them to the slow cooker, and continue with step 3.
*If your slow cooker has a removable ceramic insert, do NOT use it to store the ingredients in the refrigerator. Why? Because a refrigerated insert will take forever to heat up, and even worse, the insert may crack from the sudden increase in temperature when you turn the heat on.

*Southwestern version: Replace the rub ingredients (coriander, garlic powder, lemon peel) with 2 teaspoon chili powder, and add a can of diced green peppers and (optional, if you like heat) 1 tablespoon chipotle puree with the tomatoes.

*Other starchy root vegetable options: Parsnips, turnips, rutabaga, sweet potatoes, cabbage - all go well in the slow cooker. Cut into 1 to 1.5" chunks, and add to the cooker. Fish out like you did the carrots when you're done.

Reflection selfie in the slow cooker

Notes:
*I prefer shoulder cuts for the slow cooker because they're almost impossible to overcook, and that's what the slow cooker does - it overcooks things. 8 hours, even on low, is a mighty long time to cook something. Shoulder cuts are better when they're overcooked; they have a lot of fat and connective tissue that melts during the long cooking time.

*The slow cooker doesn't need much in the way of added liquids; the pork, onions and tomatoes have plenty in them. That's why I only add an additional ½ cup of stock; it's real purpose is to loosen up the fond you created by browning the pork and the onions, so you can get it into the slow cooker to add its flavor to the sauce.

What do you think? Questions? Other ideas? Passionate defenses of cream of mushroom soup? Leave them in the comments section below.

Related Posts:
Slow Cooker Beef Barbacoa

Basic Technique: Slow Cooker Dried Beans

Slow Cooker White Beans and Greens with Italian Sausage

Crockpot Pork and Sauerkraut

Inspired by:
Slow Cooker Pork Pot Roast in Cooks Country magazine [cookscountry.com, subscription required]


*Enjoyed this post?  Want to help out DadCooksDinner?  Subscribe using your RSS reader or by Email, recommend DadCooksDinner to your friends, or buy something from Amazon.com through the links on this site.  Thank you!

February Winter Farmer's Market Reminder

February 17, 2010 by Mike Vrobel 1 Comment

The February Winter Farmer's Market in the Cuyahoga Valley National Park is this weekend.  It is on Saturday, Feb. 20th from 9AM to 12AM 12PM (noon).  It's located in the Happy Days Lodge, 500 W. Streetsboro Road in Peninsula, OH.
*If you don't live in Northeastern Ohio, make sure to find your own local winter farmer's market.

Here's my post about the market, including a map: Winter Farmer's Market in the Cuyahoga Valley
Here's the official site for the market: Cuyahoga Valley Countryside Conservancy

See you there!

Stovetop Popcorn

February 16, 2010 by Mike Vrobel 2 Comments

I was home alone with Tim, my youngest, and he asked for Popcorn as a snack. Now, we've been using Alton Brown's brown paper bag microwave popcorn recipe, and we usually have microwave popcorn in the pantry. But I remembered Michael Ruhlman's recent post on making popcorn on the stove top, and how easy he said it is. Michael hasn't led me wrong so far, so I gave it a try.
*I remembered it because of the great picture by Donna, Michael's wife. It's amazing how a good picture makes me want to try a recipe.

After making the popcorn, I thought "That was too easy." I tasted the results, and thought "How much money have I wasted on microwave popcorn that tastes like cardboard?" Then Tim dug in, and I knew we had a winner.

Now Tim requests "Daddy's Popcorn" a few times a week, and I taught Diane the recipe* so she could make it for him whenever he needs a popcorn fix.
*Say it with me: Another "So Simple It's Barely a Recipe" recipe.

Recipe: Stovetop Popcorn

Equipment:

  • 4 quart pot with a lid. (The lid is critical, unless you want to do a live re-enactment of Snoopy in "A Charlie Brown Thanksgiving")

Ingredients:

  • ½ cup popcorn
  • 1 ½ tablespoon vegetable oil (I used peanut oil)
  • 2 tablespoon butter (optional)
  • fine sea salt (optional, but tastes very bland without it)

Directions:
1. Melt the butter: Melt the butter. I put it in my 1 cup pyrex, and microwave for 30 seconds. Then I check it, and microwave in 10 second increments until the butter is just melted.

2. Pop the corn: Put oil and popcorn in the pot, and stir so all the kernels are coated with oil. Cover the pot and put it over medium-high heat Shake the kernels often, "swirling and hopping", as Ruhlman says, while they heat up. When the first kernel pops, continue to cook, shaking constantly, until the popping slows down to more than one second between pops. Remove from the heat immediately, and rest for 30 seconds for the popping to stop. Pour into a large bowl.

3. Season and serve: Sprinkle the popcorn with some salt, and toss. Drizzle with the butter butter and toss to coat evenly. Taste for salt, and add more if you need it.

Variations: 
*Spicy popcorn - If you don't want to add butter, Ruhlman recommends adding a half teaspoon of chili flakes with the oil and popcorn.

Notes:
*This recipe doubles very easily. In fact, Ruhlman's original version has twice as much of all the ingredients - 1 cup of popcorn, and so on. When I used those quantities it was way too much popcorn for my 4 quart pot - it was still popping vigorously as it pushed the lid off of the pot. (See the picture, above.) I pulled the pot off the stove, and had about a quarter cup of unpopped kernels left.  ½ cup of popcorn is perfect for my 4 quart pot - it fills it right to the top.  If you do double the recipe, make sure you have an 8 quart pot to make it in.

*Popcorn salt is very finely ground salt, and is best for this recipe…but why buy it? Grind up some kosher or table salt in a mortar and pestle, or your coffee grinder that you keep to grind up spices*, until it's very finely ground. *You do have a coffee grinder you use just to grind spices, right?But I have to admit, I just use fine sea salt when I make this. It's my default "table" salt, which I buy in bulk from my local health food grocery. I find Kosher salt flakes to be too big for popcorn.

*I want to try this with a quarter teaspoon of ground chipotle powder; I think the smoky heat of chipotle would make a great popcorn. But…every time I get out the popcorn, Tim hears it, and comes running into the room, yelling "we're having POPCORN!" I don't think the heat will agree with him, and he's so excited that I switch back to the regular recipe. I'll have to make a batch after he goes to bed one of these nights, to see how it works.

*If you're trying to get a picture of the popcorn in the pot, take the picture before you put the pot on the heat, not after it's been on the heat for a while.  Or, at least make sure you put the lid down nearby, so you can clamp it back on the pot quickly when popcorn goes shooting across the room.

What do you think? Questions? Other ideas? Leave them in the comments section below.

Inspired by:
Michael Ruhlman's Popcorn [Ruhlman.com]

*Enjoyed this post?  Want to help out DadCooksDinner?  Subscribe using your RSS reader or by Email, recommend DadCooksDinner to your friends, or buy something from Amazon.com through the links on this site.  Thank you!

Weekly Dinner Plans

February 15, 2010 by Mike Vrobel 15 Comments

"The thing about cooking...I think the big misapprehension that people have is that cooking is time consuming. The shopping part is the time consuming. I mean, the part where you're sitting around saying what are we going to have for dinner tonight is very time consuming. I mean, if it's 4 o'clock and you're in your office and you haven't figured out what you're having for dinner tonight, the battle's half lost."

Ruth Reichl, interview with Terry Gross on Fresh Air [npr.org]

Exactly! The key to cooking dinner every night is planning your meals in advance.  Every Saturday morning, I sit down with the flyer from my local grocery store and plan out that week's menu based on what's on sale.  I make a grid in my cooking notebook, Saturday to Friday, with four columns.  Column 1 is the protein, columns 2 and 3 are the vegetables, and column 4 is the starch.*  Once I've made my plan, I make the shopping list for it on the rest of the page.  It takes some effort; I usually wind up scratching my head over a few of the days, trying to come up with some ideas for what to make that we haven't done recently.  But the benefits are amazing.
*When you're starting out, go with three columns: Protein, Veg, Starch.  I do the two vegetables to make my meals healthier, and get me to think about not making the protein the focus of the meal.  When you're starting out, setting up the menu plan is more important than making sure you get your extra veggies.  Once you've been doing it for a while, you can expand to two vegetables if you want to.

Don't think.  Just cook: Now, when I do get home on a busy Thursday, I can immediately start cooking, instead of trying to work through "OK, what do I cook now?" That is the key to cooking at home every night.  If I have to think about it, as Ruth says, the battle's half lost.  Thoughts about heading over to Tres Portrillos for a margarita and carnitas start to creep in, and it's all over.

There's nothing to cook: Another benefit is avoiding "I don't have anything to cook" incidents.  You bought everything you need when you were shopping.  Now you won't look in your fridge and find a collection of foods that don't really make a meal.

Saves money, too: It's also a good way to keep your grocery bills down.  By planning with the weekly sales right in front of you, it's easy to center your meals around what's on sale.  And, even if you don't follow the sales flyer, it is still cheaper to cook at home than it is to eat out.  Don't get me started about how much more expensive it gets when you give in to the siren song of a fast casual restaurant.

Setting up your meal plan:
Here's my general plan of attack.

Weekend: adventurous cooking

  • If I'm making something that goes bad quickly, like fresh fish, it's Saturday dinner.  Otherwise, Saturday is probably a new recipe that I want to try out.
  • Make a big roast or stew on Sunday, and plan a second meal later in the week around the leftovers.

*These two are the recipes that usually wind up on the blog, unless I'm focusing on a weeknight dish.


Then I pick a collection of weeknight friendly recipes for the rest of the week, usually from the following list:

  • Soup and Salad night
  • Sandwich and Salad night (great if you're in a hurry, and a good way to use up the weekend roast)
  • Big Salad with a loaf of bread night (also great if you're in a hurry)
  • Grilled/Sauteed protein with side of grilled/steamed vegetables, salad and quick starch

Most of my meals fall in this last category of protein with 2 veg and a starch.  Some examples of this, spread across different ethnic cuisines:

  1. American Grilled: Grilled chicken breasts with grilled asparagus, salad and a side of rice
  2. American Roast: Sear-Roast chicken pieces with frozen peas, salad and roast new potatoes
  3. American Saute: Pork Chop Saute with steamed green beans, salad and a side of orzo
  4. Chinese: Stir fried chicken with stir fried broccoli, stir fried cabbage and a side of rice
  5. Mexican: Grilled flank steak with salsa, black beans and tortillas
  6. Italian: Italian Sausage with quick pasta sauce, steamed broccoli and spaghetti
  7. Greek: Grilled Lamb Shoulder steaks with steamed green beans, shredded carrot salad and couscous
  8. French: Seared steak with herb butter with steamed asparagus, salad and roast fingerling potatoes

...the variations are endless.  I just came up with these off the top of my head over the last five minutes.  *Of course, if you've read my blog for any length of time, you know I lean heavily on the grill side of this list, particularly during the summer.

Um.  Well.  OK, I'll admit it.  When we're really in a hurry:  hot dogs with frozen corn and canned baked beans.
*The kids love it.  Hey, they can't all be gourmet meals...

And finally, when I need a break, Diane pitches in with Pizza night.
*She makes a great homemade pizza dough.
**Yes, I married well.  Love you, dear!

I tend to think of the plan as:

  • New Recipe Saturday
  • Sunday Roast
  • Sandwich and/or Soup and/or Salad day
  • American #1 day
  • Stir Fry day or Pasta day
  • American #2 day
  • Mexican day

...but I shuffle it around quite a bit, depending on our schedule, what's on sale, and what looks good in the grocery store flyer

Notes:
*I stuck with a four week meal plan when Diane was on bed rest with our youngest, and I was both DadCooksDinner and Mr. Mom for six months.  I didn't have the energy to figure out a new meal plan every week from scratch.  Nowadays, I'm too adventurous a cook to stick with the same plan month after month.  I always have some new recipe I want to give a try, and a rotating schedule felt too restrictive.

*Sticking with a meal plan, with some slight variations, will also make you a better cook.  You'll start to internalize the techniques and ingredients you need.  This is how I learned to cook, really.  I made sautes a couple of times a week with different pan sauces, then once I had the technique internalized, I moved on to something else.

*It's tough to tell from all that protein I have listed above, but I try to do one soup/salad meal a week, and one vegetarian meal a week.

*I get my CSA box every other Friday in the summer.  That's usually where the vegetables come from when we're in season.  If I'm going to the farmer's market, I fill out the plan as best I can, then put things in general terms in the shopping list.  Like: "veg for stir fry, veg for roast".  Then I fill in at the market.

*Also, once you're comfortable with the general process, don't be afraid to improvise at the store.  Green beans look bad?  Unadvertised special?  Swap something else out.

*Lean on what you know, and what you like.  Chicken Tuesdays?  Chili Thursdays?  Make-your-own-monster-burger-Monday?  Go for it.

So, how about you?  Do you plan your meals for the week?  Any other tips or tricks I didn't mention?  Any go-to weeknight meals, for when you're desperate?  Let me know in the comments, below.

Inspired by:
Ellyn Satter's Secrets of Feeding a Healthy Family: Orchestrating and Enjoying the Family Meal

*Enjoyed this post?  Want to help out DadCooksDinner?  Subscribe using your RSS reader or by Email, recommend DadCooksDinner to your friends, or buy something from Amazon.com through the links on this site.  Thank you!

Rotisserie Pork Shoulder, Char Siu Style

February 11, 2010 by Mike Vrobel 23 Comments

My second most popular post is my rotisserie pork shoulder recipe.
*I love that recipe, because it was one of the first recipes I created exclusively for this blog. I was trying to come up with a new rotisserie idea, and it worked out better than I could have hoped.  It has become a standard in my recipe rotation.
**Get it? Recipe "rotation"? On the rotisserie? OK, I'll try again later.

I was looking for a follow up, because pork shoulder (aka pork butt) is one of my favorite cuts of meat. I wanted another way to cook it on the rotisserie. When I was researching my Peking duck recipe, the idea came to me. Could I adapt char siu, Chinese barbecued pork, to the rotisserie?

The rotisserie turned out* to be a great way to make char siu. You get the sweet, glazed, crispy exterior that says "Chinese barbecue" with the juicy, tender interior that only long cooked pork shoulder can give you. The only trick to the recipe is…sugar burns easily, so you have to be careful with the glaze. I use the brinerate technique, a salty marinade based mainly on soy sauce, to flavor the roast. I save the sugary, sticky glaze for the very end, when I brush it on for the last ten minutes of cooking time.
*Get it? "Turned" out? Rotisserie? Thank you, thank you, I'll be here all week….wait, where are you going?

**Oh, and don't forget the leftovers! This recipe is worth making, just to have the leftovers for fried rice.

***Finally: Don't have a rotisserie?  Don't worry - use the brinerade and honey glaze from this recipe with the regular grill technique in my Barbecued Chinese Boneless Ribs recipe.

Recipe: Rotisserie Char Siu (Chinese Barbecued Pork Shoulder)

Cook time: 90 minutes

Equipment:

  • Grill with Rotisserie attachment (I used a Weber Summit 650 with an infrared rotisserie burner. Here it is.)
  • aluminum foil drip pan (9"x12", or whatever fits your grill)
  • butcher's twine
  • Basting brush (Preferably a silicon brush, like my Oxo basting brush. Or, to be fancy, make a brush out of scallions. Trim the root end of about three scallions and tie them together. Split the green ends lengthwise, twice per scallion, about two inches from the end to turn it into a brush.)

Ingredients:

  • 3 ½ to 4 lb Boneless Pork Shoulder Roast, aka "Boston Butt" or "Pork Butt", trimmed of any excess fat

Brinerade

  • 1 cup soy sauce
  • 2 tablespoon hoisin sauce
  • 4 cloves garlic, minced or pressed through a garlic press (or 1 tablespoon garlic powder)
  • 2 inch piece of ginger, peeled and grated (or 2 teaspoon dried ginger)
  • 2 tablespoon rice wine vinegar (or dry sherry)
  • 1 tablespoon sesame oil

Glaze

  • 2 tablespoon reserved brinerade (or 2 tablespoon soy sauce)
  • ¼ cup honey
  • ¼ cup hoisin sauce

Directions:
1. Brinerate the pork roast: Whisk the brinerade ingredients in a small bowl. Remove any bones from the pork shoulder, then split the pork shoulder almost all the way through, but not quite - you want to open it up like a book, so the brinerade has less thickness to penetrate. See the picture below; I started by removing the bone, then continued that cut the length of the pork loin. Poke the shoulder all over with a fork, at least once every half inch, again to give the brinerade a way into the pork.* Put the pork shoulder in a gallon ziploc bag, then pour in the brinerade. Brinerate for at least two hours, preferably four hours to overnight.
*This is a chance to really work out your aggression - I pretend I'm the villain in a bad horror movie while I'm doing it.

Bone removed, split open "like a book", poking with a fork

2. Prepare and rest the roast: One hour before cooking, remove the pork from the brine, and pat dry with paper towels. Fold it closed over the cut you made, then tie it tightly with butcher's twine every 1 ½ inches.* Skewer the roast on the spit through the center of the roast, then let it rest at room temperature.
*When trussing, you're trying to get a nice cylinder shape. The pork shoulder cut may not cooperate, so do the best you can. See the picture on the far right.

3. Prepare the grill: Set your grill up for rotisserie cooking at high heat. For my Weber Summit, this means removing the grates, turning the two outer burners (burners 1 and 6) to high, and turning the infrared burner to high. Then I put my drip pan in the middle, over the unlit burners, and let the grill preheat for ten to fifteen minutes. (See My Rotisserie Basic Technique Post for more rotisserie setup details.)

4. Cook the roast Put the spit on the rotisserie, start it spinning, and cook with the lid closed for a half an hour. At that point, turn off the rotisserie burner if the roast is well browned. (You have to watch out for burning because of the sugar in the brinerade. On grills without a rotisserie burner, I would turn the heat down to medium at this point.) While the roast is cooking, put the glaze ingredients in a small bowl, and whisk until the honey is dissolved in the rest of the glaze. Cook the pork roast until it reaches 175*F to 180*F in the thickest part of the meat. This should take 1 to 1.5 hours; assume about 20 minutes per pound of meat. At that point, you should only have ten minutes of cooking time left. Brush the roast all over with the glaze, cook for another ten minutes, brush again with the glaze, then remove from the grill.

5. Rest, carve and serve.

Serving options:I love this as the protein in a Chinese dinner. I serve it with a couple of stir-fried vegetables and white rice. I pass any leftover glaze, and a bottle of hoisin sauce, at the table to use as sauce on the pork.


Variations:
*Easy pantry version: Buy a boneless pork shoulder roast, brinerate with whatever ingredients you have in the brinerate list.  The only one that is absolutely necessary is the soy sauce, and I always have the garlic powder and ginger in my spice rack in the pantry.
Likewise, for the glaze, the only ingredient you have to have is the honey.  The other ingredients give the glaze more flavor, but aren't absolutely necessary.

Notes:
*I love leftovers from this roast. Aside from eating the leftovers straight up as a lunch later in the week. It also makes a great base for sandwiches - I use it, sliced thin, in bahn mi style sandwiches. If I have enough, I freeze a ziploc bag or two of the pork and use it later, chopped up in fried rice or an Asian soup (recipes coming soon, I promise!).

*To quote from my Rotisserie Pork Shoulder Roast recipe: Make sure you trim the fat cap off the top of the roast - there's plenty of fat throughout this roast, so that big hunk of fat on top will just make it greasy.  And, this is not the time to go for medium-rare, slightly pink pork. The connective tissue in the shoulder will make it jaw-achingly tough. Cook it to well done and beyond. In fact, you'd have a hard time overcooking this roast. If you have any questions about "is it done?" you should err on the side of cooking it more.

*Sugar burns easily, and you have to be careful when you're cooking something for as long as this pork roast. I try to avoid burning the roast by keeping most of the sugar out of the brinerade, and adding it at the end in the glaze. That's why I turn my rotisserie burner off after a half an hour - my roast is starting to blacken at the edges by then.

*The red band on the outside of char siu made at your local Chinese restaurant? It comes from food coloring. It doesn't add any flavor, but if you really want it, add a few drops of red food coloring to the brinerade.

What do you think? Questions? Other ideas? Leave them in the comments section below.


Related posts:
Rotisserie Pork Shoulder Roast
Rotisserie Boneless Pork Loin Roasts, Brined, Rubbed and Maple Syrup Glazed
Rotisserie Duck, Peking Style
Click here for my other rotisserie recipes.
Don't have a rotisserie?  Use my Barbecued Chinese Boneless Ribs recipe instead.


Inspired by:
Everyone who found my Rotisserie Pork Shoulder Roast recipe through Google.  Thank you!


Check out my cookbook, Rotisserie Grilling.

Everything you could ask about the rotisserie,
plus 50 (mostly) new recipes to get you cooking.

It's a Kindle e-book, so you can download it and start reading immediately!


*Enjoyed this post? Want to help out DadCooksDinner? Subscribe to DadCooksDinner using the RSS or Email options on the right, link to this post from your blog, recommend DadCooksDinner to your friends, or buy something from Amazon.com through the links on this site. (Like my Rotisserie Grilling cookbook...)

Grilled Flat Iron Steak with Salsa Verde

February 9, 2010 by Mike Vrobel 3 Comments

Flat iron steak, also known as top blade steak, is a good cut of meat for a weeknight grilling. It is cut from the chuck, but it is much more tender than a chuck roast.
Even though it is not as tender as the more expensive rib or short loin cuts (like ribeyes, or strip steaks), it makes a good cut for grilling.

It cooks a lot like a flank steak, and has the same affinity for marinades an strong flavors. The advantage is, it isn't as well known as flank steak.
When fajitas took off, flank steak got expensive.

I can usually find it at my local grocery store for a couple of bucks less a pound than flank steak, and roughly half the price of the expensive rib and short loin cuts. I grill it medium-rare to medium, and cut across the grain to increase its tenderness. In this recipe, I top the flat iron steak with Salsa Verde to give it an Italian flavor profile, but it would also taste great either chimichurri or teriyaki style.

Recipe: Grilled Flat Iron Steak with Salsa Verde

Equipment:

  • Grill (I used a Weber Summit 650. Here it is.)
  • Food processor

Ingredients:

  • 1 ¼ pound flat iron steak
  • 1 ½ teaspoon kosher salt
  • 1 teaspoon fresh ground black pepper

Salsa Verde

  • 1 clove garlic, peeled
  • 2 tablespoon capers
  • 1 anchovy fillet (optional)
  • Leaves from ½ a bunch of parsley (roughly 1 ½ cups)
  • 1 teaspoon Dijon mustard
  • pinch of salt and pepper
  • ¼ cup extra virgin olive oil

Directions:
1. Prepare the steak: As soon as possible before grilling, salt and pepper the steak. If possible, I do this 1 to 2 hours before cooking, and leave the steak out at room temperature.

2. Prepare the grill: Set your grill up for cooking on direct high heat. For my Weber Summit, this means turning all the burners to high, and preheating the grill for ten to fifteen minutes.

3. Prepare the salsa verde: While the grill is preheating, make the salsa verde. This works best with a food processor. Drop the garlic clove into a running food processor, and wait until it is completely minced, about 30 seconds. Then, drop in the capers and anchovy, and wait until completely minced, about another ten seconds. Turn off the processor, and add the parsley, mustard, salt and pepper. Pulse until well chopped, five to ten one second pulses. Then, turn on the processor again and drizzle in the olive oil. (The result should be a chunky puree).

4. Grill the steak: Clean your grill grates with your grill brush, then put the steak over the direct high heat. Cook for four minutes a side, turning 90 degrees after two minutes to give the steak a nice diamond grill pattern.
*That is: cook for two minutes, rotate 90 degrees, cook 2 minutes, flip the steak, cook 2 minutes, rotate 90 degrees, then cook for the final two minutes. Eight minutes, total.
This should give you a medium-rare to medium steak. If you like your steak rare, cook it for 6 minutes total; remove it instead of cooking the last 2 minutes.
Remove the steak to a baking dish, and top with the salsa verde. Cover the baking dish with plastic wrap, and let rest for ten minutes.

5. Slice and serve: Move the steak to a cutting board, and cut crosswise into ½ inch thick slices. Serve, drizzling with any juices left in the baking dish or on the cutting board.

Variations:
Salt and pepper steak: Skip the salsa verde - salt and pepper the steak, grill for 4 minutes a side, rest for 10 minutes, slice and serve.

Salsa verde often has mint or basil in it. Replace half the parsley with mint, basil, or a combination of the two.

See my "related posts", below, for some other ideas on toppings for the steak.

Notes:
Removing the leaves from a bunch of parsley: parsley stems are too tough to eat, so you have to pick the leaves off the bunch. But, individually picking each leaf off a bunch of parsley is a lot of work. Not to mention really, really boring. A trick I learned is to shave them off the bunch using your chef's knife - work your way around the bunch, "shaving" the leaves from the stems. See the video and post on this technique at Real Simple: How to Clean, Chop and Store Parsley.

Don't have a food processor?  Mince all the Salsa Verde ingredients, then whisk in a bowl with the olive oil.

What do you think? Questions? Other ideas? Leave them in the comments section below.

Related Posts:
Grilled Flank Steak with Chimichurri
Grilled Teriyaki Flank Steak
Grilled Ribeye Steaks with Mediterranean Herb Butter

Inspired by:
Mario Batali Salsa Verde


Enjoyed this post?  Want to help out DadCooksDinner?  Subscribe using your RSS reader or by Email, recommend DadCooksDinner to your friends, or buy something from Amazon.com through the links on this site.  Thank you!

Winter Grilling

February 8, 2010 by Mike Vrobel 4 Comments

*Thanks to Chantal for asking about grilling in the winter - it got me rolling…

I'm a grill fanatic. I'm not going to let minor inconveniences, like a foot of snow and temperatures in the single digits, stop me from grilling. Of course, it's a lot easier to want to grill when it looks like this:

My back yard on October 11th at 6:00PM

than when it looks like this:

My back yard on January 12th at 6:00 PM

Winter Grilling:
Here is how I deal with the issues that come up in winter grilling.

Cold: This is the obvious problem, and the easiest to deal with. Any good grill can hold the heat in cold weather; it just takes a little longer to come up to temperature, and a little more heat to make up for the cold.

When I'm charcoal grilling in the winter, I make sure I use a little more charcoal than normal. I add an extra quarter of a chimney, or about 25 coals. When I'm gas grilling, I just give my grill an extra five minutes to heat up - fifteen minutes instead of ten.

Keep the lid of the grill closed, unless it's absolutely necessary to have it open. It takes longer for the grill to recover to its full temperature in the cold, because it has to reheat the cold air trapped under the lid. The fewer times the lid is opened, the better.

To keep warm, I stay inside as much as possible. When I do go out, I just shrug my coat on, and trust the heat of the grill to take care of the rest.

Wind: Windchill isn't just for people; it also happens to grills. A grill heats the surrounding air; in the winter, the cold air takes longer to heat up, but eventually the grill creates a protective coating of warm air around itself. If wind is blowing that heated air away, the grill has to heat the new air, and will constantly lose heat to the wind.

In other words: "Wind is the enemy...it sucks the heat out of the cooker."  Chris Allingham, VirtualWeberBullet.com

*Windy winter days are one of the times I wish I was a Big Green Egg fanatic instead of a Weber fanatic. The Egg's thick, ceramic walls hold the heat in no matter how hard the wind blows.  Insulation is also one of the reasons I love my Weber Summit gas grill - it is really well insulated for a gas grill.

The best trick is, if possible, to put your grill where it is screened from the wind. My gas grill is on my deck, and the house is between it and the prevailing wind we get in the winter. My charcoal grill is somewhat screened by my deck itself, but is more exposed to the wind. If it's really, really windy, I just resign myself to using the gas grill. Or (shudder) cooking indoors.
*Also, if using a gas grill on a windy day, be careful that the flame doesn't blow out. This can cause gas to build up in the grill. When the lid is opened, if the gas happens to connect with a lit burner, the result is a fireball shooting out of the grill. This happened to someone I know, and we were lucky she wasn't seriously hurt. But her hairstylist did have to come up with an interesting "flip" style until the hair grew back on one side...

Snow: Snow doesn't affect your cooking; it only causes a problem in getting to the grill. I keep my gas grill on the deck, near the house, and I keep a shovel right next to the door. My charcoal grill, which lives on a patio next to the deck, is much farther away. If we have a lot of snow I have to be really enthusiastic about charcoal grilling to dig out a path to that grill.
*However, I live in Northeastern Ohio - we get a lot of snow and cold in the winter, but we also get a fair share of days above freezing. It goes in cycles: snow, which sticks around for a week or two, then melt, then snow again.

Darkness: This is another problem with winter grilling - it gets dark early. You need some way of lighting the grill while you work. My Weber Summit has good LED lights built into the handle, and is close enough to my porch light that I don't need anything else when I'm using it. Using my Weber kettle usually involves juggling my tongs, instant read thermometer, and a flashlight. I want to get is one of those camping or miner's LED headlights, so I can have hands-free light wherever I want it.
*Yes, I'll look silly. I already look silly by running in and out of the house to grill in the middle of the winter, so how much worse could it be?

Notes:
*Never, and I mean NEVER, use a grill in the garage, or other enclosed area! Why? I'm breaking out the bullet points for this one:

  • Using a grill under something that can catch fire is, in general, a bad idea. One good grease fire, and the whole garage (or carport, or whatever is above you) may go up in flames. And, if that something going up in flames is attached to your house…
  • Charcoal grills: Never, ever, burn charcoal in an enclosed space, or indoors. Charcoal produces carbon monoxide when it burns, and it can build up to poisonous levels when burned in an enclosed space.
  • Gas grills can also produce carbon monoxide, due to incomplete combustion, if they are not adjusted properly. On top of that, gas grills have the additional danger of propane buildup. If your grill doesn't light right away, or your propane tank or grill have a leak, then an enclosed area can build up enough propane for an explosion. This is why the propane association recommends that propane tanks not be kept in enclosed areas like garages or sheds.

Safe grilling resources:
CPSC Advises Consumers to Avoid Deadly Grilling Dangers
Carbon Monoxide (CO) and Propane
Propane Grill Do's and Dont's

*Winter grilling is why I own a gas grill. The gas grill convenience of "light it and forget it" lets me get back in the house where it is warm, and keeps the heat going no matter how cold it is. Because of how easy it is, I grill once a week, on average, throughout the winter.  I do use my charcoal grill during the winter, but only a handful of times after Christmas.  As I said above, I really have to be in the grip of grilling mania to do the extra shoveling to get to my charcoal grill.

*Grilling always has more variables than cooking indoors; winter grilling adds a few more (wind, cold, darkness) to the mix. I take this into account when determining my cooking times; sometimes it takes an extra hour to get that roast to finish cooking.  Leave yourself some extra time when you're grilling in the winter.

What do you think? Questions? Other ideas? Leave them in the comments section below.

*Enjoyed this post?  Want to help out DadCooksDinner?  Subscribe using your RSS reader or by Email, recommend DadCooksDinner to your friends, or buy something from Amazon.com through the links on this site.  Thank you!

Grilled Thin Sliced Pork Adobo

February 4, 2010 by Mike Vrobel Leave a Comment

*This recipe was inspired by my trip to La Loma Supermarket.

Here is why I was excited to see the full service butcher at La Loma Supermarket. Thin sliced pork marinated in adobo sauce is a staple of mexican butchers. It is the perfect cut for quick weeknight tacos.
*As I've mentioned before, the kids love tortillas, so anything that will fill them is a good candidate for a weeknight dinner for us.  Diane makes us fresh corn tortillas...when she's available.  When she's not, I use corn tortillas bought from the mexican grocery, or tostadas (as in the picture above).  Corn tortillas don't keep well, so you have to buy them from a high-turnover store like a mexican grocery for them to be decent. 


As I said, this cut of pork makes for a fast grilled weeknight meal.  It cooks very quickly because it is so thin. Even taking the preheating, resting, and chopping steps into account, the pork is ready to put on the table in as little as 25 minutes.
*If your knife skills are good, the active cooking and chopping steps are 5 minutes of that.  Ten minutes, tops.

Recipe: Grilled Thin Sliced Pork Adobo

Equipment:

  • Grill (I used a Weber Summit 650. Here it is.)

Ingredients:

  • 2 pounds thin sliced pork in adobo sauce
  • ½ lime

Directions:
1. Preheat your grill: Set your grill up for direct high heat grilling. For my Weber Summit, this means turning all the burners to high, letting it preheat for 10-15 minutes, then scraping the grate clean with my grill brush.

2. Cook the pork: Carefully place the pork on the grill. Each piece should be spread out, not folded over on itself.* Cook, covered, for 2 minutes, until you can see the pork cooking through around the edges. Turn the pork and cook the other side for 1 minute. Remove to a plate and squeeze the lime over the top of the pork. Rest for 5 minutes before slicing.
*It's tough to spread it out perfectly with this thin of a cut. Some just seem to fold while you're letting them go - see the middle piece on the left in my pictures. Just make sure you spread any folds out after you flip the pork, so it gets cooked through.

3. Chop the pork: Cut the pork crosswise into ¼ inch to ½ inch thick strips. Serve.

Serving: The night I photographed this recipe, I served the pork on tostadas,* and had the following as the optional toppings: toasted ancho chile salsa, chopped cilantro, shredded mexican cheese, and lime wedges. We had brothy black beans and a salad as our side dishes.
*As I said, Diane was in class that evening, so I didn't have my tortilla maker available.  Making tortillas myself, on top of the rest of the meal, is too time consuming for a weeknight.

Other good toppings include shredded lettuce, shredded cabbage, thin sliced jalapenos, pickled jalapenos, avocado, diced tomatoes, thin sliced onions, quick tomato salsa, and tomatillo salsa. Go with what you like on your tacos - the sky's the limit!

Notes:
*Normally, I don't like having my meats pre-marinated for me.  I don't trust the marinades you get at your local grocery store; the pre-marinated pork tenderloins packaged in cryovac just don't taste fresh to me.  In this case, I make an exception - the meat isn't marinated at the packaging plant, it's marinated in the store, and I don't get that same overmarinated taste.

*If you don't have a mexican butcher to make it for you, here's how to make the pork yourself. Get a 6 to 8 inch long piece of pork loin, then slice it lengthwise as thin as you can - you're looking for ¼ inch thick, very long slices. Marinate in adobo marinade for at least an hour, and preferably overnight.

*Or, if thin-slicing pork is too much for you, get the thin cut pork chops from your grocery store. Marinate it in the adobo sauce as mentioned above. They'll be a little thicker, probably about ½ an inch, so cook them for 3 minutes on the first side before flipping them and cooking them for only a minute on the second side.

*I want my grill as hot as I can get it for this recipe. That way, I can get some searing on the pork in the short time it cooks. 2 minutes is just long enough, at my grill's highest heat, to get grill marks on the pork before I flip it. I'm not worried about searing the second side, because the pork will be too dry by the time it sears. I want to just cook it through before pulling it from the grill.

What do you think? Questions? Other ideas? Leave them in the comments section below.

Related Posts:
Toasted Ancho Chile Salsa
Slow Cooker Beef Barbacoa

Inspired by:
La Loma Supermarket
Rick Bayless Mexican Everyday

*Enjoyed this post?  Want to help out DadCooksDinner?  Subscribe using your RSS reader or by Email, recommend DadCooksDinner to your friends, or buy something from Amazon.com through the links on this site.  Thank you!

Toasted Ancho Salsa

February 2, 2010 by Mike Vrobel 6 Comments

Inspired by my trip to La Loma Supermarket

I've mentioned that you should buy your dried peppers in bulk from mexican grocery stores. They're much cheaper per pound that way. Of course, this leads to the question: Why would I buy dried peppers in bulk? What do I use them for?

I use them to make salsa. If you want to make your weekly Taco night a little more authentic, dried pepper salsa is an easy place to start. Dried pepper salsas are very different from the tomato-based salsas we're all used to. They have a smooth, saucy consistency, going back to "salsa" in the original Spanish meaning of "sauce". They also have a sweet, earthy taste that goes great with grilled meat. They have some heat, but they're more about the flavor than the heat.
*Also, I toss a dried pepper or two in my crock pot when I'm making black beans for a Mexican dinner.  I like to add a little of their earthy, sweet taste to the beans. I discard the peppers before serving.
**Another dried pepper trick (from Alton Brown) is to mince one and add it to your regular salsa recipe .  This adds a subtle layer of heat and flavor to your salsa, without much extra effort.


Recipe: Toasted Ancho Salsa

Equipment:

  • Blender or food processor (I used my KitchenAid blender.)

Ingredients:

  • 2 ancho chile peppers
  • 4 large tomatillos (ping pong ball sized, at least)
  • 3 cloves garlic
  • 1 tablespoon vegetable oil
  • ½ cup water
  • ½ teaspoon kosher salt, plus more to taste

Directions:
1. Prepare the ingredients: Pull the stems from the ancho chiles, split them in half, and remove all the seeds and membranes. * Remove the papery husks from the tomatillos, rinse under cold water to remove their sticky coating, and slice the tomatillos in half. Peel the garlic cloves.
*Don't inhale deeply while doing this step, unless you want a low-level simulation of pepper spray.

2. Toast the ingredients: Heat the oil in a large saucepan over medium, until the oil is shimmering. Add the chiles and toast until slightly puffed and a little lightened in color, flipping once, about 30 seconds to 1 minute. Remove the chiles to the blender with a slotted spoon. Pour the oil out of the pan, then wipe it clean with a paper towel Put the pan back over medium heat, let it heat up for a minute, then add the tomatillos and garlic cloves. Let them sear for about 3 minutes, or until browned, then flip them and sear the other side, another 3 minutes. Add to the blender.

3. Blend the salsa: Add the water and salt to the blender. Give the blender a few one second pulses to chop up the ingredients, then run on low for 30 seconds to 1 minute, or until the ingredients are blended and smooth. Taste and add a little more salt if necessary.

Variations:
*Easy Chipotle Salsa: Substitute 3 canned chipotles en adobo, with their sauce, for the ancho chiles. Skip the cleaning and toasting of the peppers - just put the chipotles and their sauce in the blender, and move on to cooking the tomatillos and garlic. This gives you a much hotter and smokier salsa than the ancho version; it's different, but also very good.

*Guajillo salsa: In the original recipe, Rick Bayless uses guajillo peppers. They have the same heat level, but are less sweet than ancho peppers. Replace the ancho peppers with guajillos, or use one of each.

Notes:
*I know the oil toasting seems fussy. It adds a lot of depth of flavor to the salsa, and it only takes two minutes. Give it a try before you dismiss the recipe.

*If you're really going to skip this because of the oil toasting, read on. Instead of toasting them, just soak them in hot water for 30 minutes. (Of course, if you're in this much of a hurry, I would recommend the Easy Chipotle Salsa variation. It's easier than dealing with the dried peppers in the first place.)

*Anchos are dried poblano chiles. They have a medium heat level, a little below what a jalapeno has.

*Store this salsa in the refrigerator for up to a week, or freeze for up to three months. When I make this salsa, I double the recipe and freeze the leftovers in 1 cup containers for later use.

What do you think? Questions? Other ideas? Leave them in the comments section below.

Related Posts:
Quick Red Salsa
Tomatillo Salsa
Slow Cooker Beef Barbacoa

Adapted from:
Rick Bayless Mexican Everyday (Recipe: Toasty Guajillo Salsa)


*Enjoyed this post?  Want to help out DadCooksDinner?  Subscribe using your RSS reader or by Email, recommend DadCooksDinner to your friends, or buy something from Amazon.com through the links on this site.  Thank you!

La Loma Supermarket

February 1, 2010 by Mike Vrobel 2 Comments

A few weeks ago, Tom at Exploring Food My Way did a review of Taqueria La Loma, a taco truck on the east side of Akron.  In passing, he mentioned the truck was parked in front of a Mexican supermarket. I had to check it out; I love shopping at a good Mexican grocery store. It was even better than I had hoped!

La Loma Supermarket is well stocked, with all the staples you need if you want to cook authentic Mexican food.  Even better, they have a full service Mexican butcher on the premises, with all the specialty cuts that are unique to Mexican cooking.
*The butcher gave me a sample of chicharrones to munch on while I walked through the store. Mmm…deep fried pork belly…

La Loma Supermarket
421 Darrow Rd.
Akron, OH 44305
Tel: 330-784-9300

My top five list of favorite things they sell:
1. Full service Mexican butcher:Along with the usual selection of pork, beef, chicken and seafood, they have a variety of Mexican specialty cuts. Freshly made chorizo, thin sliced pork adobo, skirt steak…even more adventurous stuff like pork feet, beef tongue, tripe (yuck), and cabrito (young goat) is available!
*That was according to a sign in the back. I'm going to buy some for Rick Bayless's Cabrito Jaliso style (Mexican Everyday)

2. Fresh fruits and vegetables: Well stocked, with a Mexican focus. Limes, avocado and cilantro are all inexpensive compared to my local grocery store prices.

3. Spices and dried peppers: They have an impressive array of mexican spices and dried hot peppers. As I've said before, dried hot peppers are much cheaper at Mexican groceries. If you're going to use them in any quantity, you should seek out your local mexican grocery store.

4. Canned goods: Chipotles en adobo, masa harina, guava paste, mexican hot sauces, canned tomatillos, mexican chocolate…if you need it for your mexican cooking, they've got it.

5. Mexican beer: Sure, they have Corona. Doesn't everybody? They also have good mexican beer, like Pacifica, Bohemia, and my personal favorite, Negro Modelo.
*Check out this great mexican beer review by Tim Leffel, who is also the author of the Cheapest Destinations blog at travel.booklocker.com.

And don't forget to stop at their taco truck right out front, Taqueria La Loma, for a bite to eat to get you through your shopping.  You won't regret it; the food is excellent.

Here's the map:

View Larger Map

Thanks again to Tom at Exploring Food My Way for letting me know about this store!

Related posts:
My list of Ethnic and Gourmet stores near Akron, Ohio.

*Enjoyed this post?  Want to help out DadCooksDinner?  Subscribe using your RSS reader or by Email, recommend DadCooksDinner to your friends, or buy something from Amazon.com through the links on this site.  Thank you!

Deborah Madison is coming

January 31, 2010 by Mike Vrobel 2 Comments

Deborah Madison, former chef at the Greens restaurant in San Francisco, and author of What We Eat When We Eat Alone* and the award winning Vegetarian Cooking for Everyone, is coming to give a talk in the Cuyahoga Valley.
*When I'm alone, my perfect meal is a grilled steak and a glass of Cabernet Sauvignon.
**She also wrote another of my favorite quotes from a cookbook.  I'm paraphrasing her opening to This Can't be Tofu:

I was shopping at my local grocery store, and I put a block of tofu in my cart.  A man who was going by stopped and said: "Tofu.  My wife doesn't have a good recipe for that.  Do you have one?"  I thought about it for a minute, then replied: "Well, unfortunately, the recipe I usually use is this.  Leave it in the refrigerator until it is past it's expiration date, then throw it out and buy a new one."

His response was: "Darn.  That's my wife's recipe, too."

She will be at the Happy Days Lodge on February 12th at 7PM.  Tickets are available by calling (330) 657-2909.  Details are available here: Lyceum Series - Deborah Madison: Growing Food, Culture, Community, Wellness, and Pleasure.

Orange and Olive Salad with Herbes De Provence

January 28, 2010 by Mike Vrobel 1 Comment

You have probably noticed a lot of citrus in my recent recipes. That's because it is citrus season. Every week in January, my local supermarket has oranges on sale. They are tasting great; juicy and sweet.

This is a recipe I picked up from Mark Bittman last year. It turns oranges into a fancy side dish for dinner. Combining orange, olive and herbs is a classic flavor pairing in the Mediterranean, and this recipe comes together in seconds.
*Yet another "so simple it's barely a recipe" post.  Remember it the next time I publish a recipe that starts with the instructions"24 to 36 hours before cooking..."

Recipe: Orange and Olive Salad with Herbes De Provence

Ingredients:

  • 2 navel oranges
  • ¼ cup pitted kalamata olives
  • Herbes de Provence

Directions:
1. Peel and slice the oranges: Cut the top and bottom off of the orange, set down on one of the cut sides, then cut the skin and pith off by cutting around the side of the orange. Then, slice the orange crosswise into thin rounds. (See picture below.) Arrange oranges on a plate.

2. Compose the salad: Mince the olives, then put them on top of the oranges. Sprinkle a little herbes de provence over the top, and serve.

Variations:
*Tapenade: Substitute ¼ cup of tapenade for the minced olives

*Different herbs: Don't have Herbes de Provence? Use whatever herbs you have on hand.  In the original, they used fresh thyme and fennel seeds. Coriander and fennel seeds are a combination that I'm going to try next time.

Notes:
*I skipped the olive oil from the original recipe. It adds another layer of flavor to this dish, particularly if you have a good, peppery olive oil. I was trying not to scare the kids off.
*I should have peeled and sliced another orange, and left it plain.  Once they saw the black olives on the oranges, they weren't interested in trying them. Only Natalie, my adventurous eater, gave it a try.  She wasn't impressed.

*I served this with my Rotisserie Leg of Lamb Provencal.  It goes well with fatty or rich food.  The tart, acidic, sweet taste of the oranges make it a good side dish to balance out a rich main course.

What do you think? Questions? Other ideas? Leave them in the comments section below.

Related Posts:
Fennel and Orange Salad
Rotisserie Leg of Lamb Provencal

Inspired by:
Mark Bittman - The Exalted Olive [nytimes.com]
Mark Bittman - Food Matters

*Enjoyed this post?  Want to help out DadCooksDinner?  Subscribe using your RSS reader or by Email, recommend DadCooksDinner to your friends, or buy something from Amazon.com through the links on this site.  Thank you!

What my rotisserie wants to be when it grows up...

January 26, 2010 by Mike Vrobel 3 Comments

This is what my grill wants to be when it grows up, and is old enough for a driver's license:

I'm going to have to try the drip pan caramelized onions. That's genius.
*And, darn it, now I'm hungry for some rotisserie chicken. Time to fire up the grill.

They also lead this video from the Wall Street Journal about gourmet food trucks.  I know where I'm going for lunch the next time I'm in San Francisco.

[h/t] Street Food Profiles: RoliRoti in Northern California [seriouseats.com]

Check out their website: RoliRoti.com

*Enjoyed this post?  Want to help out DadCooksDinner?  Subscribe using your RSS reader or by Email, recommend DadCooksDinner to your friends, or buy something from Amazon.com through the links on this site.  Thank you!

My Big Television Adventure

January 25, 2010 by Mike Vrobel 2 Comments


Or, as Jeff at work put it: "Paging Andy Warhol...your fifteen minutes are starting..."

I now have video of my appearances on WKYC Channel 3 News Today.

First up: a profile of me and my blog, and some shots of my White Chicken Chili from Wednesday the 20th:

Recipe from WKYC: Ch.3 News Today: Dad cooks dinner blog
Recipe from my Blog: White Chicken Chili the Easy Way

Then: On Thursday the 21st, Hollie Strano cooks one of my recipes on air, then I get interviewed.  I'm live about 4:40 into the video.
Live...gulp.

Recipe from WKYC: Hollie's Dish of the Week: Sear Roasted Chicken with Lemon Herb Pan Sauce
Recipe from my Blog: Sear Roasted Chicken Breasts with Shallot Herb Pan Sauce

Everyone in my family, and that I work with, has been emailed this video.  Other bloggers I talk to a lot have been emailed this video.  I've been grabbing people as they walk by, shoving my iPod at them, and saying "Did you see me on TV?"  If you fall into any of these categories, I'm sorry for being repetitive.  I'm just so excited.  I think the adrenaline is starting to wear off, and it's three days later...

Here are the questions I've been asked by the unsuspecting victims freinds and family I've shown the videos:

1. Is Hollie as nice as she seems on TV?
Yes, absolutely!  She's a sweetheart.  The first video was shot at my house, and Hollie showed up before the cameraman did.  We talked about food and our kids for about a half an hour before the shooting started, and I had a great time chatting with her.  She insisted I come to the set for Thursday's shooting of Hollie's dish of the Week, so I could taste how she did with my recipe.

2. She didn't follow your recipe!
Yes, and I'm OK with that.  She had to improvise with some of the ingredients, using what she had on hand.  I talk about this in the original recipe - it is a good base for variations, and the sauce can be almost anything you want it to be.*  She did put a rather large handful of dried herbs in there.  OK, two handfuls.  In the recipe I say "make sure it is highly seasoned", and Hollie sure took me at my word! The sauce turned out fine, and it all tasted really good.
The key to the sauce is to add 1 cup of chicken stock, or some other liquid, to the pan.  That dissolves the browned bits on the bottom of the pan, and builds a very flavorful sauce.

3. Live on TV!  Were you nervous?
Surprisingly, no.  I think it's because I'm passionate about home cooking.  Give me an opening, and I'll talk your ear off about techniques, recipes, ingredients, where to shop...  (Hey, maybe I should start a blog!) The fact that it was live on TV didn't worry me.
It also helped to chat with Hollie for the earlier shoot; it just felt like an extension of that conversation.

4. Are you going to be on TV again?
I had a great time, and I'd do it again...once I get caught up on my sleep.  They get up really, REALLY early for the show.  Also, this was an act of kindness from my sister-in-law, Erin, a producer at WKYC.  I appreciated the opportunity, and I don't want to be a pest by asking to be on again any time soon.

5. What did you learn from the experience?
Don't take a big bite of food if I'm on live TV!  All I could say for the last 30 seconds was "MmmMmm" while I waved my hands around.

Once again, a huge thank you to Erin and Hollie for giving me this opportunity.  I had a great time!

What do you think? Questions? Other ideas? Leave them in the comments section below.

Related Posts:
White Chicken Chili (the easy way)
Sear Roasted Chicken Breasts with Shallot Herb Pan Sauce

*Enjoyed this post?  Want to help out DadCooksDinner?  Subscribe using your RSS reader or by Email, recommend DadCooksDinner to your friends, or buy something from Amazon.com through the links on this site.  Thank you!

Pork Chop Saute with Orange Mustard Sauce

January 21, 2010 by Mike Vrobel 3 Comments

Let's put the saute with pan sauce technique to use again. Different meat, different sauce…but it's really the same thing, behind the curtain.
*This was the second recipe I thought of when All-Clad asked me to test their d5 pan.

I've complained before about how boring boneless pork loin can be. This recipe takes care of that with a crispy exterior and a flavorful pan sauce.

The pan sauce is an example of why I keep going on and on about making your own stock. I freeze it in 1 cup containers for use as the base of pan sauces. Homemade stock gives you a depth of flavor and a richness from gelatin that canned just can't match. Stock makes a simple pan sauce into something sublime.
*Of course, Michael Ruhlman says that if I would just make veal stock, it could be even better. He's probably right. But I roast a chicken every few weeks. Chicken stock uses the bones and scraps to make something delicious.

What to serve with a Pork Chop Sauté

I love this recipe with Quick Baked Potatoes and Steam-Sauteed green beans.

Recipe: Pork Chop Saute with Orange Mustard Sauce

Equipment:

  • 12 inch stainless steel fry pan (I love my All-Clad 12" fry pan. I was inspired to post this recipe as part of testing the new d5 All-Clad pans).

Ingredients:

  • 5 boneless pork loin chops, 1 inch thick (About 2 pounds of pork)
  • 2 ½ teaspoon kosher salt (½ teaspoon per pork chop)
  • 1 ¼ teaspoon fresh ground black pepper (¼ teaspoon per chop)
  • ½ cup flour (optional)
  • 1 tablespoon olive oil
  • 1 tablespoon butter

Sauce ingredients:

  • 1 small shallot, minced
  • 1 cup of chicken stock (preferably homemade, or substitute water)
  • Juice and zest of one orange
  • 1 tablespoon dijon mustard
  • 1 tablespoon unsalted butter (optional)
  • salt and pepper to taste

Directions:
*For an overview, see my Saute with Pan Sauce basic technique 
1. Prepare the Sauce: Mince the shallot, and set aside. Juice and zest the orange into a small bowl. Add the chicken stock and dijon mustard to the bowl, whisk to combine, then set aside.

2. Prepare the Pork: Sprinkle the salt and pepper evenly over the pork chops. Put the flour in a shallow pan, and coat the pork chops with a thin layer of flour, shaking to remove any excess.

3. Prepare the pan: Heat the butter and olive oil in your pan over medium-high heat, until the butter has stopped foaming and is just starting to turn brown.

4. Saute the Pork: Place the floured pork chops in the pan. Shake the pan to get the oil under the chops, then let sit for 3 minutes, or until well browned. Flip the pork, and cook the other side for another 3 minutes, or until well browned. Remove the chops to a plate.

5. Make the Pan Sauce: Turn the heat down to medium, and add the minced shallot. Cook for 30 seconds to 1 minute, or until just softened, then add the orange juice - stock mixture. Increase the heat to high, and scrape the bottom of the pan until all the browned bits of pork are loose in the sauce. Boil until reduced by half, about 4 minutes. Turn off the heat, and whisk in the butter. Taste the sauce, and add salt and pepper until it is well seasoned.

6. Serve: Serve each pork chop with 1 teaspoon of sauce drizzled on top, and pass the rest of the sauce at the table.

Variations:
*Pork tenderloin: Replace the pork loin chops with a pork tenderloin, cut crosswise into 1" medallions.

*Other citrus: Replace the orange with a lemon, or a couple of limes. When tasting the sauce for seasoning, add up to a teaspoon of sugarif it needs a hit of sweetness.

Notes:
*Serve with roasted new potatoes and a salad or a sauteed vegetable.

*I prefer to buy a whole pork loin, and cut it into chops myself. When I buy pre-cut chops, they tend to be uneven in thickness, and a little too thin. It only takes a couple more minutes to cut them myself, and it is usually less expensive, because pork loin roasts tend to be cheaper than pork chops at my local grocery store.

*As I said in the basic technique, don't crowd your pan!  You'll get steaming, not browning, and the crisp breaded crust on the pork is the best part of this recipe.

*Cooking for a crowd, and want to double the recipe? (Like, say, five people, like I am?) Cook the pork in two batches, adding another tablespoon of oil and butter to the pan between batches. This is something I do so often that I should really make it part of the basic technique. Try to put the meat over the parts of the pan that have dark brown fond on them, to keep it from burning. I usually wind up turning the pan down to medium on the last turn of the second batch to keep the fond from getting too dark. Someday, when the kids are older, I think I'll have to buy another 12 inch fry pan...

What do you think? Questions? Other ideas? Leave them in the comments section below.

Related Posts:
Saute with Pan Sauce basic technique
Chicken Breast Saute with Marsala Sauce
Sear Roasted Chicken with Shallot Herb pan sauce

Adapted from:
Pam Anderson How to Cook Without a Book


*Enjoyed this post?  Want to help out DadCooksDinner?  Subscribe using your RSS reader or by Email, recommend DadCooksDinner to your friends, or buy something from Amazon.com through the links on this site.  Thank you!

Chicken Breast Saute with Marsala Sauce

January 19, 2010 by Mike Vrobel 9 Comments

Let's put the Saute with Pan Sauce technique to work. This recipe is inspired by, of all things, Macaroni Grill. It's one of our regular stops for lunches at work, particularly if we have picky eaters in the crowd. It's a safe choice - who doesn't like pasta? And, for a chain restaurant, it's not bad.
*I like it a lot more than the other alternative that always comes up. Olive Garden.  Eh, I think I brought my lunch today.

One of my good friends always orders the Chicken Marsala.* Not to knock Macaroni Grill, but I think I can do better.
*Hi, Jeff!

I love to call these "Chicken Cutelets" (adding the extra "e" in the pronunciation, Cut-eh-lets). That is how it was pronounced by the retired Italian auto worker turned caterer who cooked them for our wedding reception. When we went to his house, before we hired him, he gave us a sample of the chicken. Then he proudly served his homemade wine. I still smile, thinking of us sitting in his tiny, immaculate, knick-knack filled front room, tasting chicken cutelets and homemade wine. Of course we hired him!

Recipe: Chicken Breast Saute with Marsala Sauce

Equipment:

  • 12 inch stainless steel fry pan (I love my All-Clad 12" fry pan. I was inspired to post this recipe as part of testing the new d5 All-Clad pans).

Ingredients:

  • 4 to 5 chicken breasts (About 1 ¾ to 2 pounds of chicken - the number depends on the size of the breasts and the size of your pan.)
  • 2 to 2 ½ teaspoon kosher salt (½ teaspoon per chicken breast)
  • 1 to 1 ½ teaspoon fresh ground black pepper (¼ teaspoon per chicken breast)
  • ½ cup flour (optional)
  • 1 tablespoon olive oil
  • 1 tablespoon butter

Sauce ingredients:

  • 1 small shallot, minced
  • 1 cup of marsala.  (Please get the real thing, not a "cooking wine marsala").
  • 1 tablespoon unsalted butter (optional)
  • salt and pepper to taste

Directions:
*For an overview, see my Saute with Pan Sauce basic technique
1. Prepare the Sauce: Mince the shallot, measure out the marsala and butter, and set aside.

2. Prepare the Chicken: Sprinkle the salt and pepper evenly over the chicken breasts. Put the flour in a shallow pan, and coat the chicken breasts with a thin layer of flour, shaking to remove any excess.

3. Prepare the pan: Heat the butter and olive oil in your pan over medium-high heat, until the butter has stopped foaming and is just starting to turn brown.

4. Saute the Chicken: Place the floured chicken breasts in the pan, with as many of the thin "tails" on the edge as possible. Shake the pan to get the oil under the breasts, then let sit for 4 minutes, or until well browned. Flip the chicken, and cook the other side for another 4 minutes, or until well browned. Remove the breasts to a plate.

5. Make the Pan Sauce: Turn the heat down to medium, and add the minced shallot. Cook for 30 seconds to 1 minute, or until just softened, then add the marsala. Increase the heat to high, and scrape the bottom of the pan until all the browned bits of chicken are loose in the sauce. Boil until reduced by half, about 4 minutes. Turn off the heat, and whisk in the butter. Taste the sauce, and add salt and pepper until it is well seasoned.

6. Serve: Serve each chicken breast with 1 teaspoon of sauce drizzled on top, and pass the rest of the sauce at the table.

Variations:
*Thin-cut chicken cutlets: If your market or grocery sells thin-cut chicken breasts, they work really well with this recipe; saute them for only 3 minutes a side. If you can't buy your breasts thin cut, and you are confident in your knife skills, you can make your own thin cut cutlets. Buy regular chicken breasts and cut them in half horizontally.

*Substitute any sweet liquor (sweet vermouth, madiera, port) instead of the marsala. It won't be Chicken Marsala, but it will taste delicious.

*Add some dried fruit to the marsala. If you want to get fancy, add 2 tablespoons of raisins, dried currants, or dried cherries to the pan with the shallots. (Currants go really well with marsala.)


Notes:
*Serve with angel-hair pasta, tossed with butter and parmesan cheese. And serve a green vegetable. Sautes taste great, but they are a boring tan-brown color. When served with noodles, you need that hit of green from the vegetables to add some color to the plate.
*Look at me! I'm styling my food! Watch out, or I'll break out the squeeze bottles and really go to town.

*As I said in the basic technique, don't crowd your pan! At my local grocery store, the breasts are about 8 ounces, without tenderloins attached, so I can fit 4 breasts in my pan. If I can find 6 ounce breasts, I can fit 5 in the pan. If the chicken breasts come with tenderloins attached, I need one less breast. I pull the tenderloins off the breasts, season and flour them, and cook them like they were another breast.

*Cooking for a crowd, and want to double the recipe? Use two pans, or cook the chicken in two batches, adding another tablespoon of oil and butter to the pan between batches.

What do you think? Questions? Other ideas? Leave them in the comments section below.

Related Posts:
Saute with Pan Sauce basic technique
Pork Chop Saute with Orange Mustard Sauce
Sear Roasted Chicken Breasts with Orange Herb Pan Sauce

Adapted from:
Chicken Marsala at Macaroni Grill
Pam Anderson How to Cook Without a Book


*Enjoyed this post?  Want to help out DadCooksDinner?  Subscribe using your RSS reader or by Email, recommend DadCooksDinner to your friends, or buy something from Amazon.com through the links on this site.  Thank you!

Basic Technique: Saute with Pan Sauce

January 18, 2010 by Mike Vrobel 5 Comments

Saute is derived from the French word "To Jump". In cooking, it means:

Using a small amount of oil in a hot pan to cook thin, tender ingredients by giving them a good sear on the outside.

The saute technique is one of the core techniques in cooking, and is used for both meat and vegetables. Most recipes saute at least a few of the ingredients. Sauteing builds flavor in two ways. The first is the good sear you get on the food you are cooking. The second is the browned bits that are left in the bottom of the pan, called the fond (French for "foundation"). Fond is the foundation of pan sauces; it dissolves into liquid added to the pan, adding flavor to that liquid.

I'm going to use a saute to make a quick weeknight dinner, with a pan sauce from the fond. This is the first real cooking technique I learned. I was chained to recipes, to use Michael Ruhlman's wonderful turn of phrase.  Learning to saute, as a technique, unlocked those chains. Everything in this blog followed from that "Aha!" moment. Behind every recipe are techniques (like a saute), flavor combinations (what do you put in the pan sauce?), and ratios (how much salt per pound?). This realization made me a real cook. Of course, it also showed me how little I actually knew, and how much more there was to discover. I've been happily chasing better techniques, different flavor combinations, and new ratios ever since.
*I know I've been mentioning Pam Anderson a lot recently.  I have to. I owe it to her. How to Cook Without a Book, with it's explanation of the saute and pan sauce technique, was the key. Without it, I might still be chained to recipes.

Here is the technique, in shorthand form:

Basic Technique: Saute with Pan Sauce

Saute:

  • Thin to medium cut of meat, usually ½ inch to ¾ inch thick.
  • Season the meat, then (optional) coat with flour.
  • Heat 2 tablespoon of oil in a 12" fry pan over medium-high heat until shimmering.
  • Put meat in pan and cook for 3-4 minutes a side, until golden brown.
  • Remove to plate.

Heated oil and butter; thin, tender cut, lightly floured; well browned


Pan Sauce:

  • Reduce heat to medium.
  • Add aromatics, cook until just fragrant (30 sec to 1 minute)
  • Add 1 cup stock, and/or other flavoring liquids, and herbs. Increase heat to high.
  • Scrape browned bits into the liquid, add juices from resting meat.  Boil until reduced by half.
  • Remove from heat. Whisk dairy into sauce, season, and serve.

Aromatics are softened; sauce is reduced and ready; adding the butter

Detailed walk through of the technique:


Thin to medium cut of meat, usually ½ inch to 1 inch thick.
I tend to think of boneless, skinless chicken breasts or boneless pork loin cutlets when I think of a saute, but any thin, tender meat works with this technique.  I love sauteed new york strip steaks with a red wine pan sauce, and turkey cutlets or pork tenderloin medallions also saute really well.

The thickness of the meat determines the cooking time.  1 inch thick will cook medium-rare to medium by the time it browns (good for pork or beef); ½ inch to ¾ inch will cook to well done (good for chicken or turkey).

Season the meat, then (optional) coat with flour.
Sprinkle liberally with kosher salt and fresh ground black pepper; I assume ½ teaspoon of kosher salt per piece of meat.  I like to flour boneless chicken and pork.  It gives them a nice, browned, crisp coating.  Beef works better without a flour coating, and if I'm trying to cut a few calories, or don't want the extra step, I skip the flour altogether.

Heat oil in a 12 inch fry pan over medium-high heat until shimmering.
For floured meats, I use 2 tablespoon of fat; 1 tablespoon of vegetable oil (canola or grape seed), and 1 tablespoon of butter (for flavor).  For non-floured meats, where I want a really good sear, I put 1 teaspoon of oil in the pan, just to get it slightly slick. I turn the pan to medium-high heat and wait for the oil to shimmer, swirling the oil around occasionally to coat the entire bottom of the pan.  Heating the oil to shimmering takes 3-5 minutes depending on the pan and your stove.
*When I use butter, I look for it to just start to turn brown as my indicator that the pan is ready.

When making a pan sauce with the saute, do NOT use a non-stick pan.  Fond, the browned bits of meat and flour that stick to the bottom of the pan, become the foundation of your pan sauce.  I want the little bit of sticking you get with steel, aluminum, or enameled cast iron. That sticking is where fond comes from.  This is why I love my All-Clad stainless steel pans, and why I requested a 12 inch fry pan when I reviewed them.  The combination of even heating and stainless coating make the All-Clad 12 inch fry pan my go-to saute pan.
*I prefer the 12 inch fry pan to their "saute" pan for sautes. I've owned them both, and I get a better sear from the 12 inch fry pan because things are less crowded in it.  See the next step for details.

Put meat in pan and cook for 3-4 minutes a side, until golden brown.
This is the actual "saute" part.  Don't crowd the pan, or the meat will steam instead of browning. Leave at least ¼ inch of space between each piece of meat. If the cutlets are just barely touching when they first go into the pan, it might work, because they will shrink slightly as they cook.  If I squeeze them in to fit, I'm doing it wrong. My 12 inch skillet can just fit 5 chicken breasts, if they aren't Frankenchickens.  If you have too much meat to cook without crowding, cook it in two batches.

Once all the meat is in the pan, shake it back and forth a few times to make sure there is oil underneath the cutlets.  After that, leave them alone for 3 minutes.  Playing with the cutlets or the pan will slow down the searing - don't be a pan shaker! After 3 minutes, check the browning, and cook them for another minute or two if they need to brown more (and increase your heat a little next time).*  Then, flip the cutlets, and let them sit for another 3-4 minutes to cook the other side.
*This is one of the keys to a good saute - learning how to work with your stove and your pans.  Every stove is different.  Medium high on my above-average GE Profile might be medium on a Viking professional range, and might be High on a cheap "contractor grade" stove.

Remove to plate.
Put the meat on a plate, preferably in a single layer, and let it rest while preparing the pan sauce. The plate will catch any juices that escape, and I will add them to the the pan sauce later.

Reduce heat to medium. Add aromatics, cook until just fragrant (30 sec to 1 minute)
I don't want the fond to burn, but I do want the aromatics to soften a bit. Garlic and shallots are my favorite for this, because they cook so quickly. I mince them as finely as I can, so they cook quickly, and I give them a minute at most before adding the liquids to the pan.  Note that the aromatics are optional; you can just move on to the flavoring liquids if aromatics don't work with your sauce.

Add 1 cup stock, and/or other flavoring liquids, and herbs. Increase heat to high.
One of the reasons I recommend making your own stock is because it makes the best pan sauce.  Sauteed cutlets with a pan sauce made of nothing but good homemade stock is an excellent recipe.  If you don't have homemade stock, water is a good second choice; it will pick up the flavor you built with your fond in the next step.
*Yes, you can use store-bought, canned chicken broth if you must.  But I think plain water with some salt in it tastes better, once it picks up the flavor of the fond.

I usually use 1 to 1 ½ cups of liquid.  My simplest pan sauce is made with one cup of stock, the fond in the pan, and seasoned with salt and pepper.

If I'm using stock plus another flavoring liquid, I usually use 1 cup of stock plus ¼ to ½ cup of the flavoring liquid.  My favorite flavoring liquids are wines (red, white, or dry vermouth, or cognac) or citrus juices (lemon and orange in particular).

Good standalone flavoring liquids are sweet liquors (sweet vermouth, marsala, madiera) or a can of diced tomatoes with their juices.  If I use one of these, I don't add stock; they are a good substitute in and of themselves.

If I want herbs in the sauce, I just toss the whole sprig in with the liquid, and fish it out before serving.  Thyme, rosemary, oregano, and tarragon all go well in pan sauces, depending on the flavor profile I am looking for.

Scrape browned bits into the liquid, add juices from resting meat.  Boil until reduced by half.
The flavoring liquid will loosen the fond from the pan as it heats up.  Scrape the bottom of the pan with a flat edged wooden spoon, and the fond will dissolve into the liquid, giving you the foundation for your sauce.  Pour any accumulated juices from the plate where the meat is resting into the pan.  Boil until reduced by half.  I do this by eye; when the liquid has thickened enough, I can drag my spoon through it and see the trail on the bottom of the pan for a few seconds.

Remove from heat. Whisk dairy into sauce, season, and serve.
Remove the pan from the heat before adding butter or cream.  This should keep the dairy from separating while you whisk it into the sauce.  After adding the dairy, taste the sauce.  Add more salt, pepper, and/or sugar if necessary.  I want the sauce to be highly seasoned, so I err on the side of a little more salt or pepper if I think the sauce needs it.  To serve, put the meat on a dinner plate and drizzle with 1 teaspoon of the sauce.  Pass the rest of the sauce at the table.
*If I want a more elegant sauce, I pass it through a fine mesh strainer before serving, to remove any stray bits of solid fond or leftover aromatic.  I rarely do this; I like my sauce to be a bit more rustic.

...
And that's it!  Now you know how to make:

  • Chicken Picatta - sauteed chicken breast with stock-lemon-caper sauce
  • Veal Scallopini - sauteed veal cutlets with stock-sherry-cream sauce
  • Eggplant Parmesan - sauteed eggplant rounds, topped with cheese, with tomato pan sauce
  • Wiener Schnitzel - sauteed pork chop (breaded with bread crumbs), with stock-lemon sauce
  • Steak Bordelaise - sauteed steak with shallot-stock-wine sauce

...and on and on.  The list is almost endless.  I'll post a two of my favorites later this week.

Please don't be intimidated by my detailed explanation above.  It probably took longer to read it than it will to do it.  Once you have this technique down, you can have dinner on the table in a half an hour, tops.

What do you think? Questions? Other ideas? Leave them in the comments section below.

Related posts:

Chicken Breast Saute with Marsala Sauce (Tuesday)

Pork Chop Saute with Orange Mustard Sauce (Thursday)
Swiss Chard Saute (an example of sauteing  a tender vegetable)
Sear-Roasted Chicken Pieces (This is a saute, followed by finishing the cooking in the oven, and then making the pan sauce.  See?  Once you know the technique, everything starts to come together.)

Adapted from:
Pam Anderson: How to Cook Without a Book


*Enjoyed this post?  Want to help out DadCooksDinner?  Subscribe using your RSS reader or by Email, recommend DadCooksDinner to your friends, or buy something from Amazon.com through the links on this site.  Thank you!

DadCooksDinner: As Seen On TV

January 17, 2010 by Mike Vrobel 2 Comments

Image from Wikimedia Commons

[Update 1/25/09 - I was on TV, and I've got the video here: My Big Television Adventure]


Loyal readers, set your Tivos on stun*.  I'm going to be on the WKYC Channel 3 News @ Sunrise show next Wednesday, January 20th, some time between 5AM and 7AM!
*I don't expect you to get up at 5AM, just to see my smiling face before your first cup of coffee.  You guys are loyal readers, but you're not THAT loyal.

They're doing a segment on DadCooksDinner, and interviewing me and my family about having Dad do the cooking.  I'll find out more details tomorrow, when they come to my house to do the shoot.

Then, on Thursday the 21st, Hollie Strano is going to cook one of my recipes as Hollie's Dish of the Week.

This is it, I've hit the big time!  I'll be sure to remember all the people who made this possible...
*Um...like my sister-in-law Erin, who is a producer at WKYC.  She really DID make all this possible.  Thank you, Erin!

Rotisserie Leg of Lamb Provencal

January 14, 2010 by Mike Vrobel 14 Comments

This week I'm sharing recipes inspired by my trip to the winter farmer's market in the Cuyahoga Valley National Park.

I had a pleasant surprise at the market: locally grown lamb from the Great American Lamb Company. I bought a 5 pound bone in lamb leg. Then came the fun part: when I got it home, I had to figure out what to do with it!

I decided to cook it with my rotisserie.* I've already posted recipes for rotisserie lamb leg Greek and Moroccan style. I needed to come up with something different.
*I know you're shocked, SHOCKED to hear I'm cooking it on the rotisserie.

What other leg of lamb recipes are there? Why, leg of lamb Provencal, of course!
*Have I mentioned that I spent a week at a cooking class in Provence? Not recently? Don't worry, I have a series of posts from those classes coming, so you'll get to hear all about it. Again.

I went to my cookbooks for inspiration. A few of the recipes wanted me to poke holes in the lamb with a paring knife, and stuff them with garlic, rosemary and olives. I've tried this approach before, and I've never been impressed. I know it is traditional, but it is also fussy work filling in all those little holes. And the results, while good, have never made me sit up and say, "Wow!"

It was time to go my own way. I would use a dry brine, like Judy Rodgers does on her lamb.* And I would baste the lamb with a lemon/mustard sauce, using a thyme and rosemary herb brush, inspired by Lulu's Provencal Kitchen.
*Yes, I've done a lot of dry brining recently. It works, and works well.
**And, I would like to formally apologize to any linguists who read my blog. I know that "dry brine" is a contradiction in terms. But it describes what I'm doing (using salt to denature the proteins in the meat, just like a brine does), and it is what cooks seem to be calling the technique.

Recipe: Rotisserie Leg of Lamb Provencal

Cook time: 60 minutes

Equipment:

  • Grill with Rotisserie attachment (I used a Weber Summit 650 with an infrared rotisserie burner. Here it is.)
  • Aluminum foil drip pan (9"x12", or whatever fits your grill)
  • Butcher's twine
  • A few sprigs of thyme and rosemary, tied into a brush (or a basting brush)

Ingredients:

  • 4 to 5 pound leg of lamb roast, bone in
  • 4 to 5 teaspoon kosher salt (1 teaspoon per pound)
  • 2 teaspoon Herbes de Provence (½ teaspoon per pound)

Lemon-mustard baste

  • Juice of 1 lemon (about 2 tbsp)
  • pinch of salt
  • pinch of fresh ground black pepper
  • 1 teaspoon Herbes de Provence
  • 2 cloves of garlic, minced or pressed through a garlic press
  • 2 teaspoon dijon mustard
  • ¼ cup olive oil

Directions:
1. Salt the lamb: One to three days before cooking, trim the leg of lamb by removing any fat or membrane on the outside. Sprinkle the salt and herbes de provence evenly over the lamb, cover with plastic wrap, and refrigerate.
*You want to salt the lamb at least the day before, and 2 to 3 days is better. This gives the salt enough time to dry-brine the lamb.

2. Tie the lamb, and rest at room temperature: Remove the lamb from the refrigerator 2 to 4 hours before cooking, to let it come to room temperature. Truss the lamb by tying it every 1 ½ inches, pulling it into a cylindrical shape. Find both ends of the bone, and skewer by running the spit parallel to the bone, as close to the bone as you can, through the thicker side of the lamb roast.

3. Prepare the grill: Set your grill up for rotisserie cooking at high heat. For my Weber Summit, this means removing the grates, turning the two outer burners (burners 1 and 6) to high, and turning the infrared burner to high. Then I put my drip pan in the middle, over the unlit burners, and let the grill preheat for ten to fifteen minutes. (See My Rotisserie Basic Technique Post for more rotisserie setup details.)

4. Prepare the baste: Combine all the baste ingredients in a small bowl, and whisk to combine. Tie the herb brush together.

5. Cook the lamb: Put the spit on the grill, and start the rotisserie. Cook with the lid closed. You want to cook the lamb until an instant read thermometer reads the following temperatures in the thickest part of the roast: 125*F for medium, 120*F for medium-rare, 115*F for rare. This should take 45 minutes to an hour, depending on the size of your leg of lamb. Assume roughly 15 minutes per pound of lamb, and start checking the temperature after 30 to 45 minutes, depending on how worried you are about overcooking your lamb.
With about ten minutes left to go in your cooking time, use your herb brush to baste the lamb with the lemon-mustard baste.

6. Rest and serve the lamb: Baste the lamb one more time, then remove it from the spit from the grill. Remember, the spit is hot, so be careful! Remove the roast from the spit, then remove the trussing string from the roast. Baste the roast one last time, then let it rest for 20 to 30 minutes before carving. Remove the lamb from the bone and slice crosswise into ¼ inch to ½ inch thick slices. Pour any juices from the resting and carving of the lamb into a gravy dish. Serve the lamb, using the juices as a sauce.

Variations:
*Poked lamb: After removing the lamb from the refrigerator for resting, poke holes roughly 1 inch apart in the lamb, and stuff with slivers of garlic, olives, and herbs (thyme or rosemary).

Notes:
*Serve with: A crusty french baguette, tapenade, goat cheese, and rotisserie pan potatoes. Good vegetable side dishes are a green salad and carottes Râpées.

*Leftovers make a delicious lamb sandwich: slice a french baguette in half, and spread the tapenade on one side and the goat cheese on the other.  Add thin sliced leftover lamb, and you're ready to eat.  Or, you can make gyros: Pita bread, tzatziki sauce, sliced cucumbers and red onions.

*The baste is a variation on my lemon herb dressing. I skipped the sugar and added mustard.

*Carving a bone-in lamb roast can be a little tricky. The easy way is to slice off pieces as everyone wants them, but I like to get a little of the crust in every piece, since that's my favorite part of a rotisseried roast.  *Diane and I tend to fight over who gets the crusty end pieces. 

To get crust on every slice, I remove the bone before carving. There is a side of the leg where the bone runs along the surface. Start with that side, running your carving knife along the bone to free it from the meat.  Then, after the bone is removed, you can carve the (now boneless) roast.
A quicker way to carve is: find the bone, then cut the lamb into two large pieces, running your knife all the way along the bone on one side, then on the other. This will leave you with some meat on the bone, which you can cut off in smaller pieces and use later in the week in your Gyros.

What do you think? Questions? Other ideas? Leave them in the comments section below.

Related Posts:
Rotisserie Leg of Lamb Moroccan Style
Rotisserie Boneless Leg of Lamb Greek Style
Rotisserie Pan Potatoes
Click here for my other rotisserie recipes.

Inspired by:
Locally grown leg of lamb from the Great American Lamb Company
Lulu's Provencal Kitchen


Check out my cookbook, Rotisserie Grilling.

Everything you could ask about the rotisserie,
plus 50 (mostly) new recipes to get you cooking.

It's a Kindle e-book, so you can download it and start reading immediately!


*Enjoyed this post? Want to help out DadCooksDinner? Subscribe to DadCooksDinner using the RSS or Email options on the right, link to this post from your blog, recommend DadCooksDinner to your friends, or buy something from Amazon.com through the links on this site. (Like my Rotisserie Grilling cookbook...)

Roasted New Potatoes

January 12, 2010 by Mike Vrobel 4 Comments

This week I'm sharing recipes inspired by my trip to the winter farmer's market in the Cuyahoga Valley National Park.

When I'm cooking a roast, and I want an easy side dish, roasted new potatoes are what I make. This recipe can be explained in one sentence: Put the potatoes in a baking dish, toss with oil, salt and pepper, then cook for one hour.
*This is another of my "so simple it is barely a recipe" recipes. I'm a fan of side dishes that take little effort or attention.

Don't be fooled by how easy this recipe is. The results taste fabulous. You get bite-sized potatoes that are salty and a little crisp on the outside, and deliciously creamy on the inside.

Recipe: Roasted New Potatoes

Equipment:

  • 13 x 9 baking dish (I like a simple pyrex baking dish)

Ingredients:

  • 1 ½ pounds new potatoes (or fingerling potatoes), no more than 2" in diameter.
  • 1 tablespoon olive oil
  • 1 tablespoon kosher salt
  • 1 teaspoon fresh ground black pepper

Directions:
1. Prepare the Potatoes: Preheat the oven to 400*F. Clean the potatoes, dry them, then put them in the baking dish. Drizzle the olive oil over the potatoes, then sprinkle on the salt and pepper. Toss until the potatoes are well coated with oil, salt and pepper.

2. Cook the potatoes: Put the baking dish in the oven. Cook for 40 minutes to 1 hour. You want the potatoes to be slightly crisp on the outside, and a paring knife or fork should or until the potatoes are slightly crisp on the outside, and a knife can be inserted into the biggest potato with no resistance.

Notes:
*The longer you can cook the potatoes, the better. It's hard to overcook them. I try to let them go for a full hour before I take them out of the oven; I only test them for doneness if some of the potates are particularly large.

*The oven temperature can vary on this recipe as well - I've done it as high as 500*F, and as low as 325*F. If you are cooking it with a roast, use whatever the appropriate temperature for the roast is; the potatoes will turn out OK. You get the best results at 400*F, plus or minus 50 degrees; above or below that I would adjust the cooking time and check to make sure the potatoes cook properly.

*Don't skimp on the salt - you won't be seasoning the inside of the potatoes, so the coating of salt on the outside is all that you have to flavor them.

*Don't crowd the pan. You want a little space between the potatoes to help them cook evenly. 1 ½ pounds of new potatoes fits perfectly in my 13 x 9 inch baking dish. If you are cooking for a crowd, and want to cook more potatoes, go with a rimmed sheet pan (I love my restaurant supply store half-sheet pans), which can hold 3 pounds of potatoes.

*Potatoes from your winter farmer's market are the best option for this recipe. But, this recipe works fine with a bag of new potatoes from the grocery store. I have a slight preference for redskin potatoes, with fingerling potatoes (like in the pictures) as my second choice.
*The fingerlings looked great at the market, so I couldn't pass them up.

What do you think? Questions? Other ideas? Leave them in the comments section below.

Related Posts:
Winter Farmer's Market in the Cuyahoga Valley National Park
Swiss Chard Saute
Grated Carrot Salad

Inspired by:
Amanda Hesser - Cooking for Mr. Latte

*Enjoyed this post?  Want to help out DadCooksDinner?  Subscribe using your RSS reader or by Email, recommend DadCooksDinner to your friends, or buy something from Amazon.com through the links on this site.  Thank you!

Winter Farmer's Market in the Cuyahoga Valley

January 11, 2010 by Mike Vrobel 2 Comments

Would you like to give your cooking a mid-winter shot of inspiration?  Find your local winter farmer's market.

My CSA from Crown Point doesn't run during the winter.  I needed a fix of locally grown produce and locally raised meat.  The Cuyahoga Valley Conservancy, the organization behind the Howe Road farmer's market in the summer, moves the market indoors for the winter. It is in the Happy Days Lodge in Cuyahoga Valley National Park, and it runs one Saturday a month from November through April.

I was impressed with the variety of food available for a market in the middle of winter.  Obviously, since this is Northeastern Ohio, we don't have a wide range of produce, but the storage vegetables were out in abundance.  I couldn't believe all the different, locally grown meats that were available.  Beef, pork, lamb, buffalo, chicken, duck...and those were just the ones I saw; someone might have been hiding in a corner that I didn't get to.

They even have a "bank machine" at the front desk of the lodge - they can run a debit card and give you $5 tokens for the market.
This is a big help when you have a space cadet moment and forget to stop at the bank machine on your way there.  Like I did.

While I was there, I ran into DineInDiva from Garden, Grocery, Gadget Girl.  It's always nice to meet someone you've been reading on the internet, to put a real face on the person behind the words.

Countryside Winter Farmers' Markets
Saturday: November 21, December 19, January 16, February 20, March 20, April 17
Happy Days Lodge
500 West Streetsboro Road
Peninsula, OH 44264
cvcountryside.org

My top five list of favorite things they sell:
1. Eggs: Brunty Farms has fresh, local brown eggs.  We bought a flat of 24, and they were gone in five days.  I think I need to get two flats next time.

2. Winter vegetables: Potatoes, chard, kale, onions, carrots, beets, squash, even hothouse lettuce.  I was impressed with the variety available in the middle of winter.

3. Lamb: I bought a leg of lamb from Great American Lamb, and ordered a lamb shoulder roast for next time.  I love lamb shoulder, which is hard to find whole around here.  The best I can usually do is lamb shoulder chops.

4. Goat Cheese:  Lake Erie Creamery makes a wonderful goat cheese that I get as part of my Crown Point CSA during the summer.  I was excited to see them at the market, so I could pick some during the winter.


5. Pork: I found out about Curly Tail Farms from Garden, Grocery and Gadget Girl's Paella post.  In addition to the usual pork selection, they have sausages (chorizo!) and pork belly.  Pork belly!  I've been looking for that, and I walked right by them.

6. Other: I couldn't keep the list to five this time.  Duck, Buffalo, homemade jelly, homemade chocolate candy.  And that's just what I was able to get to - the place was pretty crowded by 10AM, and I spent all the money I had budgeted (and then some) before I got through the entire building.
*Ben was with me for the trip.  His top 5 would be: 1 through 4: chocolate, 5: jelly.

Here's the map:

View Larger Map

Related posts:
My list of Ethnic and Gourmet stores near Akron, Ohio.

*Enjoyed this post?  Want to help out DadCooksDinner?  Subscribe using your RSS reader or by Email, recommend DadCooksDinner to your friends, or buy something from Amazon.com through the links on this site.  Thank you!

DadCooksDinner and Pam Anderson back in 2002

January 10, 2010 by Mike Vrobel 3 Comments

I found this picture while going through my photo library, looking for the right pictures for my weight lost post last week. And, while it's not a good picture of my weight loss, it is a good weight loss picture.

This is me and Pam Anderson at a cooking class she was giving at the Western Reserve School of Cooking in 2002:

*If you haven't already figured it out, I'm the geeky looking one on the left.

I had already lost all my weight, and was as thin as I've ever been, or probably ever will be. Pam hadn't started her weight loss yet.
*We've been emailing back and forth about our blogs for a little while now, so I sent it to her, because I thought she might like it.

She said that the picture was amazing, and better than any possible advertisement for her book. Take a look at her now:

*This has been the best part of DadCooksDinner - I get to connect with people who have been positive influences on my life and my cooking.  And because of this blog, they treat me like I'm a Real Food Writer.  Me!  Can you believe it?  And, as I've said before - thank you, Pam!

Go visit Pam and her daughters, Maggie and Sharon, at their fun food blog: ThreeManyCooks.com

Pam Anderson: The Perfect Recipe for Losing Weight and Eating Great

*Enjoyed this post?  Want to help out DadCooksDinner?  Subscribe using your RSS reader or by Email, recommend DadCooksDinner to your friends, or buy something from Amazon.com through the links on this site.  Thank you!

Mexican Hot Chocolate

January 7, 2010 by Mike Vrobel 1 Comment

Mexican Hot Chocolate is my favorite drink on a cold winter's day.
*Non-alcoholic division.

Mexican chocolate has a hint of cinnamon and spice in it. It makes a better cup of hot chocolate than the one I grew up with.
*Swiss Miss powder, with the tiny "marshmallows" in it.

Our kids love it. They've been drinking it since they were little.

Years ago, we were visiting my aunt and uncle in Chicago.* We spent a day downtown on Michigan Avenue, checking out all the shops on the Miracle Mile. Ben and Natalie loved the Lego store; Tim was a little over a year old, and was snoozing in his stroller. We went for a late lunch at Rick Bayless's Frontera Grill. The kids thought it was the best meal of our visit. They ate tortillas and drank cup after cup of Mexican hot chocolate, while the servers cooed over Tim as he slept in his stroller.
*Hi, Terry and Mary!

Recipe: Mexican Hot Chocolate

Equipment:

  • Stick blender (Or a regular blender, if you're brave. See the Notes section below.)

Ingredients:

  • 3 ounce disk of Mexican chocolate, broken into tabs
  • 2 ½ cups milk

Directions:
1. Heat the Milk and Chocolate: Put the chocolate and milk into a small saucepan. Heat over medium-low heat, stirring often, until the milk is steaming and the chocolate is melted. The milk will be 200*F; steaming, but not quite simmering.

2. Blend the Hot Chocolate: Using your stick blender, blend the hot chocolate until it has a good head of froth on it, about 1 minute.

3. Serve: Pour into cups and serve!

Variations:
*Spicy hot chocolate: Add a quarter teaspoon of ground chipotle chile pepper before heating the milk. Spicy heat and chocolate are a combination that goes back to the Aztecs.

*Vanilla: Add a split vanilla bean to the pot when you're heating the milk, and take it out before you start blending.

Notes:
*The kids love this with mini-marshmallows. I know it's not very authentic, but it tastes great.

*Sometimes, the hard part of this recipe is finding Mexican chocolate. Look for it in the international aisle of your grocery store, or, preferably, at your local Mexican market. I get the Ibarra or Nestle Abuelita brand.

*Blending the hot chocolate. I recommend blending the hot chocolate; it gives you a nice, frothy layer on top. I love using my stick blender for this. Because I have a wide pot, I pour the hot chocolate into 1 quart pyrex cup before blending. If you have a sauce pot that is taller than it is wide, and is less than half full from the hot chocolate, you can blend in the pot.
*Also, the pyrex cup has a pouring spout, which makes for easier serving.

*If you use a traditional blender, watch out! Hot liquid plus blender equals lid shooting off and hot chocolate spraying all over the place.
*Warning - I go full-on food science geek for the next paragraph or two...

Why? Hot air expands in volume by about a quarter. When you put hot liquid in a blender, you have room temperature air above it in the blender. Turn the blender on, and that air gets mixed into the hot liquid and heats up.  This causes two things to happen: first, the air in the top of the blender, heated by the liquid, increases in size by a quarter. This causes a blast of air pressure, which will shoot the lid off the top of the blender if it can't escape. Second, the air mixed into the liquid causes the liquid to expand as well, and climb up the sides of the blender. If you have a tight seal on the lid, or too much liquid in the blender…kablooey.
*For more details, including the equation that shows you get 1.273 times more volume of air in your blender, read this: Blending Hot Liquids [kitchensavvy.com]

*Safe blending tips are: don't fill the blender more than half full, leave the feed tube cap off the lid to let the expanding gases escape, and hold the lid on tight with a kitchen towel to force the expanding gases out through the hole in the feed tube.

**Not that I've ignored these tips, and left my camera turned on and sitting right next to the blender, making me clean drops of hot chocolate off the lens while holding my breath and hoping I didn't cause permanent damage. Nope, that's never happened to me.

*If you want to be really authentic, get a Mexican molinillo and spin it between your palms to whisk up the froth.

What do you think? Questions? Other ideas? Leave them in the comments section below.

Related Posts:
Iced Sweet Tea

Adapted from:
Rick Bayless: Authentic Mexican

*Enjoyed this post?  Want to help out DadCooksDinner?  Subscribe using your RSS reader or by Email, recommend DadCooksDinner to your friends, or buy something from Amazon.com through the links on this site.  Thank you!

Rules for Losing Weight

January 5, 2010 by Mike Vrobel 4 Comments

Weighing in, 12/30/2009. Darn! I gained a pound over Christmas!

Here are my rules for healthy eating and sane weight loss.
*See yesterday's DadCooksDinner Loses Weight post for an overview of how I got to these rules...

1. Eat a variety of foods. (The Marion Nestle, "Eat a variety of foods within and among food groups" rule.) The wider range of food I eat, the healthier a diet I have. There is no one way to eat; different cultures have figured out many different cuisines that are both delicious and healthy. Explore!

2. Cook for yourself, using unprocessed food, and emphasize plants in your diet. (The Michael Pollan, "Eat real food, mostly plants" rule.) If I eat at home most of the time, and do my shopping around the edge of the grocery store, then I'm on the right track.  I cook most of our meals; we reserve eating out as a treat.
*I get bonus points if I shop at my local farmer's market, but the important part is to stay away from the processed stuff in the middle of the grocery store.  I do most of my shopping in the produce, dairy, and meat departments around the edge of the store.

To emphasize plants, I try to use meat as a side dish, not as the main part of dinner. I try to have two different vegetables at every meal (usually, one cooked side dish and one salad). I also divide my plate into quarters, and make one quarter meat, one quarter starch, and two quarters vegetables.
*Emphasizing plants is hard one for me, as you can probably tell if you've been following this blog for any length of time. I'm used to the big hunk of meat being at the center of the plate. I try to cook one vegetarian meal a week. With my crowd, that usually means rice and beans, or a pasta.
**While I enjoyed both Pollan and Nestle's book, I know they're not for everyone. If you want the simple, summary version of their arguments, read Mark Bittman's Food Matters.

3. Practice mindful eating. I pay attention when I'm eating, taste my food, and stop when I'm just getting full. I eat less and enjoy my food more.  For me, slowing down while I'm eating is the key.  If I take my time, and savor my food, it's easier to notice when I'm full.
*The hardest part was learning what "not hungry" felt like.  I was used to eating until I was stuffed.

**Diane mentioned another trick while reading this.  She said that it's easy to get caught up in the speed other people eat, and that I eat very fast.  (Who, me?)  She has to make a conscious effort to slow down when she's eating with me.

The flip side of this is avoiding mindless eating.  If I stop paying attention, I eat an awful lot of tortilla chips and salsa.  That's where portion control comes in...

4. Portion control matters. (The "please don't Super Size Me" rule.) While mindful eating is important, studies show that we will eat until we clear our plates, not until we're full.  Portion control is critical to losing weight, and it's tough for people to recognize appropriate portions.  Our mind responds to visual cues for determining portion size.*
*In a study using self-refilling soup bowls, researchers found people would eat 73% more soup if their bowl never emptied.  And they didn't feel any more full than people who ate out of regular bowls.

I use this trick to my advantage.  Diane talked me into buying 9 inch dinner plates, to fool our brains into thinking we were eating more.  I said "yeah, right", but bought the plates anyhow.  That was four months ago; I have lost five pounds since then, with no other changes in my eating habits.

5. Calories matter. (The anti-Atikns rule.) There is no silver bullet in avoiding certain types of food. Fat has calories; protein has calories; carbohydrates have calories. If I eat more calories than I burn in a day, I will gain weight. Eat less calories than I burn, and I lose weight. In other words: When I want to lose weight, I have to eat less. Calories can be an imperfect measurement, but they're the best we've got. Less calories means more weight lost.  The rule of thumb is to eat 500 calories less than I burn a day, and I will lose a pound a week.
*Here is the Mayo Clinic's Calorie Calculator.  It will estimate the calories you burn in a day, based on your age, height, gender, and activity level.

5a. How to cook when you want to cut calories. Since I'm a geek, I'll explain how to cook to lose weight using an equation:

Fat and sugar > Low fiber starch > Lean protein > High fiber starch > Plants > Water

The more of my meal that's to the right of the equation, the less calories it has. I can eat plants until my jaw is tired, and not eat many calories. But, I need some of the middle to the left side of the equation to give a meal flavor.

If I can move a meal to the right, I can cut calories. As an example, I can cut out some of the fat.  Or I can make my chili with more beans (high fiber starch) and less fatty protein (beef). Meals with a lot of bulk that are almost entirely from the right side, like soups and salads, are great for cutting calories and staying full.
*And don't forget salt and spices, which add a big boost of flavor without adding many calories.

6. Enjoy your food. (The "don't torture yourself" and "be a food snob" rule.) Overly restrictive diets will not last. If I try a diet that involves cutting out foods that I love, at some point I won't be satisfied, and I will fall off the wagon. Remember: this is a lifelong change of eating habits, not a diet. Denying myself for the long term is only possible if I have an iron will. (I do not.) As I said above, plain vegetables have almost no calories, but they taste much better with a little bit of butter and some salt.

A related point: I try to be picky about my food. Smaller portions of higher quality food help me lose weight, even if they have more calories per ounce. This ties back to mindful eating and portion control - if I love what I'm eating, I pay more attention, notice when I am full, and stop eating.

7. Celebration meals are part of being human. (The "Moderation in all things, including moderation" rule.)  As Rick Bayless says in the introduction to Mexican Everyday, everyday food should be simple, healthy, and quick. Special occasions are for celebration with family and friends. I always give myself one meal a week where I don't worry about what I'm eating. A delicious meal, with a tasty beverage and lively conversation, is one of life's simple pleasures. Every culture has feast days and celebrations built around food. I enjoy them, and worry about being eternally vigilant tomorrow.

8. Let kids be kids. (The "kids are going to be picky eaters" rule.) Kids will prefer junk food, be very texture oriented, want all their food kept separate on the plate, avoid anything green, and will only eat things that are not "yucky". Remember the division of responsibility at the table. Parents provide a variety of nutritious foods, and kids choose wether or not to eat them. Don't short order cook, and try to make a kid friendly dish in every meal.
*Don't be surprised when the kid friendly dish is suddenly "yucky".  Don't worry, they won't starve to death if they just drink milk with a meal.
**Around the age of two, when kids start to pick everything up and put it in their mouths, they develop a strong aversion to anything with a bitter taste. It's a self-defense mechanism; in nature, bitter equals poison. They're much more likely to survive to be adults this way. But, I know from experience that it's not much fun when a two year old suddenly refuses to eat anything other than white rice, bread and milk.

9. There is no one-size fits all answer to maintaining a healthy weight. (The "Find your own path" rule.) Consumer Reports polled their readers a few years back, asking them about weight loss and what had worked.  According to their poll, about 80% of people who tried to lose weight had gained it all back within a few years.  The ones who kept the weight off followed different paths to keep the weight off; the only constants among the group were changing eating habits instead of dieting, and regular exercise.
*The highest failure rate was meal replacement diets, ones that substituted "diet shakes" for real food.

Everything listed above works for me. Your milage may vary, and your answer to "What is healthy eating?" may be different from mine. That's OK! We all have different tastes and preferences for food. That's part of what makes food so interesting.*
*Particularly with the rules suggestions for kids! There's nothing as annoying as someone who thinks they know how you should raise your kids. (Not that I'm ever guilty of that.)
**And remember that your kids have their own personalities, with their own likes and dislikes. What works for you might not work for them. (Again, not that I'm ever guilty of that...)

What do you think? Questions? Other ideas? Leave them in the comments section below.

*Special thanks to Dan at Casual Kitchen for inspiring this post with his review of The End of Overeating.

**Extra special thanks to my lovely wife, Diane, for giving me a second set of eyes on these posts.  While I've lost weight and kept it off, because of our kids, she's lost, gained, lost, gained and lost again - she's had to pay more attention than I have, and the results are looking great for her.

Sources:
Pam Anderson: Perfect Recipe for Losing Weight
Mark Bittman: Food Matters
Michael Pollan: In Defense of Food
Marion Nestle: What to Eat
Rick Bayless: Mexican Everyday
Ellyn Satter: Secrets to Feeding a Healthy Family
Walter Willet: Eat, Drink and Be Healthy

*Enjoyed this post?  Want to help out DadCooksDinner?  Subscribe using your RSS reader or by Email, recommend DadCooksDinner to your friends, or buy something from Amazon.com through the links on this site.  Thank you!

DadCooksDinner Loses Weight ... Then Gains Some Back

January 4, 2010 by Mike Vrobel 5 Comments

2001 and 260 lbs, 2002 and 180 lbs, 2009 and 225 lbs

Growing up, I was always a skinny kid. In my twenties, that changed. I injured my knee playing basketball, which caused me to cut back on my activities. After I graduated from college, I started my first job behind a desk. My weight started to creep up. And up. And up. At my heaviest I weighed over 260 pounds.
*I bought a scale after I started losing weight, so I don't know where, exactly, the top was. The first time I was brave enough to get on the scale, I weighed 255 pounds. Yikes.

In the summer of 2001, after Ben was born, Diane signed up for Weight Watchers to help lose her pregnancy weight. At the same time, I read Walter Willet's Eat, Drink and Be Healthy. This book explains current medical research on eating and health. These events pushed me to get serious about losing some weight. In my imagination, I was thin, like I was as a teenager. I wanted to look like that again, not like the fat guy in the mirror.
*In my imagination, I'm also much younger - about 23 years old.

I started counting calories, limiting myself to 2000 a day. Following Willet's book, I ate less processed starches and animal fat, and ate more whole grains, unsaturated fats, and vegetables.
*That is, less white flour, pasta, potatoes, white rice, animal fat, and whole milk; eat more fish, oils, nuts, fruit and vegetables, brown rice and whole wheat bread and pasta.

The weight started to drop off immediately.  My enthusiasm for home cooking really helped. Without doing my own cooking, I don't think I could have lost weight.  Cooking changed losing weight from drudgery and denial into a challenge. Could I adapt my cooking to weight loss, while still enjoying the results? Where could I cut calories in a recipe without losing flavor? What worked, and what didn't? What recipes were inherently low calorie, what recipes could be adapted to be low calorie, and what recipes should just be avoided? I enjoyed this whole process, and learned a lot about cooking in the process.
*Much of what I knew about basic technique came from Pam Anderson's How to Cook without a Book. I would have had less trial and error if she published Perfect Recipe for Losing Weight back in 2001. I think it's the best "diet" cookbook out there, because it teaches you techniques more than recipes.

I trained myself to be a mindful eater. To keep below 2000 calories a day, I had to constantly ask myself: are these calories worth it? Am I going to enjoy them enough? As an example, I would always keep enough calories in reserve for a glass of wine with dinner, as a treat for myself. It helped to be a bit of a food snob. For example, when confronted with a dish of candy in a co-worker's cube, I would say to myself: "I don't want that hershey's miniature, I want to wait and have a piece of good, dark chocolate."

Portion control was another key to losing weight. At first, It came as part of calorie counting. Unless I knew my portion size, I I didn't know how many calories I ate. Soon I put two and two together - larger portions meant more calories.  But the flip side was I could get away with eating smaller portions of higher calorie foods, and not bust my calorie budget for the day.

It wasn't all about denial. I would have a celebration meal once a week, either Sunday dinner, or a party with family and friends. For this meal I would relax all the rules. I would eat a large serving of vegetables with dinner, and otherwise just enjoy myself.
*And did I mention the glass of wine or two that would go along with it?

By the summer of 2002, I dropped from 260 pounds to 180. I was rail thin. People were amazed, and some were a little taken aback. Occasionally I was asked questions that implied, "are you having a medical issue?"
*I think I was able to lose so much weight so quickly because I have a high metabolism.  That's why I was always skinny when I was a kid.  My metabolism slowed down as I got older, but not that much - it was still pretty high.  I just had to slow down my eating to match it.

I settled into a virtuous groove. My eating habits were stable. I could tell how many calories were in a dish from the portion size and the ingredients. I knew when to say I was done. Eventually, I stopped tracking calories every day.  I let myself eat some of the foods I was supposed to avoid.

We had Natalie in late 2002, then Tim in 2004. Pretty soon, we were cooking for the kids, not just us. At that point, what I ate became less important to me, and I started to worry about what the kids were eating. Or if they were eating at all. Ben was an extraordinarily picky eater as a toddler, and would only eat‚ you guessed it, processed starches, and whole milk.*
*Well, not exclusively, but to someone who enjoys a range of food as much as I do, it sure seemed like it. He's starting to grow out of it now, but it's still a struggle to get him to try new stuff. And Tim is turning out to be even more stubborn about what he eats.
**I have NO IDEA where this stubborn streak comes from. Wait…why are you all looking at me like that?

We started using the approach recommended by Ellyn Satter for dealing with picky eaters - divide the responsibility at the dinner table. Our job as parents was to give them a variety of healthy food options with the meal; their job was to decide whether or not they want to eat. Don't make the dinner table a power struggle. If they won't eat, another meal will be coming. They won't going to starve if they skip a meal. That said, I tried to be kid friendly with our menu.  I wouldn't make an entire meal that was challenging to them.  I would make at least one part of every meal familiar or kid friendly.
*Her best piece advice, other than the division of responsibility: try to make sure there's some bread on the table. If nothing else, they'll eat the bread. 
**Her second best piece of advice: No short order cooking! The whole family eats the same meal. That's how you get kids used to different foods. If they see their parents eating and enjoying a range of foods, the will eventually try it. Even if they won't touch anything but the bread right now.

I started to chafe against the restrictive Willet approach. I get a lot of enjoyment out of eating food, and it felt wrong to label certain foods as good or bad. I didn't want my kids to pick up food phobias from me; they were doing a good enough job themselves. I don't want them to think some foods are bad, just that some food should be eaten in moderation. I wanted them to focus more on variety than on avoiding certain foods.
*I loved the switch to whole wheat bread, but I was never able to make the "no white flour or white rice" part work for me.  Whole wheat pasta and brown rice are pale substitutes for the real thing. I would cook them, and then try to eat as much of everything else in the meal as I could. When the kids refused to touch them, they drifted out of my cooking routine. If I'm not supposed to short order cook for the kids, I'm not supposed to do it for me either.

Then came the one-two punch that finalized the change in my eating habits.

First was the Atkins diet. I had a strong, almost visceral reaction to it: this is wrong! Any diet that said fruit was bad for you is not helping. I started to question the sanity of restricting entire ranges of foods from my diet.

The second change was my interest in the "eat local" movement. I wanted to eat more locally and seasonally, and that's tough to do if you're restricting your diet.

In the end, I relaxed quite a bit on my eating. As a result, my weight crept back up. By 2006, I was at 225 pounds, and have been there (plus or minus five pounds) for the last three years. And, while I would like to lose 25 pounds and be back down to 200, I also have maintained 35 pounds of weight loss for eight years. From what I've read, that's a great result.
*With that said, I've decided that it's time to start paying attention again, and get my weight down a bit. I had a hard time writing this piece; I kept picking it up and putting it down. Eventually I figured out that my current weight does bother me a bit, and that's why I was blocking on it so much. I'm going to try to get my weight closer to 200 pounds. That would give me a BMI of 25 for my 6 foot 3 inch frame. I've already lost 5 of those pounds; I regularly weigh in at 218 now. Only 18 to go!

Tomorrow, in part 2, I'll lay out my rules for losing weight.

What do you think? Questions? Other ideas? Leave them in the comments section below.

*Special thanks to Dan at Casual Kitchen for inspiring this post with his review of The End of Overeating.

Sources:
Pam Anderson: Perfect Recipe for Losing Weight
Mark Bittman: Food Matters
Michael Pollan: In Defense of Food
Marion Nestle: What to Eat
Rick Bayless: Mexican Everyday
Ellyn Satter: Secrets to Feeding a Healthy Family
Walter Willet: Eat, Drink and Be Healthy

*Enjoyed this post?  Want to help out DadCooksDinner?  Subscribe using your RSS reader or by Email, recommend DadCooksDinner to your friends, or buy something from Amazon.com through the links on this site.  Thank you!

New Address: DadCooksDinner.com

January 3, 2010 by Mike Vrobel 2 Comments

You've probably noticed the recent design changes I've made to DadCooksDinner.  If you haven't yet, try out the options on my menu bar at the top of the page, including a Google search of this site.

Here's another change - I now have my own address, DadCooksDinner.com!

If you are linking directly to my site, please change the address to point to dadcooksdinner.com instead of dadcooksdinner.blogspot.com.

If you are subscribing through my RSS feed or through email, everything should be seamless for you - my feedburner feed should remain the same.

What do you think of the changes?  Anything else you'd like to see?  Let me know in the comments, below.

Happy New Year!

January 1, 2010 by Mike Vrobel 1 Comment

Here are my resolutions for 2010:

Try something new:
The most fun I've had over the last year has been trying out new things:

  • Rotisserie recipes (like Rack of Pork and Beef Tenderloin)
  • Pickling last summer's bounty
  • Entering the Taste of Akron steak cook-off

Oh, yeah, and writing a blog. What I love about food is that there is always something new to explore. I haven't decided what the next thing is, but I'm leaning towards one or more of the following:

  • Ethnic cuisines:
    • Greek
    • Indian
    • Japanese
      • Yakitori
  • Canning
  • Homemade bacon
  • Rotisserie Stuffed Cornish Game Hens
    • *Yes, I know, Stuffing is Evil.  They said I was mad!  Mad!  Bwahahahaha!

**My brother-in-law Travis gave me a Japanese cooking package for Christmas - a cookbook, dried seaweed, kombu, dried sardines...now I know which one to lead with...

Use the cookbooks I have:
Instead of buying a bunch of new ones, dig into the cookbooks I already have. I bought some great cookbooks last year, which I enjoyed reading.  But I didn't cook much from them. A recipe here, a recipe there...and that was about it.  I read them more for inspiration and flavor combinations than as a direct source of what I'm going to cook. This year I will cut back on my cookbook purchases, and focus on what I already own.
*But…Steven Raichlen's Planet Barbecue is coming…and so is Rick Bayless's Fiesta at Rick's…and Robb Walsh's The Tex Mex Grill…and that's just in May.
**Darn. I've already broken this resolution, haven't I? It's just a matter of time.

Eat healthier, and blog healthier:
Yes, this blog has been very heavy on the Meaty Main Dish side of recipes. They're fun! I love cooking them, and writing about them. Not to mention eating them. But I don't feel like I'm giving an accurate picture of how I actually eat. I'm going to try to get more interesting side dishes posted in the new year. *But don't worry - I'm not giving up on the meaty main dishes entirely. In fact, I'm trying to line up a pork belly so I can give it a try on the rotisserie.

What do you think? Any suggestions? What are your cooking resolutions for the new year?  Leave them in the comments section below.

Happy New Year, everyone!

*Enjoyed this post?  Want to help out DadCooksDinner?  Subscribe using your RSS reader or by Email, recommend DadCooksDinner to your friends, or buy something from Amazon.com through the links on this site.  Thank you!

Sear Roasted Chicken Breasts with Shallot Herb Pan Sauce

December 29, 2009 by Mike Vrobel 21 Comments

Sear Roasted Chicken Breasts with Shallot Herb Pan Sauce

*This was the first recipe I thought of when All-Clad asked me to test their new d5 Stainless pans. Enjoy!

The best part of chicken is crispy skin. This recipe gives you the crispiest skin that I know how to make.
*The only thing that comes close is cooking your chicken on a rotisserie. I don't think fried chicken counts, because you're frying the coating as much as the skin.
**Not that there's anything wrong with fried chicken.

The basic sear-roast technique is useful when you want to cook something with a deep, browned crust, but it's too thick to cook through on the stovetop without burning. You sear it to get the browning, then move it into the oven to gently finish cooking. I've sear-roasted everything from pork tenderloin, to thick-cut steak, to rack of lamb. This recipe is my favorite application of the sear-roast technique.

Recipe: Sear Roasted Chicken Breasts with Lemon Herb Pan Sauce

Equipment

  • 12-inch oven safe frypan (It needs to be a heavy pan - I love All-Clad pans for this; that's why I picked it to test the d5 pan. My second choice would be a 12-inch cast iron skillet.)

Variations:
*Use bone-in, skin-on chicken pieces instead of just breasts - you can just fit a cut up 4 pound fryer in a 12" skillet. Or, just use chicken thighs, like I did in this recipe: Sear roasted chicken thighs.

*Change up the sauce. Replace the scallion with another aromatic, like garlic or scallions. Replace some of the stock with a liquor, like marsala or sherry. Replace the butter with 2 tablespoons of heavy cream. The variations here are almost endless. If you have a favorite pan sauce, use it here.
*Or, simplify the sauce. The simplest sauce I know is: deglaze the pan with 1 cup chicken stock or water, with some salt and pepper for seasoning. The browned bits in the pan give this simple sauce a surprising depth of flavor.

Notes:
*Don't crowd your pan. If you have a 3 quart saute pan (like I used to), 5 chicken breasts are too many. 4 pieces will have to do. You want a little space between each breast. Otherwise, the chicken will steam instead of browning, and you won't get the wonderful, crispy skin that makes this recipe worthwhile.

*If you want to cook less than 4 chicken breasts, use a smaller pan. I would use a 10" fry pan for 2 or 3 pieces.

*If you want to cook more chicken, double the recipe by using two pans. Or, brown the chicken in two batches, then move it to a roasting pan or rimmed baking sheet, and put that in the oven for the roasting.

What do you think? Questions? Other ideas? Leave them in the comments section below.

Related Posts:
Here's another variation on this technique: Sear roasted chicken thighs with quick lemon pan sauce
Instant Pot Chicken with 40 Cloves of Garlic

Inspired by:
Testing the new 12 inch All-Clad d5 Stainless fry pan

Adapted from:
Pan-Roasted Chicken by Cooks Illustrated [cooksillustrated.com, subscription required]

*Enjoyed this post?  Want to help out DadCooksDinner?  Subscribe using your RSS reader or by Email, recommend DadCooksDinner to your friends, or buy something from Amazon.com through the links on this site.  Thank you!

  • « Previous Page
  • 1
  • …
  • 31
  • 32
  • 33
  • 34
  • 35
  • …
  • 37
  • Next Page »

Welcome to Dad Cooks Dinner!

I'm Mike Vrobel, a dad who cooks dinner every night. I'm an enthusiastic home cook, and I write about pressure cooking, rotisserie grilling, and other food topics that grab my attention.

More About Me →

Popular

  • Three bowls of cooked Pinto Beans on a wood table
    Instant Pot Pinto Beans (No Soaking)
  • Pressure Cooker Beef Shank (Osso Bucco)
  • Pressure Cooker 7 Hour Leg of Lamb (in 90 minutes)
    Pressure Cooker 7 Hour Leg of Lamb (in 90 minutes)
  • Pressure Cooker Brown Jasmine Rice
  • Grilled Tomahawk Steak (Long Bone Ribeye, Reverse Seared)
    Grilled Tomahawk Steak (Long Bone Ribeye, Reverse Seared)
  • A green bowl full of chicken noodle soup
    Instant Pot Rotisserie Chicken Noodle Soup

Seasonal

  • A bowl of asparagus risotto
    Instant Pot Asparagus Risotto (Pressure Cooker Recipe)
  • Grilled Butterflied Chicken with Garlic Butter
  • Sous Vide rack of lamb sliced into chops
    Sous Vide Rack of Lamb with Dijon Bread Crumb Crust
  • A bowl of beef stew with asparagus, carrots, and radishes.
    Instant Pot Spring Vegetable Beef Stew
  • A Rotisserie Chicken (Pollo Asado)on a platter of shredded cabbage
    Rotisserie Chicken Pollo Asado
  • Rotisserie Pork Shoulder Roast with Carolina Mustard BBQ Sauce
    Rotisserie Pork Shoulder with South Carolina Mustard Barbecue Sauce

Footer

↑ back to top

About

  • Privacy Policy

Newsletter

  • Sign Up! for emails and updates

Contact

  • Contact

Copyright © 2025 Dad Cooks Dinner